Owner's Manual (english)
Page 4
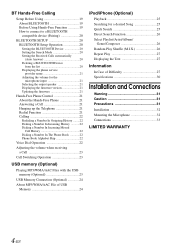
... Received Calls automatically (Auto Answer 20 Deleting a BLUETOOTH Device from the list 20 Displaying the phone service provider name 21 Adjusting the volume for the microphone input 21 Selecting the output speaker 21 Displaying the firmware version 21 Updating the firmware 21 Hands-Free Phone Control 21 About the Hands-Free... Displaying the Text 27 Information In Case of Difficulty 27 Specifications 30 Installation and Connections Warning 31 Caution 31 Precautions 31 Installation 32 Mounting the Microphone 32 Connections 33 LIMITED WARRANTY 4-EN
... Received Calls automatically (Auto Answer 20 Deleting a BLUETOOTH Device from the list 20 Displaying the phone service provider name 21 Adjusting the volume for the microphone input 21 Selecting the output speaker 21 Displaying the firmware version 21 Updating the firmware 21 Hands-Free Phone Control 21 About the Hands-Free... Displaying the Text 27 Information In Case of Difficulty 27 Specifications 30 Installation and Connections Warning 31 Caution 31 Precautions 31 Installation 32 Mounting the Microphone 32 Connections 33 LIMITED WARRANTY 4-EN
Owner's Manual (english)
Page 8
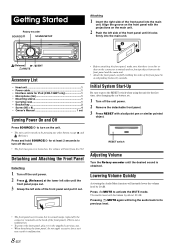
...; When detaching the front panel, do not apply excessive force as it may become hot in malfunction. 8-EN Press and hold SOURCE/ for iPod (CDE-126BT only 1 • Microphone (4m 1 • Mounting sleeve 1 • Carrying case 1 • Bracket key 2 • Screw (M5 × 8 4 • Owner's Manual 1 set Turning Power On and Off...
...; When detaching the front panel, do not apply excessive force as it may become hot in malfunction. 8-EN Press and hold SOURCE/ for iPod (CDE-126BT only 1 • Microphone (4m 1 • Mounting sleeve 1 • Carrying case 1 • Bracket key 2 • Screw (M5 × 8 4 • Owner's Manual 1 set Turning Power On and Off...
Owner's Manual (english)
Page 21
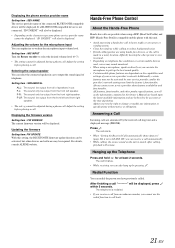
... and other product specifications, as well as you have previously called. Alpine reserves the right to pick up the Telephone Press and hold for the microphone input You can emphasize or weaken the microphone input volume level. After calling, playback will be adjusted during a...If both calling parties are announced by your service provider, and/or the provider's network settings may sound unnatural. • When using a microphone, speak as directly as the information contained in car. Press . The call . Always contact your service provider's network. Answering a Call ...
... and other product specifications, as well as you have previously called. Alpine reserves the right to pick up the Telephone Press and hold for the microphone input You can emphasize or weaken the microphone input volume level. After calling, playback will be adjusted during a...If both calling parties are announced by your service provider, and/or the provider's network settings may sound unnatural. • When using a microphone, speak as directly as the information contained in car. Press . The call . Always contact your service provider's network. Answering a Call ...

Owner's Manual (english)
Page 22
..., and each individual category for making calls based on the recognition range of the mobile phone and mounting location of the microphone. Depending on the unit may not be obtained via voice dial, you cannot correctly place a call the telephone by performing... from A to B, B to C. The speak mode is activated, and "SPEAK" is displayed for the last dialed/received/missed calls. Note when the microphone is displayed. Setting items : DIALED / RECEIVED / MISSED / PHONE BOOK DIALED: Dialed history RECEIVED: Received history MISSED: Missed incoming history PHONE BOOK: Mobile...
..., and each individual category for making calls based on the recognition range of the mobile phone and mounting location of the microphone. Depending on the unit may not be obtained via voice dial, you cannot correctly place a call the telephone by performing... from A to B, B to C. The speak mode is activated, and "SPEAK" is displayed for the last dialed/received/missed calls. Note when the microphone is displayed. Setting items : DIALED / RECEIVED / MISSED / PHONE BOOK DIALED: Dialed history RECEIVED: Received history MISSED: Missed incoming history PHONE BOOK: Mobile...
Owner's Manual (english)
Page 23
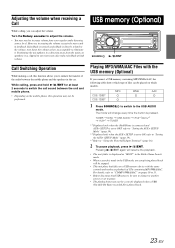
... between the mobile phone and the speakers in the car. While calling, press and hold / /ENT for at high volume. Positioning the microphone in a direction away from your regular audio listening source level. TUNER DISC USB AUDIO iPod*1/AUX+*2 AUX*3 TUNER *1 Displayed only when the...16). 2 To pause playback, press / /ENT. The mode will resume the playback. • The root folder is pressed. MP3 WMA AAC CDE-126BT CDE-125BT 1 Press SOURCE/ to switch to eliminate it. However, increasing the volume excessively may also reduce feedback at least 2 seconds to switch the call ,...
... between the mobile phone and the speakers in the car. While calling, press and hold / /ENT for at high volume. Positioning the microphone in a direction away from your regular audio listening source level. TUNER DISC USB AUDIO iPod*1/AUX+*2 AUX*3 TUNER *1 Displayed only when the...16). 2 To pause playback, press / /ENT. The mode will resume the playback. • The root folder is pressed. MP3 WMA AAC CDE-126BT CDE-125BT 1 Press SOURCE/ to switch to eliminate it. However, increasing the volume excessively may also reduce feedback at least 2 seconds to switch the call ,...
Owner's Manual (english)
Page 32
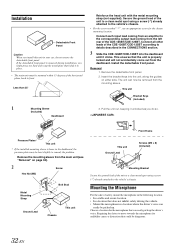
... a stable and secure location. • In a location that does not inhibit safely driving the vehicle. • Mount the microphone in the CONNECTlONS section. 3 Slide the CDE-126BT/CDE-125BT into the unit, along the guides on page 32). 2 Screw Hex Nut (M5) Metal Mounting Strap Ground Lead *2 Bolt Stud...the dashboard until it clicks. The unit can now be removed from the dashboard. Mounting the Microphone For the sake of the CDE-126BT/CDE-125BT. Secure the ground lead of the CDE-126BT/CDE-125BT according to the vehicle's chassis. Connect all other leads of the unit to a clean metal...
... a stable and secure location. • In a location that does not inhibit safely driving the vehicle. • Mount the microphone in the CONNECTlONS section. 3 Slide the CDE-126BT/CDE-125BT into the unit, along the guides on page 32). 2 Screw Hex Nut (M5) Metal Mounting Strap Ground Lead *2 Bolt Stud...the dashboard until it clicks. The unit can now be removed from the dashboard. Mounting the Microphone For the sake of the CDE-126BT/CDE-125BT. Secure the ground lead of the CDE-126BT/CDE-125BT according to the vehicle's chassis. Connect all other leads of the unit to a clean metal...
Owner's Manual (english)
Page 34
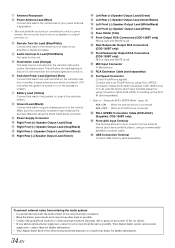
...34-EN Make sure the connection is made to bare metal and is connected. Rear/Subwoofer Output RCA Connectors (CDE-126BT only) Front/Subwoofer Output RCA Connectors (CDE-125BT only) RED is right and WHITE is left . Connect this to an iPod/iPhone by using FULL SPEED ...signal processor, etc. MIC Input Connector To Microphone. AUX+ OFF : When an iPod/iPhone is turned on lead of your amplifier or signal processor. Your Alpine dealer carries various noise suppressors, contact them for further information. • Your Alpine dealer knows best about noise prevention measures ...
...34-EN Make sure the connection is made to bare metal and is connected. Rear/Subwoofer Output RCA Connectors (CDE-126BT only) Front/Subwoofer Output RCA Connectors (CDE-125BT only) RED is right and WHITE is left . Connect this to an iPod/iPhone by using FULL SPEED ...signal processor, etc. MIC Input Connector To Microphone. AUX+ OFF : When an iPod/iPhone is turned on lead of your amplifier or signal processor. Your Alpine dealer carries various noise suppressors, contact them for further information. • Your Alpine dealer knows best about noise prevention measures ...

