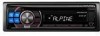
Cde-102 Owner′s Manual (english)
Page 28
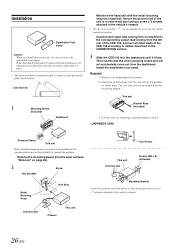
...unit can now be removed from the left rear of the CDE-102 according to front. If the detachable front panel is removed during installation, you do not remove the detachable front panel. Connect all other leads of the CDE-102. Insert the bracket keys into the dashboard until it clicks....using a screw (*1) already attached to remedy the problem. Pull the unit out, keeping it in the CONNECTlONS section. 3 Slide the CDE-102 into the unit, along the guides on page 26). 2 Screw Hex Nut (M5) Metal Mounting Strap Ground Lead *2 Bolt Stud *1 Chassis This unit Front Frame ...
...unit can now be removed from the left rear of the CDE-102 according to front. If the detachable front panel is removed during installation, you do not remove the detachable front panel. Connect all other leads of the CDE-102. Insert the bracket keys into the dashboard until it clicks....using a screw (*1) already attached to remedy the problem. Pull the unit out, keeping it in the CONNECTlONS section. 3 Slide the CDE-102 into the unit, along the guides on page 26). 2 Screw Hex Nut (M5) Metal Mounting Strap Ground Lead *2 Bolt Stud *1 Chassis This unit Front Frame ...


