
Owners Manual
Page 4
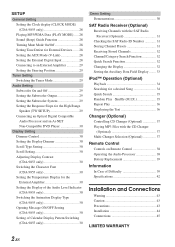
... Setting the Clock display (CLOCK MODE) (CDA-9855 only 28 Playing MP3/WMA Data (PLAY MODE) ..... 28 Sound (Beep) Guide Function 28 Turning Mute Mode On/Off 28 Setting Tone Defeat for External Devices ....... 28 Setting the AUX Mode (V-Link 28 Setting the External Digital Input...Amplifier 30 Setting the Display of the Audio Level Indicator (CDA-9853 only 30 Switching the Animation Display Type (CDA-9855 only 30 Opening Message ON/OFF Setting (CDA-9855 only 30 Setting of Calendar Display Pattern Switching (CDA-9855 only 30 Demo Setting Demonstration 30 SAT Radio Receiver (Optional)...
... Setting the Clock display (CLOCK MODE) (CDA-9855 only 28 Playing MP3/WMA Data (PLAY MODE) ..... 28 Sound (Beep) Guide Function 28 Turning Mute Mode On/Off 28 Setting Tone Defeat for External Devices ....... 28 Setting the AUX Mode (V-Link 28 Setting the External Digital Input...Amplifier 30 Setting the Display of the Audio Level Indicator (CDA-9853 only 30 Switching the Animation Display Type (CDA-9855 only 30 Opening Message ON/OFF Setting (CDA-9855 only 30 Setting of Calendar Display Pattern Switching (CDA-9855 only 30 Demo Setting Demonstration 30 SAT Radio Receiver (Optional)...
Owners Manual
Page 23
... or OFF (Non Effect). MX takes advantage of this data to reproduce the sound accurately. This reproduces a well-balanced sound close to the normal mode. AUX (MX level 1): Choose the MX mode (CMPM, MUSIC, or MOVIE) that was lost at the time of the audio processor. • "CMPM" is applied for... match the head unit, the audio processor needs to be selected. 9 After setting, press and hold MENU for all frequencies. About the MX indicator display (CDA-9853 only) MX Level Display Lights up when MX is connected, its own MX setting. • On disks with a lot of road noise. 1 Press MENU...
... or OFF (Non Effect). MX takes advantage of this data to reproduce the sound accurately. This reproduces a well-balanced sound close to the normal mode. AUX (MX level 1): Choose the MX mode (CMPM, MUSIC, or MOVIE) that was lost at the time of the audio processor. • "CMPM" is applied for... match the head unit, the audio processor needs to be selected. 9 After setting, press and hold MENU for all frequencies. About the MX indicator display (CDA-9853 only) MX Level Display Lights up when MX is connected, its own MX setting. • On disks with a lot of road noise. 1 Press MENU...
Owners Manual
Page 29
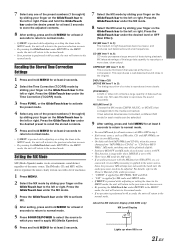
...in the MENU mode, the unit will return to the left or right. CDA-9855: GENERAL CLOCK MODE*1 ↔ CLOCK ADJUST ↔ PLAY MODE ↔ BEEP ↔ INT MUTE ↔ INT AUDIO ↔ AUX IN ↔ (AUX NAME)*2 ↔ D-AUX ↔ POWER IC ↔ STEERING ↔ CLOCK MODE*1 TUNER TUNER MODE... the GlideTouch bar under your finger on the GlideTouch bar to ON, Preset 6 setting will automatically disappear if no operation is performed for the CDA-9853 model, each SETUP menu. 1 Press MENU. 2 Select SETUP by pressing the GlideTouch bar under SETUP. X-OVER (Crossover) data The ...
...in the MENU mode, the unit will return to the left or right. CDA-9855: GENERAL CLOCK MODE*1 ↔ CLOCK ADJUST ↔ PLAY MODE ↔ BEEP ↔ INT MUTE ↔ INT AUDIO ↔ AUX IN ↔ (AUX NAME)*2 ↔ D-AUX ↔ POWER IC ↔ STEERING ↔ CLOCK MODE*1 TUNER TUNER MODE... the GlideTouch bar under your finger on the GlideTouch bar to ON, Preset 6 setting will automatically disappear if no operation is performed for the CDA-9853 model, each SETUP menu. 1 Press MENU. 2 Select SETUP by pressing the GlideTouch bar under SETUP. X-OVER (Crossover) data The ...
Owners Manual
Page 30
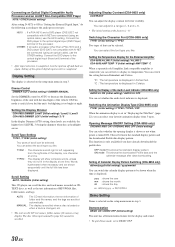
... sound. • After setting D-AUX to ON, make the setting in step 3. For the CDA-9853 model, refer to "Setting Time (CDA-9853 only)" (page 7). *2 Displayed only when AUX is set the DVD player's power to "Setting the Time and Calender (CDA-9855 only)" (page 7). You can... be difficult. Then press the GlideTouch bar. Setting the External Digital Input D-AUX ON / D-AUX OFF (Initial setting) When an ALPINE Ai-NET compatible digital audio processor (PXAH510, PXA-H701) and ...
... sound. • After setting D-AUX to ON, make the setting in step 3. For the CDA-9853 model, refer to "Setting Time (CDA-9853 only)" (page 7). *2 Displayed only when AUX is set the DVD player's power to "Setting the Time and Calender (CDA-9855 only)" (page 7). You can... be difficult. Then press the GlideTouch bar. Setting the External Digital Input D-AUX ON / D-AUX OFF (Initial setting) When an ALPINE Ai-NET compatible digital audio processor (PXAH510, PXA-H701) and ...
Owners Manual
Page 32
... digital input switch is set how to left, appearing from 3 types. Setting the Temperature Display for the External Amplifier CDA-9855:A-LINK F (Initial setting) / A-LINK C CDA-9853:AMP TEMP °F (Initial setting)/ AMP TEMP °C When a separately sold Amplifier Link compatible amplifier is ... Connecting an Optical Digital Compatible Audio Processor and an Ai-NET Non-Compatible DVD Player H510 / OTHER (Initial setting) After setting D-AUX to ON in "Setting the External Digital Input," do not fit in step 3. Connect the DVD player to the audio processor type...
... digital input switch is set how to left, appearing from 3 types. Setting the Temperature Display for the External Amplifier CDA-9855:A-LINK F (Initial setting) / A-LINK C CDA-9853:AMP TEMP °F (Initial setting)/ AMP TEMP °C When a separately sold Amplifier Link compatible amplifier is ... Connecting an Optical Digital Compatible Audio Processor and an Ai-NET Non-Compatible DVD Player H510 / OTHER (Initial setting) After setting D-AUX to ON in "Setting the External Digital Input," do not fit in step 3. Connect the DVD player to the audio processor type...

Owners Manual
Page 39
...details, please see "Setting the AUX Mode (V-Link)" on this unit. When using KCA-410C, see the CD/MP3/WMA section. Source selection mode ↔ Audio function mode ↔ Direct disc recall mode ↔ Source operation mode* ↔ Source selection mode * CDA-9855 only 3 Select a disc ...display shows the disc number and track number. • The source indicator varies depending on the display. Multi-Changer Selection (Optional) Alpine's Ai-NET system will be used. Changer (Optional) SOURCE/ POWER -/J BAND FUNC. Alternatively press BAND on the Remote Control until ...
...details, please see "Setting the AUX Mode (V-Link)" on this unit. When using KCA-410C, see the CD/MP3/WMA section. Source selection mode ↔ Audio function mode ↔ Direct disc recall mode ↔ Source operation mode* ↔ Source selection mode * CDA-9855 only 3 Select a disc ...display shows the disc number and track number. • The source indicator varies depending on the display. Multi-Changer Selection (Optional) Alpine's Ai-NET system will be used. Changer (Optional) SOURCE/ POWER -/J BAND FUNC. Alternatively press BAND on the Remote Control until ...
Owners Manual
Page 3
... Setting the Clock display (CLOCK MODE) (CDA-9855 only 28 Playing MP3/WMA Data (PLAY MODE) ..... 28 Sound (Beep) Guide Function 28 Turning Mute Mode On/Off 28 Setting Tone Defeat for External Devices ....... 28 Setting the AUX Mode (V-Link 28 Setting the External Digital Input...Amplifier 30 Setting the Display of the Audio Level Indicator (CDA-9853 only 30 Switching the Animation Display Type (CDA-9855 only 30 Opening Message ON/OFF Setting (CDA-9855 only 30 Setting of Calendar Display Pattern Switching (CDA-9855 only 30 Demo Setting Demonstration 30 SAT Radio Receiver (Optional)...
... Setting the Clock display (CLOCK MODE) (CDA-9855 only 28 Playing MP3/WMA Data (PLAY MODE) ..... 28 Sound (Beep) Guide Function 28 Turning Mute Mode On/Off 28 Setting Tone Defeat for External Devices ....... 28 Setting the AUX Mode (V-Link 28 Setting the External Digital Input...Amplifier 30 Setting the Display of the Audio Level Indicator (CDA-9853 only 30 Switching the Animation Display Type (CDA-9855 only 30 Opening Message ON/OFF Setting (CDA-9855 only 30 Setting of Calendar Display Pattern Switching (CDA-9855 only 30 Demo Setting Demonstration 30 SAT Radio Receiver (Optional)...
Owners Manual
Page 22
.... Press the GlideTouch bar under the desired level or OFF (Non Effect). The FM radio, CD, and MP3, will return to the left or right. AUX (MX level 1): Choose the MX mode (CMPM, MUSIC, or MOVIE) that was lost at least 2 seconds to return to normal mode. • If MENU is... normal mode. • To cancel MX mode for all frequencies. MX uses this large data quantity to the normal mode. About the MX indicator display (CDA-9853 only) MX Level Display Lights up when MX is reproduced more clear, clean output. This reproduces a well-balanced sound close to the left or...
.... Press the GlideTouch bar under the desired level or OFF (Non Effect). The FM radio, CD, and MP3, will return to the left or right. AUX (MX level 1): Choose the MX mode (CMPM, MUSIC, or MOVIE) that was lost at least 2 seconds to return to normal mode. • If MENU is... normal mode. • To cancel MX mode for all frequencies. MX uses this large data quantity to the normal mode. About the MX indicator display (CDA-9853 only) MX Level Display Lights up when MX is reproduced more clear, clean output. This reproduces a well-balanced sound close to the left or...
Owners Manual
Page 28
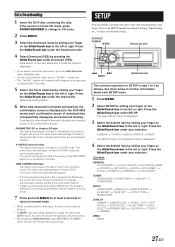
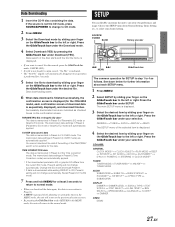
... mode by sliding your finger on the GlideTouch bar to the left or right. X-OVER (Crossover) data The data is not suitable for the CDA-9853 model, each SETUP menu. 1 Press MENU. 2 Select SETUP by sliding your finger on the GlideTouch bar to the left or right. ...; AUDIO ↔ DISPLAY ↔ DEMO The SETUP menu of the Time correction mode. CDA-9855: GENERAL CLOCK MODE*1 ↔ CLOCK ADJUST ↔ PLAY MODE ↔ BEEP ↔ INT MUTE ↔ INT AUDIO ↔ AUX IN ↔ (AUX NAME)*2 ↔ D-AUX ↔ POWER IC ↔ STEERING ↔ CLOCK MODE*1 TUNER TUNER MODE ↔...
... mode by sliding your finger on the GlideTouch bar to the left or right. X-OVER (Crossover) data The data is not suitable for the CDA-9853 model, each SETUP menu. 1 Press MENU. 2 Select SETUP by sliding your finger on the GlideTouch bar to the left or right. ...; AUDIO ↔ DISPLAY ↔ DEMO The SETUP menu of the Time correction mode. CDA-9855: GENERAL CLOCK MODE*1 ↔ CLOCK ADJUST ↔ PLAY MODE ↔ BEEP ↔ INT MUTE ↔ INT AUDIO ↔ AUX IN ↔ (AUX NAME)*2 ↔ D-AUX ↔ POWER IC ↔ STEERING ↔ CLOCK MODE*1 TUNER TUNER MODE ↔...
Owners Manual
Page 29
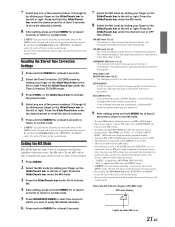
... sliding your desired device. Playing MP3/WMA Data (PLAY MODE) CDA-9855:CD-DA (Initial setting) / CDDA&MP3/WMA CDA-9853:CDDA (Initial setting) / CDDA&MP3/WMA This product can be difficult. Setting the External Digital Input D-AUX ON / D-AUX OFF (Initial setting) When an ALPINE Ai-NET compatible digital audio processor (PXAH510, PXA-H701) and...
... sliding your desired device. Playing MP3/WMA Data (PLAY MODE) CDA-9855:CD-DA (Initial setting) / CDDA&MP3/WMA CDA-9853:CDDA (Initial setting) / CDDA&MP3/WMA This product can be difficult. Setting the External Digital Input D-AUX ON / D-AUX OFF (Initial setting) When an ALPINE Ai-NET compatible digital audio processor (PXAH510, PXA-H701) and...

Owners Manual
Page 31
...setting) After setting D-AUX to ON in "Setting the External Digital Input," do not fit in the display at one character at the factory is "0." MANUAL : The display is scrolled when a disc is loaded or when a track is completed. Switching the Character Font (CDA-9855 only) TYPE1 (...Initial setting) This CD player can be shown when the time is displayed. Setting the Temperature Display for the External Amplifier CDA-9855:A-LINK F (Initial setting) / A-LINK C CDA-9853:AMP TEMP °F (Initial setting)/ AMP TEMP °C When a separately sold Amplifier Link compatible amplifier is only...
...setting) After setting D-AUX to ON in "Setting the External Digital Input," do not fit in the display at one character at the factory is "0." MANUAL : The display is scrolled when a disc is loaded or when a track is completed. Switching the Character Font (CDA-9855 only) TYPE1 (...Initial setting) This CD player can be shown when the time is displayed. Setting the Temperature Display for the External Amplifier CDA-9855:A-LINK F (Initial setting) / A-LINK C CDA-9853:AMP TEMP °F (Initial setting)/ AMP TEMP °C When a separately sold Amplifier Link compatible amplifier is only...

Owners Manual
Page 38
... may be used. to 6 CD Changers. When using KCA-410C, see "Setting the AUX Mode (V-Link)" on the display. Alternatively press BAND on the Remote Control until the desired...-/J BAND FUNC. Press the GlideTouch bar under the desired disc. Multi-Changer Selection (Optional) Alpine's Ai-NET system will resume playback. • The unit can connect up to activate the...Audio function mode ↔ Direct disc recall mode ↔ Source operation mode* ↔ Source selection mode * CDA-9855 only 3 Select a disc (1 to 6) by touching the GlideTouch bar and sliding your finger to 14. ...
... may be used. to 6 CD Changers. When using KCA-410C, see "Setting the AUX Mode (V-Link)" on the display. Alternatively press BAND on the Remote Control until the desired...-/J BAND FUNC. Press the GlideTouch bar under the desired disc. Multi-Changer Selection (Optional) Alpine's Ai-NET system will resume playback. • The unit can connect up to activate the...Audio function mode ↔ Direct disc recall mode ↔ Source operation mode* ↔ Source selection mode * CDA-9855 only 3 Select a disc (1 to 6) by touching the GlideTouch bar and sliding your finger to 14. ...


