Owners Manual
Page 8
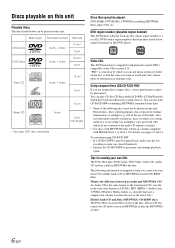
... discs, discs with fingerprints, discs exposed to extreme temperatures or sunlight (e.g., left in the car or this DVD player. 1 ALL Video CDs This DVD head unit is compatible with playback control (PBC) compatible video CDs (version 2.0). You can play CD-Rs (CD-Recordable)/CD-RWs (CD-ReWritable) which a ...in dialogue style. "PBC" is the same format as CD-DA). DVD region number (playable region number) This DVD player will play the CD audio section or MP3/WMA to help you create your own CDs The DVA-9861 plays DVD Audio, DVD Video, Video CD, Audio CD and has a built in the store...
... discs, discs with fingerprints, discs exposed to extreme temperatures or sunlight (e.g., left in the car or this DVD player. 1 ALL Video CDs This DVD head unit is compatible with playback control (PBC) compatible video CDs (version 2.0). You can play CD-Rs (CD-Recordable)/CD-RWs (CD-ReWritable) which a ...in dialogue style. "PBC" is the same format as CD-DA). DVD region number (playable region number) This DVD player will play the CD audio section or MP3/WMA to help you create your own CDs The DVA-9861 plays DVD Audio, DVD Video, Video CD, Audio CD and has a built in the store...

Owners Manual
Page 17
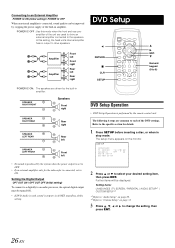
...control, be played automatically. The front panel will be used . Video CD discs can be used . DVD-R/DVD-RW discs recorded in a video mode can be used . When a disc is required. • DVA-9861 automatically changes the video output signal (NTSC or PAL), according to open . 2 Insert a disc ... CD In this section, both remote control and main unit operations are described. (OPEN) SOURCE/ POWER / 4 DN UP RETURN / MENU CLR DISP./TOP M. Disc types that can be used for each heading are represented by the following mark is displayed on the monitor screen: Play ...
...control, be played automatically. The front panel will be used . Video CD discs can be used . DVD-R/DVD-RW discs recorded in a video mode can be used . When a disc is required. • DVA-9861 automatically changes the video output signal (NTSC or PAL), according to open . 2 Insert a disc ... CD In this section, both remote control and main unit operations are described. (OPEN) SOURCE/ POWER / 4 DN UP RETURN / MENU CLR DISP./TOP M. Disc types that can be used for each heading are represented by the following mark is displayed on the monitor screen: Play ...

Owners Manual
Page 27
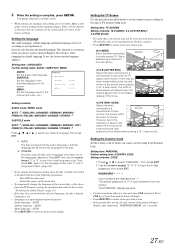
...in the tag information display mode. CDDA : Only CD data can select playback of the unit with RCA output can be difficult. For example, even at night. Visual Customizing Dimmer ...Interface cable (KCA-121B) or Versatile Link Terminal (KCA-410C) to 2 external devices with the head lights of display characters for the display. • To quit Demo mode, set . External ... scrolling methods. Scroll Setting (TEXT SCROLL) SCROLL AUTO / SCROLL MANU (Initial setting) This CD player can input TV/video sound by pressing or , then press MODE. When a disc contains both ...
...in the tag information display mode. CDDA : Only CD data can select playback of the unit with RCA output can be difficult. For example, even at night. Visual Customizing Dimmer ...Interface cable (KCA-121B) or Versatile Link Terminal (KCA-410C) to 2 external devices with the head lights of display characters for the display. • To quit Demo mode, set . External ... scrolling methods. Scroll Setting (TEXT SCROLL) SCROLL AUTO / SCROLL MANU (Initial setting) This CD player can input TV/video sound by pressing or , then press MODE. When a disc contains both ...
Owners Manual
Page 28
POWER IC OFF : Use this mode when the front and rear preamplifier of the unit are used , sound is output via Ai-NET regardless of this setting, the head unit's internal amplifier has no output to each of the built-in amplifier. Refer to the specific section for the subwoofer is connected,... / OPT OUT OFF (Initial setting) To connect to a digitally to an audio processor, the optical digital output must be turned ON. • If DVD Audio is used to drive an external amplifier connected to the speakers. SPEAKER RIGHT FRONT Speakers Front right SPEAKER RIGHT REAR SPEAKER LEFT REAR Rear...
POWER IC OFF : Use this mode when the front and rear preamplifier of the unit are used , sound is output via Ai-NET regardless of this setting, the head unit's internal amplifier has no output to each of the built-in amplifier. Refer to the specific section for the subwoofer is connected,... / OPT OUT OFF (Initial setting) To connect to a digitally to an audio processor, the optical digital output must be turned ON. • If DVD Audio is used to drive an external amplifier connected to the speakers. SPEAKER RIGHT FRONT Speakers Front right SPEAKER RIGHT REAR SPEAKER LEFT REAR Rear...
Owners Manual
Page 29
...; Press RETURN to return to the previous display. Press CLR for at the top and bottom of the current disc, either do so from the DVD menu or using the operation described in the section "Switching the Audio Tracks" (page 19). • If the disc does not include the selected language...: The disc is played with the audio language or subtitle language set to the selected screen size. (For details, refer to the explanation on the head unit. • To temporarily change the language setting when the disc is inside, the setting is decided with a language other than one digit at the extreme...
...; Press RETURN to return to the previous display. Press CLR for at the top and bottom of the current disc, either do so from the DVD menu or using the operation described in the section "Switching the Audio Tracks" (page 19). • If the disc does not include the selected language...: The disc is played with the audio language or subtitle language set to the selected screen size. (For details, refer to the explanation on the head unit. • To temporarily change the language setting when the disc is inside, the setting is decided with a language other than one digit at the extreme...
Owners Manual
Page 39
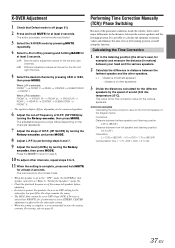
The unit returns to the normal mode. • When the speaker is selected for FRONT1. It is selected : FRONT 1L FRONT 1R FRONT 2L FRONT 2R REAR L ... and right channels. Calculating the Time Correction 1 Sit in the listening position (the driver's seat, for example) and measure the distance (in meters) between your head and the various speakers. 2 Calculate the difference in the distances between the various speakers and the listening position. The audio processor control mode is the...
The unit returns to the normal mode. • When the speaker is selected for FRONT1. It is selected : FRONT 1L FRONT 1R FRONT 2L FRONT 2R REAR L ... and right channels. Calculating the Time Correction 1 Sit in the listening position (the driver's seat, for example) and measure the distance (in meters) between your head and the various speakers. 2 Calculate the difference in the distances between the various speakers and the listening position. The audio processor control mode is the...
Owners Manual
Page 49
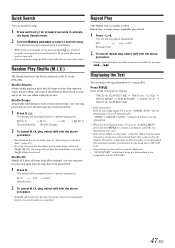
...does not play back randomly even when Shuffle album is canceled. • If there are played back in order, and so on the DVA-9861. M.I.X. (off ) with the DVA-9861. 47-EN Repeat Play Only Repeat One is 128 (128 byte). • Some characters may take time to "SCROLL MANU," press... 250 characters is displayed as M.I.X. The selected song is played back immediately. • While in the search mode, if you press and hold for the head unit is available for songs. Random Play Shuffle (M.I .X.), the songs will not play back again until all songs have been played back. 1 Press 5 ....
...does not play back randomly even when Shuffle album is canceled. • If there are played back in order, and so on the DVA-9861. M.I.X. (off ) with the DVA-9861. 47-EN Repeat Play Only Repeat One is 128 (128 byte). • Some characters may take time to "SCROLL MANU," press... 250 characters is displayed as M.I.X. The selected song is played back immediately. • While in the search mode, if you press and hold for the head unit is available for songs. Random Play Shuffle (M.I .X.), the songs will not play back again until all songs have been played back. 1 Press 5 ....
Owners Manual
Page 65
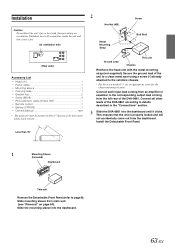
...8226; The main unit must be mounted within 35 degrees of the DVA-9861. Install the Detachable Front Panel. Secure the ground lead of the DVA-9861 according to front. 2 Hex Nut (M5) Screw ** Bolt Stud Metal Mounting Strap * Ground Lead Chassis This unit Reinforce the head unit with the metal ...mounting strap (not supplied). Connect all other leads of the unit to a clean metal spot using ...
...8226; The main unit must be mounted within 35 degrees of the DVA-9861. Install the Detachable Front Panel. Secure the ground lead of the DVA-9861 according to front. 2 Hex Nut (M5) Screw ** Bolt Stud Metal Mounting Strap * Ground Lead Chassis This unit Reinforce the head unit with the metal ...mounting strap (not supplied). Connect all other leads of the unit to a clean metal spot using ...
Owners Manual
Page 69
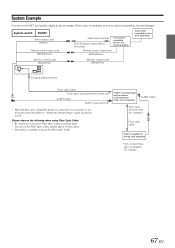
... changer (sold separately) Monitor control Lead (White/Pink) Monitor control Lead (White/Pink) To Digital output terminal Fiber optic Cable Fiber optic input terminal (for head unit) Ai-NET Cable Ai-NET output terminal • When the fiber optic compatible product is connected, it is necessary to set to ON. Please observe... at a sharp angle. • Do not coil the Fiber Optic Cable smaller than a 30 mm radius. • Do not place anything on top of this unit.
... changer (sold separately) Monitor control Lead (White/Pink) Monitor control Lead (White/Pink) To Digital output terminal Fiber optic Cable Fiber optic input terminal (for head unit) Ai-NET Cable Ai-NET output terminal • When the fiber optic compatible product is connected, it is necessary to set to ON. Please observe... at a sharp angle. • Do not coil the Fiber Optic Cable smaller than a 30 mm radius. • Do not place anything on top of this unit.


