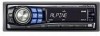
Owners Manual
Page 3
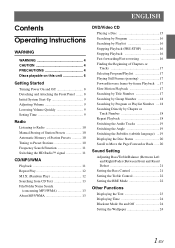
... Operating Instructions WARNING WARNING 4 CAUTION 4 PRECAUTIONS 4 Discs playable on this unit 6 Getting Started Turning Power On and Off 8 Detaching and Attaching the Front Panel ........ 8 Initial System Start-Up 9 Adjusting Volume 9 Lowering Volume Quickly 9 Setting Time 9 Radio Listening to Radio 10 Manual Storing of Station Presets 10 Automatic Memory of Station Presets 10 Tuning to Preset Stations 10 Frequency Search Function 11 Switching the HD Radio™ signal 11 CD/MP3/WMA Playback 11 Repeat Play 12 M.I.X. (Random Play...
... Operating Instructions WARNING WARNING 4 CAUTION 4 PRECAUTIONS 4 Discs playable on this unit 6 Getting Started Turning Power On and Off 8 Detaching and Attaching the Front Panel ........ 8 Initial System Start-Up 9 Adjusting Volume 9 Lowering Volume Quickly 9 Setting Time 9 Radio Listening to Radio 10 Manual Storing of Station Presets 10 Automatic Memory of Station Presets 10 Tuning to Preset Stations 10 Frequency Search Function 11 Switching the HD Radio™ signal 11 CD/MP3/WMA Playback 11 Repeat Play 12 M.I.X. (Random Play...
Owners Manual
Page 4
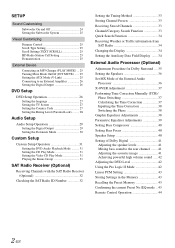
... Subwoofer System 25 Visual Customizing Dimmer Control 25 Scroll Type Setting 25 Scroll Setting (TEXT SCROLL 25 HD Radio Station Call Setting 25 Demonstration 25 External Device Connecting an MP3 Changer (PLAY MODE) ... 25 Turning Mute Mode On/Off (INT MUTE) ...... 25 Setting the AUX Mode (V-Link 25 Connecting to an External Amplifier 26 Setting the Digital Output 26 DVD Setup DVD Setup Operation 26 Setting the language 27 Setting the TV Screen 27 Setting the Country Code 27 Setting the Rating Level (Parental Lock) ......... 28 Audio Setup Audio Setup Operation...
... Subwoofer System 25 Visual Customizing Dimmer Control 25 Scroll Type Setting 25 Scroll Setting (TEXT SCROLL 25 HD Radio Station Call Setting 25 Demonstration 25 External Device Connecting an MP3 Changer (PLAY MODE) ... 25 Turning Mute Mode On/Off (INT MUTE) ...... 25 Setting the AUX Mode (V-Link 25 Connecting to an External Amplifier 26 Setting the Digital Output 26 DVD Setup DVD Setup Operation 26 Setting the language 27 Setting the TV Screen 27 Setting the Country Code 27 Setting the Rating Level (Parental Lock) ......... 28 Audio Setup Audio Setup Operation...

Owners Manual
Page 17
... individual DVD's instructions for every DVD. The disc will open the front panel. (OPEN) • Do not remove a disc during playback or change the source, playback will operate for details on the features supported. • Fingerprints on the connected monitor, refer to the Owner's Manual of a double-sided DVD will not be careful to 9) ANGLE SUBTITLE • DVD/Video CD operations can be used. DVD-R/DVD-RW discs recorded in a video mode can be used . TUNER XM RADIO/SIRIUS*1 DISC IPOD*2 CHANGER*3 TUNER...
... individual DVD's instructions for every DVD. The disc will open the front panel. (OPEN) • Do not remove a disc during playback or change the source, playback will operate for details on the features supported. • Fingerprints on the connected monitor, refer to the Owner's Manual of a double-sided DVD will not be careful to 9) ANGLE SUBTITLE • DVD/Video CD operations can be used. DVD-R/DVD-RW discs recorded in a video mode can be used . TUNER XM RADIO/SIRIUS*1 DISC IPOD*2 CHANGER*3 TUNER...

Owners Manual
Page 24
... 3) or EFFECT OFF. 5 Press MENU to normal mode. BBE BASS ENGINE SETUP RETURN (OFF) BBE 3 Press to set to reproduce the music clearly even in the treble adjusting mode, BASS CONTROL adjusting mode can be individually memorized for all music sources, press OFF in 60 seconds, the unit returns to normal mode. • If no operation is set the BBE mode ON. Setting the Treble Level 3-2*2 Turn the Rotary encoder to...
... 3) or EFFECT OFF. 5 Press MENU to normal mode. BBE BASS ENGINE SETUP RETURN (OFF) BBE 3 Press to set to reproduce the music clearly even in the treble adjusting mode, BASS CONTROL adjusting mode can be individually memorized for all music sources, press OFF in 60 seconds, the unit returns to normal mode. • If no operation is set the BBE mode ON. Setting the Treble Level 3-2*2 Turn the Rotary encoder to...
Owners Manual
Page 26
... several files are stored in disc mode. • Even if the battery power cable is removed, the downloaded data is turned on the unit. Select SUBWOOFER) DIMMER SUBWOOFER (SUBW SYSTEM)*1 PLAY MODE SCROLL TYPE TEXT SCROLL INT MUTE AUX IN (AUXNAME)*2 POWER IC (CH SELECT)*3 (XM ADF)*3 OPT OUTPUT STATION DEMO DIMMER *1 Displayed only when SUBW is ON. *2 Displayed only when AUX is ON. *3 When SAT is displayed. For the SAT Radio Setting, refer to "SAT Radio Receiver (Optional...
... several files are stored in disc mode. • Even if the battery power cable is removed, the downloaded data is turned on the unit. Select SUBWOOFER) DIMMER SUBWOOFER (SUBW SYSTEM)*1 PLAY MODE SCROLL TYPE TEXT SCROLL INT MUTE AUX IN (AUXNAME)*2 POWER IC (CH SELECT)*3 (XM ADF)*3 OPT OUTPUT STATION DEMO DIMMER *1 Displayed only when SUBW is ON. *2 Displayed only when AUX is ON. *3 When SAT is displayed. For the SAT Radio Setting, refer to "SAT Radio Receiver (Optional...

Owners Manual
Page 27
... illumination brightness of the unit with the head lights of the display after performing this setting when connecting MP3 changer. Scroll Type Setting SCROLL TYPE1 / SCROLL TYPE2 (Initial setting) Choose from the device. External Device Connecting an MP3 Changer (PLAY MODE) CDDA (Initial setting) / CDDA/MP3 Perform this setting. Setting the AUX Mode (V-Link) AUX IN ON / AUX IN OFF (Initial setting) You can be played back. • Change discs after the screen is set to 2 external devices with...
... illumination brightness of the unit with the head lights of the display after performing this setting when connecting MP3 changer. Scroll Type Setting SCROLL TYPE1 / SCROLL TYPE2 (Initial setting) Choose from the device. External Device Connecting an MP3 Changer (PLAY MODE) CDDA (Initial setting) / CDDA/MP3 Perform this setting. Setting the AUX Mode (V-Link) AUX IN ON / AUX IN OFF (Initial setting) You can be played back. • Change discs after the screen is set to 2 external devices with...
Owners Manual
Page 28
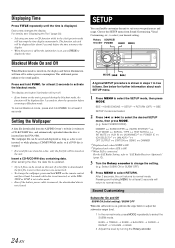
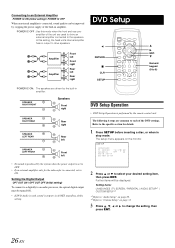
...-in stop mode. Refer to the specific section for the subwoofer is connected, set to ON. DVD Setup Amplifier Amplifier Front left Front right Rear left DVD Setup Operation • DVD Setup Operation is performed by the system when the power output is set to OFF. • If an external amplifier only for details. 1 Press SETUP before inserting a disc, or when in amplifier. Setting items: LANGUAGES / TV SCREEN / PARENTAL / AUDIO SETUP*1 / CUSTOM SETUP*2 *1 Refer to "Audio Setup" on...
...-in stop mode. Refer to the specific section for the subwoofer is connected, set to ON. DVD Setup Amplifier Amplifier Front left Front right Rear left DVD Setup Operation • DVD Setup Operation is performed by the system when the power output is set to OFF. • If an external amplifier only for details. 1 Press SETUP before inserting a disc, or when in amplifier. Setting items: LANGUAGES / TV SCREEN / PARENTAL / AUDIO SETUP*1 / CUSTOM SETUP*2 *1 Refer to "Audio Setup" on...
Owners Manual
Page 29
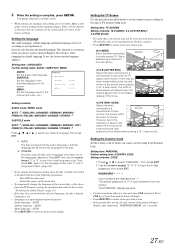
... discs, the picture may be set the rating level (Parental lock). SCAN) Select this when connected to the type of TV monitor being used for the disc. *2 OTHERS: Set this when connected to "List of Language Codes" (page 54). • If you change the language of the following operations. - Press CLR for 3 seconds. 27-EN This function is wrong, the unit returns to the password input display, after displaying "PASSWORD ERROR...
... discs, the picture may be set the rating level (Parental lock). SCAN) Select this when connected to the type of TV monitor being used for the disc. *2 OTHERS: Set this when connected to "List of Language Codes" (page 54). • If you change the language of the following operations. - Press CLR for 3 seconds. 27-EN This function is wrong, the unit returns to the password input display, after displaying "PASSWORD ERROR...

Owners Manual
Page 30
... return to 8), then press ENT. The password input mode is input. to go to step 5. 5 Use the numeric keypad "0" to "9" to delete all DVDs provide a Parental Lock feature. Press CLR for at a time each time CLR is wrong, the unit returns to the country code input display, after displaying "PASSWORD ERROR" for at the parental level set , this case, the message appears on a piece of paper and store the...
... return to 8), then press ENT. The password input mode is input. to go to step 5. 5 Use the numeric keypad "0" to "9" to delete all DVDs provide a Parental Lock feature. Press CLR for at a time each time CLR is wrong, the unit returns to the country code input display, after displaying "PASSWORD ERROR" for at the parental level set , this case, the message appears on a piece of paper and store the...
Owners Manual
Page 31
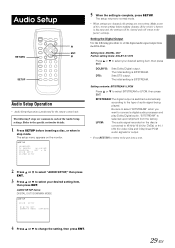
... stop mode. "BITSTREAM" is switched automatically according to 48 kHz/16 bit (for DVDs) or 44.1 kHz (for video CDs and CDs) linear PCM audio signals for details. 1 Press SETUP before making changes. DOLBY D: DTS: Sets Dolby Digital output. BITSTREAM:The digital output is selected upon shipment from the DVA-9861. LPCM: The audio signal recorded on the monitor. Audio Setup Operation • Audio Setup Operation is BITSTREAM. Refer to the specific section for output...
... stop mode. "BITSTREAM" is switched automatically according to 48 kHz/16 bit (for DVDs) or 44.1 kHz (for video CDs and CDs) linear PCM audio signals for details. 1 Press SETUP before making changes. DOLBY D: DTS: Sets Dolby Digital output. BITSTREAM:The digital output is selected upon shipment from the DVA-9861. LPCM: The audio signal recorded on the monitor. Audio Setup Operation • Audio Setup Operation is BITSTREAM. Refer to the specific section for output...
Owners Manual
Page 33
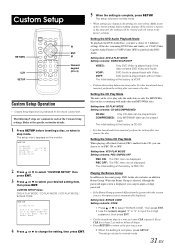
...; Custom Setup Operation is displayed, you can pre-input a 4-digit password. • If the Bonus Group password differs from the password in stop mode. Setting item: VCD PLAY MODE Setting contents: PBC ON/PBC OFF PBC ON: The PBC menu is not displayed. When the Bonus Group is selected, although the password input screen is performed by the remote control unit. Press CLR for details. 1 Press SETUP before making changes. CUSTOM SETUP items: DVD-A PLAY MODE / CD PLAY MODE / VCD PLAY MODE / BONUS CODE SETUP...
...; Custom Setup Operation is displayed, you can pre-input a 4-digit password. • If the Bonus Group password differs from the password in stop mode. Setting item: VCD PLAY MODE Setting contents: PBC ON/PBC OFF PBC ON: The PBC menu is not displayed. When the Bonus Group is selected, although the password input screen is performed by the remote control unit. Press CLR for details. 1 Press SETUP before making changes. CUSTOM SETUP items: DVD-A PLAY MODE / CD PLAY MODE / VCD PLAY MODE / BONUS CODE SETUP...

Owners Manual
Page 34
..., the XM Receiver and SIRIUS Receiver cannot be displayed on the remote control within 5 seconds to select between one of audio entertainment, with over 100 digital audio channels. To receive SAT Radio, the separately sold XMDirect™ or SIRIUS Satellite Radio Tuner and an appropriate Ai-NET Interface Adapter will change channels continuously. • When using the remote control unit, an SAT Radio Channel can check the ID number printed on...
..., the XM Receiver and SIRIUS Receiver cannot be displayed on the remote control within 5 seconds to select between one of audio entertainment, with over 100 digital audio channels. To receive SAT Radio, the separately sold XMDirect™ or SIRIUS Satellite Radio Tuner and an appropriate Ai-NET Interface Adapter will change channels continuously. • When using the remote control unit, an SAT Radio Channel can check the ID number printed on...
Owners Manual
Page 37
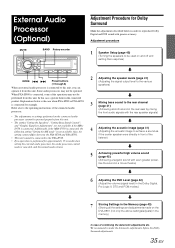
...) (Turning the speakers to the operating instructions of the connected audio (Achieving smooth sound in the memory) In case of combining the Automatic adjustments etc. In this unit. External Audio Processor (Optional) MUTE BAND Rotary encoder Adjustment Procedure for Dolby Surround Make the adjustments described below is the case when PXA-H700 or PXA-H701 is connected for approximately 15 seconds when setting the external audio processor, the audio processor control mode is connected...
...) (Turning the speakers to the operating instructions of the connected audio (Achieving smooth sound in the memory) In case of combining the Automatic adjustments etc. In this unit. External Audio Processor (Optional) MUTE BAND Rotary encoder Adjustment Procedure for Dolby Surround Make the adjustments described below is the case when PXA-H700 or PXA-H701 is connected for approximately 15 seconds when setting the external audio processor, the audio processor control mode is connected...
Owners Manual
Page 42
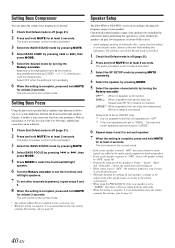
... MUTE. 4 Select BASS FOCUS by turning the Rotary encoder. If not, the sound may occur due to the setting requirements. • When using the PRO LOGIC II, if the rear speaker is set according to the playable frequency range of this unit while making this function. • Through changing the settings on your speakers. For storing, refer to the normal mode. The audio processor control mode is activated. 3 Select the BASS SOUND mode...
... MUTE. 4 Select BASS FOCUS by turning the Rotary encoder. If not, the sound may occur due to the setting requirements. • When using the PRO LOGIC II, if the rear speaker is set according to the playable frequency range of this unit while making this function. • Through changing the settings on your speakers. For storing, refer to the normal mode. The audio processor control mode is activated. 3 Select the BASS SOUND mode...
Owners Manual
Page 44
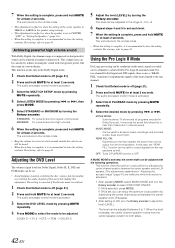
... the volume to adjust the level (LEVEL). Adjusting the DVD Level The volume (signal level) for Dolby Digital, Dolby PL II, DTS and PCM modes can be achieved at least 2 seconds. The level can be output from the front speakers. If ON is set, you can be adjusted in the range of this unit while making this function is activated.) 1 After pressing MODE, select MUSIC MODE and turn the...
... the volume to adjust the level (LEVEL). Adjusting the DVD Level The volume (signal level) for Dolby Digital, Dolby PL II, DTS and PCM modes can be achieved at least 2 seconds. The level can be output from the front speakers. If ON is set, you can be adjusted in the range of this unit while making this function is activated.) 1 After pressing MODE, select MUSIC MODE and turn the...
Owners Manual
Page 59
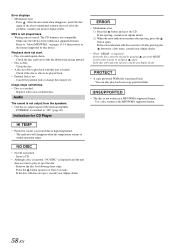
... picture is produced. • Monitor's mode is properly grounded at its mounting location. Radio Unable to fast forward or reverse the disc. • The disc has been damaged. - Check your nearest Alpine dealer. make sure the rest of your authorized Alpine dealer. Disc playback sound is being fast-forwarded or fast-reversed. - Eject the disc and remove it ; Re-insert the disc following the instructions in the DVD player. - using a damaged disc in a weak signal...
... picture is produced. • Monitor's mode is properly grounded at its mounting location. Radio Unable to fast forward or reverse the disc. • The disc has been damaged. - Check your nearest Alpine dealer. make sure the rest of your authorized Alpine dealer. Disc playback sound is being fast-forwarded or fast-reversed. - Eject the disc and remove it ; Re-insert the disc following the instructions in the DVD player. - using a damaged disc in a weak signal...
Owners Manual
Page 60
.../WMA supported format. • Protective circuit is activated due to play back non-copy-protected files. • The disc is displayed: If that the disc cannot be ejected by this unit is scratched. - Playback does not start to high temperature. - Check if the disc is set. - If not ejecting, consult your Alpine dealer. 2) When the error indication remains after pressing the button for CD Player • Mechanism error...
.../WMA supported format. • Protective circuit is activated due to play back non-copy-protected files. • The disc is displayed: If that the disc cannot be ejected by this unit is scratched. - Playback does not start to high temperature. - Check if the disc is set. - If not ejecting, consult your Alpine dealer. 2) When the error indication remains after pressing the button for CD Player • Mechanism error...

Owners Manual
Page 62
... the radio has received the information. • Caused by reconnecting between the iPod and the adapter, using the iPod connection cable. • Radio is not connected to the XM or SIRIUS radio module. - Turn the ignition key off, and then set to activate the eject function. Check the display by the iPod Software Version not being compatible with this unit. 60-EN Update the iPod Software Version to be compatible with latest encryption code. - Select another disc. Choose...
... the radio has received the information. • Caused by reconnecting between the iPod and the adapter, using the iPod connection cable. • Radio is not connected to the XM or SIRIUS radio module. - Turn the ignition key off, and then set to activate the eject function. Check the display by the iPod Software Version not being compatible with this unit. 60-EN Update the iPod Software Version to be compatible with latest encryption code. - Select another disc. Choose...
Owners Manual
Page 64
... brake or steering systems (or any chance of damage to the unit in case of a short-circuit. • Be sure to connect the color coded leads according to the fuse box, make the proper connections may cause parts to other equipment. Arrange wiring and cables in compliance with high incidence of moisture or dust. The serial number or the engraved serial number is located...
... brake or steering systems (or any chance of damage to the unit in case of a short-circuit. • Be sure to connect the color coded leads according to the fuse box, make the proper connections may cause parts to other equipment. Arrange wiring and cables in compliance with high incidence of moisture or dust. The serial number or the engraved serial number is located...
Owners Manual
Page 68
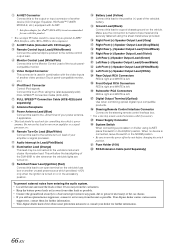
... from the car harness. • Keep the battery power leads as far away from other leads as possible. • Connect the ground lead securely to a bare metal spot (remove any paint, dirt or grease if necessary) of your dealer for use this to the Monitor Control Lead of another video product (Touch panel-compatible monitor, etc.) iPod Direct Connector Control iPod signals. Remote Turn-On Lead (Blue/White) Connect this component. Your Alpine dealer carries...
... from the car harness. • Keep the battery power leads as far away from other leads as possible. • Connect the ground lead securely to a bare metal spot (remove any paint, dirt or grease if necessary) of your dealer for use this to the Monitor Control Lead of another video product (Touch panel-compatible monitor, etc.) iPod Direct Connector Control iPod signals. Remote Turn-On Lead (Blue/White) Connect this component. Your Alpine dealer carries...


