Owners Manual
Page 3
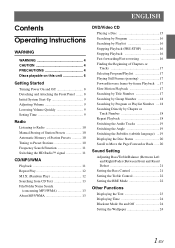
...and Attaching the Front Panel ........ 8 Initial System Start-Up 9 Adjusting Volume 9 Lowering Volume Quickly 9 Setting Time 9 Radio Listening to Radio 10 Manual Storing of Station Presets 10 Automatic Memory of Station Presets 10 Tuning to Preset Stations 10 Frequency Search Function 11 Switching the HD Radio™...Play 12 M.I.X. (Random Play 12 Searching from CD Text 13 File/Folder Name Search (concerning MP3/WMA 13 About MP3/WMA 13 DVD/Video CD Playing a Disc 15 Searching by Program 16 Searching by Playlist 16 Stopping Playback (PRE-STOP 16 Stopping Playback 16 Fast-...
...and Attaching the Front Panel ........ 8 Initial System Start-Up 9 Adjusting Volume 9 Lowering Volume Quickly 9 Setting Time 9 Radio Listening to Radio 10 Manual Storing of Station Presets 10 Automatic Memory of Station Presets 10 Tuning to Preset Stations 10 Frequency Search Function 11 Switching the HD Radio™...Play 12 M.I.X. (Random Play 12 Searching from CD Text 13 File/Folder Name Search (concerning MP3/WMA 13 About MP3/WMA 13 DVD/Video CD Playing a Disc 15 Searching by Program 16 Searching by Playlist 16 Stopping Playback (PRE-STOP 16 Stopping Playback 16 Fast-...
Owners Manual
Page 4
...Off (INT MUTE) ...... 25 Setting the AUX Mode (V-Link 25 Connecting to an External Amplifier 26 Setting the Digital Output 26 DVD Setup DVD Setup Operation 26 Setting the language 27 Setting the TV Screen 27 Setting the Country Code 27 Setting the Rating Level (Parental Lock)...Dolby Surround .... 35 Setting the Speakers 36 Set MX Mode of the External Audio Processor 36 X-OVER Adjustment 37 Performing Time Correction Manually (TCR)/ Phase Switching 37 Calculating the Time Correction 37 Inputting the Time Correction 38 Switching the Phase 38 Graphic Equalizer Adjustments 38 ...
...Off (INT MUTE) ...... 25 Setting the AUX Mode (V-Link 25 Connecting to an External Amplifier 26 Setting the Digital Output 26 DVD Setup DVD Setup Operation 26 Setting the language 27 Setting the TV Screen 27 Setting the Country Code 27 Setting the Rating Level (Parental Lock)...Dolby Surround .... 35 Setting the Speakers 36 Set MX Mode of the External Audio Processor 36 X-OVER Adjustment 37 Performing Time Correction Manually (TCR)/ Phase Switching 37 Calculating the Time Correction 37 Inputting the Time Correction 38 Switching the Phase 38 Graphic Equalizer Adjustments 38 ...
Owners Manual
Page 9
... must be playable. Use of DVD-Rs/ DVD-RWs/DVD+Rs/DVD+RWs. • Compared to direct sunlight. An independent license for private, noncommercial use is required. The DVA-9861 can be added. You may ... playback.) • In the following cases, the disc may also be played on this DVD player. • Some discs may occur and it is dusty. • Make sure that discs...32 characters) or Joliet (Windows or Macintosh long filenames) file naming conventions*. *Please consult the Owner's manual for a long time. If the disc is not closed (finalized), additional data may use this product in...
... must be playable. Use of DVD-Rs/ DVD-RWs/DVD+Rs/DVD+RWs. • Compared to direct sunlight. An independent license for private, noncommercial use is required. The DVA-9861 can be added. You may ... playback.) • In the following cases, the disc may also be played on this DVD player. • Some discs may occur and it is dusty. • Make sure that discs...32 characters) or Joliet (Windows or Macintosh long filenames) file naming conventions*. *Please consult the Owner's manual for a long time. If the disc is not closed (finalized), additional data may use this product in...
Owners Manual
Page 11
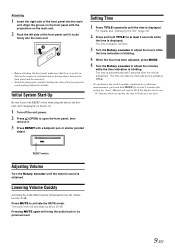
Setting Time 1 Press TITLE repeatedly until the desired sound is obtained. The time is automatically set by about 20 dB. The time can also be manually set 5 seconds after changing the car battery, etc. 1 Turn off the unit power. 2 Press (OPEN) to adjust the minutes while the time indication is blinking. ...
Setting Time 1 Press TITLE repeatedly until the desired sound is obtained. The time is automatically set by about 20 dB. The time can also be manually set 5 seconds after changing the car battery, etc. 1 Turn off the unit power. 2 Press (OPEN) to adjust the minutes while the time indication is blinking. ...
Owners Manual
Page 12
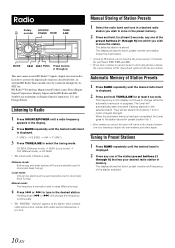
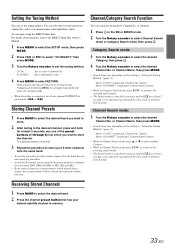
...wish to tune in the selected band. The tuner will be cleared and replaced with the new station. and Foreign Patents. Manual mode: The frequency is displayed. The selected station is received. Tuning to Preset Stations 1 Press BAND repeatedly until the desired radio ...Local mode: Only strong stations will be automatically tuned in a preset memory which you were listening to the station stored in (Automatic Seek Tuning). Manual Storing of the station preset buttons (1 through 6) into buttons 1 to store in the preset memory. 2 Press and hold TUNE/A.ME for each ...
...wish to tune in the selected band. The tuner will be cleared and replaced with the new station. and Foreign Patents. Manual mode: The frequency is displayed. The selected station is received. Tuning to Preset Stations 1 Press BAND repeatedly until the desired radio ...Local mode: Only strong stations will be automatically tuned in a preset memory which you were listening to the station stored in (Automatic Seek Tuning). Manual Storing of the station preset buttons (1 through 6) into buttons 1 to store in the preset memory. 2 Press and hold TUNE/A.ME for each ...
Owners Manual
Page 13
... for at least 2 seconds in Radio mode to activate Frequency Search mode. 2 Turn the Rotary encoder to select the desired frequency. Close the front panel manually.
... for at least 2 seconds in Radio mode to activate Frequency Search mode. 2 Turn the Rotary encoder to select the desired frequency. Close the front panel manually.
Owners Manual
Page 16
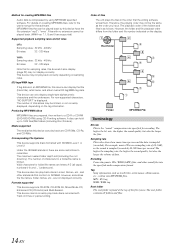
...Level 2. However, the folder and file playback order differs from the folder and file number indicated on creating MP3/WMA files, refer to the user's manual for that can play back are letters A-Z (all folders and files. 14-EN MP3: ID3 tag WMA: WMA tag Root folder The root folder ... into the specified audio compression format. Order of data. Producing MP3/WMA discs MP3/WMA files are some restrictions to a CD-R or CD-RW (DVD-R/DVD-RW) using MP3/WMA specified software. Valid characters for folder/file names are CD-ROMs, CD-Rs, and CD-RWs. This device cannot correctly play...
...Level 2. However, the folder and file playback order differs from the folder and file number indicated on creating MP3/WMA files, refer to the user's manual for that can play back are letters A-Z (all folders and files. 14-EN MP3: ID3 tag WMA: WMA tag Root folder The root folder ... into the specified audio compression format. Order of data. Producing MP3/WMA discs MP3/WMA files are some restrictions to a CD-R or CD-RW (DVD-R/DVD-RW) using MP3/WMA specified software. Valid characters for folder/file names are CD-ROMs, CD-Rs, and CD-RWs. This device cannot correctly play...

Owners Manual
Page 17
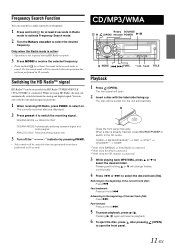
...CD discs can be used . Clean the disc if necessary. • When using the remote control, be careful to the disc. Close the front panel manually. TUNER XM RADIO/SIRIUS*1 DISC IPOD*2 CHANGER*3 TUNER *1 Only when XM Radio or Sirius Radio is connected. *2 Only when the iPod is connected. ... CD In this section, both remote control and main unit operations are described. • To view DVD/Video CD, the optional TV monitor is required. • DVA-9861 automatically changes the video output signal (NTSC or PAL), according to press only one disc at the same time may adversely affect ...
...CD discs can be used . Clean the disc if necessary. • When using the remote control, be careful to the disc. Close the front panel manually. TUNER XM RADIO/SIRIUS*1 DISC IPOD*2 CHANGER*3 TUNER *1 Only when XM Radio or Sirius Radio is connected. *2 Only when the iPod is connected. ... CD In this section, both remote control and main unit operations are described. • To view DVD/Video CD, the optional TV monitor is required. • DVA-9861 automatically changes the video output signal (NTSC or PAL), according to press only one disc at the same time may adversely affect ...
Owners Manual
Page 35
To customers using the SIRIUS Tuner Box: For details about functions, refer to the SIRIUS Tuner Box Owner's Manual. 1 Press MENU to select the SETUP mode, then press MODE. 2 Press or to select "CH SELECT," then press MODE. 3 Turn the Rotary encoder to store ...
To customers using the SIRIUS Tuner Box: For details about functions, refer to the SIRIUS Tuner Box Owner's Manual. 1 Press MENU to select the SETUP mode, then press MODE. 2 Press or to select "CH SELECT," then press MODE. 3 Turn the Rotary encoder to store ...
Owners Manual
Page 36
... or Sirius channel. Each time you press this text information as shown below . Press and hold BAND for more than 2 seconds to "SCROLL MANUAL," the display scrolls only once after any function is received. Pressing and holding BAND for at least 2 seconds will be switched on or off.... CHANNEL No. The unit can display this button, the display changes as explained below . There is set to scroll the display manually. • "CHANNEL No." In XM or SIRIUS mode, press TITLE. and "CLOCK" displays do not scroll. • Depending on page 34). • ...
... or Sirius channel. Each time you press this text information as shown below . Press and hold BAND for more than 2 seconds to "SCROLL MANUAL," the display scrolls only once after any function is received. Pressing and holding BAND for at least 2 seconds will be switched on or off.... CHANNEL No. The unit can display this button, the display changes as explained below . There is set to scroll the display manually. • "CHANNEL No." In XM or SIRIUS mode, press TITLE. and "CLOCK" displays do not scroll. • Depending on page 34). • ...
Owners Manual
Page 39
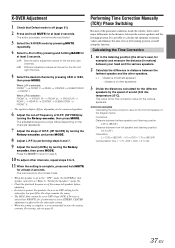
..., depending on the diagram below. Refer to the "OFF" mode, the X-OVER for that Defeat mode is off frequency of other speakers. Performing Time Correction Manually (TCR)/ Phase Switching Because of the connected speakers before adjusting. • In order to page 43. This value is no OFF setting for the various...
..., depending on the diagram below. Refer to the "OFF" mode, the X-OVER for that Defeat mode is off frequency of other speakers. Performing Time Correction Manually (TCR)/ Phase Switching Because of the connected speakers before adjusting. • In order to page 43. This value is no OFF setting for the various...
Owners Manual
Page 47
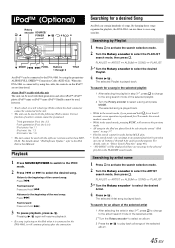
... / . Searching for a song in the selected playlist 1 After selecting the playlist in step 3*1. • Playlist search cannot be connected to the DVA-9861 by artist name 1 Press to activate the search selection mode. 2 Turn the Rotary encoder to "Direct Search Function" (page 46). • "...-22. Advance to the iPod Instruction Manual. Searching by using the proprietary ALPINE FULL SPEED™ Connection Cable (KCE-422i). Correct function of songs. iPod™ (Optional) Rotary encoder SOURCE/ POWER / 45 6 MODE FUNC. When the DVA-9861 is played back. The selected Artist...
... / . Searching for a song in the selected playlist 1 After selecting the playlist in step 3*1. • Playlist search cannot be connected to the DVA-9861 by artist name 1 Press to activate the search selection mode. 2 Turn the Rotary encoder to "Direct Search Function" (page 46). • "...-22. Advance to the iPod Instruction Manual. Searching by using the proprietary ALPINE FULL SPEED™ Connection Cable (KCE-422i). Correct function of songs. iPod™ (Optional) Rotary encoder SOURCE/ POWER / 45 6 MODE FUNC. When the DVA-9861 is played back. The selected Artist...
Owners Manual
Page 64
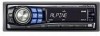
... chance of damage to other safety-related system), or tanks should NEVER be extremely hazardous. This may result in doubt, consult your Alpine dealer. • The DVA-9861 uses female RCA-type jacks for assistance. • Be sure to connect the speaker (-) leads to electrical shorts. Moisture or dust... this unit internally or may result in fire or electric shock. USE ONLY IN CARS WITH A 12 VOLT NEGATIVE GROUND. (Check with the manual to the diagram. BEFORE WIRING, DISCONNECT THE CABLE FROM THE NEGATIVE BATTERY TERMINAL. Never cut by the metal edge of a short-circuit. &#...
... chance of damage to other safety-related system), or tanks should NEVER be extremely hazardous. This may result in doubt, consult your Alpine dealer. • The DVA-9861 uses female RCA-type jacks for assistance. • Be sure to connect the speaker (-) leads to electrical shorts. Moisture or dust... this unit internally or may result in fire or electric shock. USE ONLY IN CARS WITH A 12 VOLT NEGATIVE GROUND. (Check with the manual to the diagram. BEFORE WIRING, DISCONNECT THE CABLE FROM THE NEGATIVE BATTERY TERMINAL. Never cut by the metal edge of a short-circuit. &#...
Owners Manual
Page 65
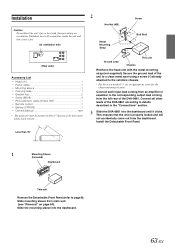
...8226; Bracket key 2 • Screw (M5x8 4 • RCA extension cable (Video) (2m 1 • Remote control 1 • Battery (CR2025 1 • Owner's Manual 1 set • The main unit must be mounted within 35 degrees of the unit to a clean metal spot using a screw (*) already attached to the vehicle... Sleeve (Included) Dashboard This unit Remove the Detachable Front Panel (refer to details described in the "Connections" section. 3 Slide the DVA-9861 into the dashboard. 63-EN This ensures that the unit is properly locked and will accumulate inside the unit and may cause a fire...
...8226; Bracket key 2 • Screw (M5x8 4 • RCA extension cable (Video) (2m 1 • Remote control 1 • Battery (CR2025 1 • Owner's Manual 1 set • The main unit must be mounted within 35 degrees of the unit to a clean metal spot using a screw (*) already attached to the vehicle... Sleeve (Included) Dashboard This unit Remove the Detachable Front Panel (refer to details described in the "Connections" section. 3 Slide the DVA-9861 into the dashboard. 63-EN This ensures that the unit is properly locked and will accumulate inside the unit and may cause a fire...
