
Owners Manual
Page 5
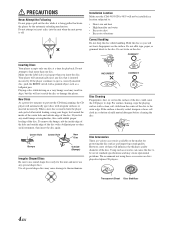
...cloth from jamming, the CD player will not leave fingerprints on the surface. If you insert the disc. Transparent Sheet Disc Stabilizer 4-EN Installation Location Make sure the CDA-9855/CDA-9853 will not scratch the disc or damage the player. If the surface is facing up when you feel... around the inside edge of the hole and outside edge of mild neutral detergent before cleaning the disc. Do not affix tape, paper, or gummed labels to be installed in Alpine CD...
...cloth from jamming, the CD player will not leave fingerprints on the surface. If you insert the disc. Transparent Sheet Disc Stabilizer 4-EN Installation Location Make sure the CDA-9855/CDA-9853 will not scratch the disc or damage the player. If the surface is facing up when you feel... around the inside edge of the hole and outside edge of mild neutral detergent before cleaning the disc. Do not affix tape, paper, or gummed labels to be installed in Alpine CD...
Owners Manual
Page 11
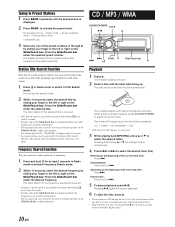
... Search function. Playback 1 Press c. Pressing and holding for 2 seconds. • Any radio station can be pulled into the unit automatically. Pressing -/J again will change every time the... 2 seconds with the movable display open . 2 Insert a disc with the label side facing up your search by sliding your search by pressing and holding 8 or 9 will resume playback. ...select mode → Preset mode → Source operation mode* → Source select mode CD / MP3 / WMA SOURCE/POWER TITLE -/J 8 * CDA-9855 only 3 Select any one disc at a time. f FUNC. 9 GlideTouch bar g...
... Search function. Playback 1 Press c. Pressing and holding for 2 seconds. • Any radio station can be pulled into the unit automatically. Pressing -/J again will change every time the... 2 seconds with the movable display open . 2 Insert a disc with the label side facing up your search by sliding your search by pressing and holding 8 or 9 will resume playback. ...select mode → Preset mode → Source operation mode* → Source select mode CD / MP3 / WMA SOURCE/POWER TITLE -/J 8 * CDA-9855 only 3 Select any one disc at a time. f FUNC. 9 GlideTouch bar g...
Owners Manual
Page 45
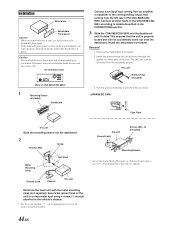
...CDA-9855/CDA9853. Face Plate this unit Slide the mounting sleeve into the dashboard. 2 Hex Nut (M5) Screw Metal Mounting Strap Ground Lead *2 Bolt Stud *1 Chassis this unit this unit in your car, do so. Reinforce the head unit with the metal mounting strap (not supplied). Air ventilation hole (Rear of CDA-9855/CDA...the mounting sleeve. This unit Bracket Keys (Included) 3 Pull the unit out, keeping it in the CONNECTlONS section. 3 Slide the CDA-9855/CDA-9853 into the slot and through the guides on either side of the unit to a clean metal spot using a screw (*1) already attached...
...CDA-9855/CDA9853. Face Plate this unit Slide the mounting sleeve into the dashboard. 2 Hex Nut (M5) Screw Metal Mounting Strap Ground Lead *2 Bolt Stud *1 Chassis this unit this unit in your car, do so. Reinforce the head unit with the metal mounting strap (not supplied). Air ventilation hole (Rear of CDA-9855/CDA...the mounting sleeve. This unit Bracket Keys (Included) 3 Pull the unit out, keeping it in the CONNECTlONS section. 3 Slide the CDA-9855/CDA-9853 into the slot and through the guides on either side of the unit to a clean metal spot using a screw (*1) already attached...


