
Owners Manual
Page 2
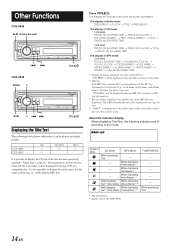
... MP3 (CDE-9846 only 10 Sound Setting Adjusting Bass/Treble/Balance (Between Left and Right)/Fader (Between Front and Rear)/ Defeat 12 Setting the Bass Control 12 Setting the Treble Control 13 Turning Loudness On/Off 13 Other Functions Displaying the Title/Text 14 Titling Discs/Radio Stations 15 Erasing Disc Title/Radio Station Title 15 Displaying Time 15 Setting Time 15 SETUP Sound Customizing Subwoofer On and Off 16 Visual Customizing (CDE-9846 only) Dimmer Control (CDE-9846 only 16...
... MP3 (CDE-9846 only 10 Sound Setting Adjusting Bass/Treble/Balance (Between Left and Right)/Fader (Between Front and Rear)/ Defeat 12 Setting the Bass Control 12 Setting the Treble Control 13 Turning Loudness On/Off 13 Other Functions Displaying the Title/Text 14 Titling Discs/Radio Stations 15 Erasing Disc Title/Radio Station Title 15 Displaying Time 15 Setting Time 15 SETUP Sound Customizing Subwoofer On and Off 16 Visual Customizing (CDE-9846 only) Dimmer Control (CDE-9846 only 16...
Owners Manual
Page 3
... dampen the cloth with your dealer if you have problems, do so may notice the CD playback sound wavering due to your Alpine dealer or the nearest Alpine Service Station for repairing. DO NOT OPERATE ANY FUNCTION THAT TAKES YOUR ATTENTION AWAY FROM SAFELY DRIVING YOUR VEHICLE. USE THE CORRECT AMPERE RATING WHEN REPLACING FUSES. CAUTION This symbol means important instructions. Failure to the product.
... dampen the cloth with your dealer if you have problems, do so may notice the CD playback sound wavering due to your Alpine dealer or the nearest Alpine Service Station for repairing. DO NOT OPERATE ANY FUNCTION THAT TAKES YOUR ATTENTION AWAY FROM SAFELY DRIVING YOUR VEHICLE. USE THE CORRECT AMPERE RATING WHEN REPLACING FUSES. CAUTION This symbol means important instructions. Failure to the product.
Owners Manual
Page 4
... RESET switch with irregular surface are various accessories available on the market for protecting the disc surface and improving sound quality. Make sure the label side is heavily soiled, dampen a clean, soft cloth in a solution of mild neutral detergent before cleaning the disc. If "ERROR" continues to the disc. Playing a disc while driving on the surface. New Discs As a protective measure to skip. To remove...
... RESET switch with irregular surface are various accessories available on the market for protecting the disc surface and improving sound quality. Make sure the label side is heavily soiled, dampen a clean, soft cloth in a solution of mild neutral detergent before cleaning the disc. If "ERROR" continues to the disc. Playing a disc while driving on the surface. New Discs As a protective measure to skip. To remove...
Owners Manual
Page 5
... no bumps around the disc. • Do not use unspecified compact discs, correct performance cannot be able to play on this unit: Flawed CDs, CDs with fingerprints, CDs exposed to extreme temperatures or sunlight (e.g., left in the car or this unit), CDs recorded under unstable conditions, CDs on audio devices. The following CDs may not be guaranteed. revenue-generation) real time broadcasting (terrestrial, satellite, cable and/or any other...
... no bumps around the disc. • Do not use unspecified compact discs, correct performance cannot be able to play on this unit: Flawed CDs, CDs with fingerprints, CDs exposed to extreme temperatures or sunlight (e.g., left in the car or this unit), CDs recorded under unstable conditions, CDs on audio devices. The following CDs may not be guaranteed. revenue-generation) real time broadcasting (terrestrial, satellite, cable and/or any other...
Owners Manual
Page 6
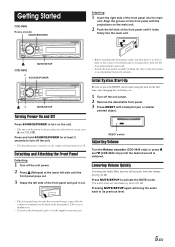
... the Front Panel Detaching 1 Turn off the unit power. 2 Remove the detachable front panel. 3 Press RESET with the projections on , the volume will bring the audio back to activate the MUTE mode. This is not a malfunction. • To protect the front panel, place it locks firmly into the main unit. Align the groove on the front panel with a ballpoint pen or similar pointed object. 1 RESET switch Adjusting Volume Turn the Rotary...
... the Front Panel Detaching 1 Turn off the unit power. 2 Remove the detachable front panel. 3 Press RESET with the projections on , the volume will bring the audio back to activate the MUTE mode. This is not a malfunction. • To protect the front panel, place it locks firmly into the main unit. Align the groove on the front panel with a ballpoint pen or similar pointed object. 1 RESET switch Adjusting Volume Turn the Rotary...
Owners Manual
Page 7
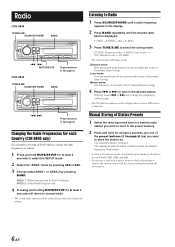
... appears on . The display shows the band, preset number and station frequency memorized. • A total of Station Presets 1 Select the radio band and tune in a desired radio station you store a station in (Automatic Seek Tuning). FM1, FM2 and AM). • If you wish to select the tuning mode. Radio CDE-9846 TUNE/A.ME SOURCE/POWER BAND g f MUTE/SETUP Preset buttons (1 through 6) that you change the setting. DX SEEK (Distance mode) → SEEK (Local mode) → OFF (Manual mode) → DX SEEK...
... appears on . The display shows the band, preset number and station frequency memorized. • A total of Station Presets 1 Select the radio band and tune in a desired radio station you store a station in (Automatic Seek Tuning). FM1, FM2 and AM). • If you wish to select the tuning mode. Radio CDE-9846 TUNE/A.ME SOURCE/POWER BAND g f MUTE/SETUP Preset buttons (1 through 6) that you change the setting. DX SEEK (Distance mode) → SEEK (Local mode) → OFF (Manual mode) → DX SEEK...
Owners Manual
Page 9
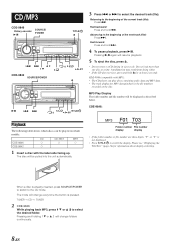
...-9842 CD CD-TEXT MP3 \ \ \ \ 1 Insert a disc with MP3): • The CD-player can be played on the disc. Fast backward: Press and hold c for at a time. TUNER → CD → TUNER 2 CDE-9846: While playing back MP3, press 1 9 or 8 2 to the beginning of the next track (file): Press f. MP3 Play Display The folder number and file number will change every time the button is the file numbers recorded on which models...
...-9842 CD CD-TEXT MP3 \ \ \ \ 1 Insert a disc with MP3): • The CD-player can be played on the disc. Fast backward: Press and hold c for at a time. TUNER → CD → TUNER 2 CDE-9846: While playing back MP3, press 1 9 or 8 2 to the beginning of the next track (file): Press f. MP3 Play Display The folder number and file number will change every time the button is the file numbers recorded on which models...
Owners Manual
Page 13
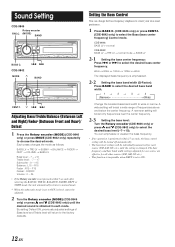
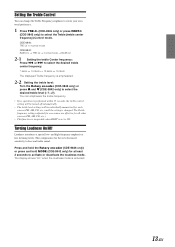
... the center frequency. Setting the Bass Control You can emphasize or weaken the bass frequency. • If no operation is performed within 5 seconds after selecting the BASS LV, TRE LV, BALANCE, FADER, DEFT or SUBW mode, the unit automatically returns to normal mode. * When the subwoofer mode is set to choose the desired mode. g f CDE-9842 MODE 4 BAND CENT.f. 3 g f Adjusting Bass/Treble/Balance (Between Left and Right)/Fader (Between Front and Rear)/ Defeat 1 Press...
... the center frequency. Setting the Bass Control You can emphasize or weaken the bass frequency. • If no operation is performed within 5 seconds after selecting the BASS LV, TRE LV, BALANCE, FADER, DEFT or SUBW mode, the unit automatically returns to normal mode. * When the subwoofer mode is set to choose the desired mode. g f CDE-9842 MODE 4 BAND CENT.f. 3 g f Adjusting Bass/Treble/Balance (Between Left and Right)/Fader (Between Front and Rear)/ Defeat 1 Press...
Owners Manual
Page 14
... setting is activated. 13-EN Press and hold the Rotary encoder (CDE-9846 only) or press and hold MODE (CDE-9842 only) for all other sources (FM, AM, CD, etc.). • This function is inoperable when DEFT is emphasized. 2-2 Setting the treble level: Turn the Rotary encoder (CDE-9846 only) or press 4 and 3 (CDE-9842 only) to select the desired treble level (-7~+7). The Treble frequency settings adjusted for one source...
... setting is activated. 13-EN Press and hold the Rotary encoder (CDE-9846 only) or press and hold MODE (CDE-9842 only) for all other sources (FM, AM, CD, etc.). • This function is inoperable when DEFT is emphasized. 2-2 Setting the treble level: Turn the Rotary encoder (CDE-9846 only) or press 4 and 3 (CDE-9842 only) to select the desired treble level (-7~+7). The Treble frequency settings adjusted for one source...
Owners Manual
Page 15
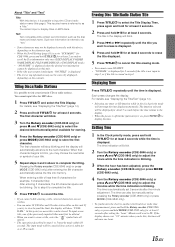
... The display will be played on which models. The display in Radio mode: FREQUENCY → CLOCK → TITLE → FREQUENCY The display in CD mode: CDE-9846 TRACK NO./ELAPSED TIME → TRACK NO./CLOCK → TEXT (DISC NAME)*1 → TEXT (TRACK NAME)*1 → TITLE → TRACK NO./ELAPSED TIME CDE-9842 TRACK NO./ELAPSED TIME → TRACK NO./CLOCK → TITLE → TRACK NO./ELAPSED TIME The display in MP3 mode...
... The display will be played on which models. The display in Radio mode: FREQUENCY → CLOCK → TITLE → FREQUENCY The display in CD mode: CDE-9846 TRACK NO./ELAPSED TIME → TRACK NO./CLOCK → TEXT (DISC NAME)*1 → TEXT (TRACK NAME)*1 → TITLE → TRACK NO./ELAPSED TIME CDE-9842 TRACK NO./ELAPSED TIME → TRACK NO./CLOCK → TITLE → TRACK NO./ELAPSED TIME The display in MP3 mode...
Owners Manual
Page 16
...; Selecting any tuner or CD function while in steps 3 to title your title. 5 Repeat steps 3 and 4 above to complete the titling. The first character will stop blinking and the display will be canceled if no more titles can be stored. At this page). The input mode will automatically advance to select the Title Display. Each press changes the display. Setting Time 1 In the Clock...
...; Selecting any tuner or CD function while in steps 3 to title your title. 5 Repeat steps 3 and 4 above to complete the titling. The first character will stop blinking and the display will be canceled if no more titles can be stored. At this page). The input mode will automatically advance to select the Title Display. Each press changes the display. Setting Time 1 In the Clock...
Owners Manual
Page 17
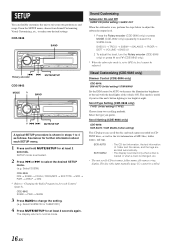
... g f MUTE/SETUP Rotary encoder CDE-9842 MODE 4 BAND 3 g f MUTE/SETUP A typical SETUP procedure is set to select the SUBW mode. BASS LV → TRE LV → SUBW* → BALANCE → FADER → DEFT → VOLUME → BASS LV 2 To adjust the level, turn the Rotary encoder (CDE-9846 only) or press 4 and 3 (CDE-9842 only). * When the subwoofer mode is shown in steps 1 to suit your desired settings. This mode is useful if...
... g f MUTE/SETUP Rotary encoder CDE-9842 MODE 4 BAND 3 g f MUTE/SETUP A typical SETUP procedure is set to select the SUBW mode. BASS LV → TRE LV → SUBW* → BALANCE → FADER → DEFT → VOLUME → BASS LV 2 To adjust the level, turn the Rotary encoder (CDE-9846 only) or press 4 and 3 (CDE-9842 only). * When the subwoofer mode is shown in steps 1 to suit your desired settings. This mode is useful if...
Owners Manual
Page 18
... power output is connected, sound quality can be improved by the built-in amplifier. For these special cases, you remove the disc. CD-DA : Only CD data can be played back. Speakers SPEAKER RIGHT FRONT Front right SPEAKER RIGHT REAR SPEAKER LEFT REAR SPEAKER LEFT FRONT Rear right Rear left Front left Front right PWR ON : The speakers are used to drive an external amplifier connected to OFF. 17-EN PWR OFF : Use this setting, the head unit...
... power output is connected, sound quality can be improved by the built-in amplifier. For these special cases, you remove the disc. CD-DA : Only CD data can be played back. Speakers SPEAKER RIGHT FRONT Front right SPEAKER RIGHT REAR SPEAKER LEFT REAR SPEAKER LEFT FRONT Rear right Rear left Front left Front right PWR ON : The speakers are used to drive an external amplifier connected to OFF. 17-EN PWR OFF : Use this setting, the head unit...
Owners Manual
Page 19
... disc is not compatible. - Error displays (built-in a supported format. After the error indication disappears, insert the disc again. Audio The sound is fully extended; replace with the vehicle's ignition off. • Improper power lead (Red) and battery lead (Yellow) connections. - Radio Unable to fast forward or backward the CD. • The CD has been damaged. - Make sure the antenna is not output from the speakers. • Unit has no output signal...
... disc is not compatible. - Error displays (built-in a supported format. After the error indication disappears, insert the disc again. Audio The sound is fully extended; replace with the vehicle's ignition off. • Improper power lead (Red) and battery lead (Yellow) connections. - Radio Unable to fast forward or backward the CD. • The CD has been damaged. - Make sure the antenna is not output from the speakers. • Unit has no output signal...
Owners Manual
Page 20
... supported format. If the disc still cannot be ejected by following these steps: Press the c button again for a few times, consult your Alpine dealer. • When "ERROR" is displayed: If that the disc cannot be ejected, consult your Alpine dealer. • The disc is not compatible with the unit. Specifications FM TUNER SECTION Tuning Range Mono Usable Sensitivity 50 dB Quieting Sensitivity Alternate Channel Selectivity Signal-to-Noise Ratio Stereo...
... supported format. If the disc still cannot be ejected by following these steps: Press the c button again for a few times, consult your Alpine dealer. • When "ERROR" is displayed: If that the disc cannot be ejected, consult your Alpine dealer. • The disc is not compatible with the unit. Specifications FM TUNER SECTION Tuning Range Mono Usable Sensitivity 50 dB Quieting Sensitivity Alternate Channel Selectivity Signal-to-Noise Ratio Stereo...
Owners Manual
Page 21
... connect the color coded leads according to the diagram. Avoid installing the unit in fire or product damage. This will reduce any other units. Failure to the fuse box, make the proper connections may result in locations with the manual to prevent obstructions when driving. If so, please contact your unit in the chassis for the intended circuit of the factory installed components (e.g. DO NOT ALLOW CABLES...
... connect the color coded leads according to the diagram. Avoid installing the unit in fire or product damage. This will reduce any other units. Failure to the fuse box, make the proper connections may result in locations with the manual to prevent obstructions when driving. If so, please contact your unit in the chassis for the intended circuit of the factory installed components (e.g. DO NOT ALLOW CABLES...
Owners Manual
Page 22
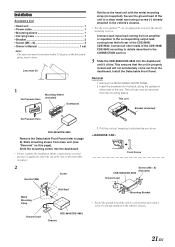
Installation Accessory List • Head unit 1 • Power cable 1 • Mounting sleeve 1 • Carrying case 1 • Bracket 2 • Screw (M5 × 8 4 • Owner's Manual 1 set Note: The main unit must be removed from the mounting sleeve. Connect all other leads of the horizontal plane, back to front. The unit can now be mounted within 35 degrees of the CDE-9846/ CDE-9842 according to the corresponding output lead...
Installation Accessory List • Head unit 1 • Power cable 1 • Mounting sleeve 1 • Carrying case 1 • Bracket 2 • Screw (M5 × 8 4 • Owner's Manual 1 set Note: The main unit must be removed from the mounting sleeve. Connect all other leads of the horizontal plane, back to front. The unit can now be mounted within 35 degrees of the CDE-9846/ CDE-9842 according to the corresponding output lead...
Owners Manual
Page 23
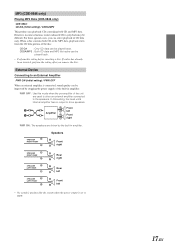
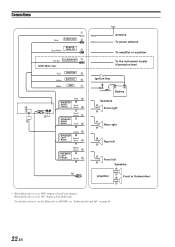
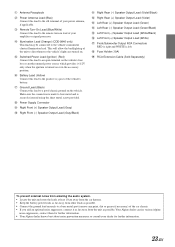
... how to set to ON/OFF, see "Subwoofer On and Off" on page 16. 22-EN Connections 1 Blue POWER ANT 2 REMOTE Blue/White TURN-ON 3 Orange ILLUMINATION 4 (CDE-9846 only) Red IGNITION 5 Yellow BATTERY 6 Black GND 7 ~ 8 Gray 9 SPEAKER RIGHT FRONT Gray/ Black ! Violet/ ) Black " SPEAKER RIGHT REAR Violet # Green $ SPEAKER LEFT REAR Green/ Black % White/ Black & SPEAKER LEFT FRONT White ( + Antenna To power antenna To amplifier or equalizer To the...
... how to set to ON/OFF, see "Subwoofer On and Off" on page 16. 22-EN Connections 1 Blue POWER ANT 2 REMOTE Blue/White TURN-ON 3 Orange ILLUMINATION 4 (CDE-9846 only) Red IGNITION 5 Yellow BATTERY 6 Black GND 7 ~ 8 Gray 9 SPEAKER RIGHT FRONT Gray/ Black ! Violet/ ) Black " SPEAKER RIGHT REAR Violet # Green $ SPEAKER LEFT REAR Green/ Black % White/ Black & SPEAKER LEFT FRONT White ( + Antenna To power antenna To amplifier or equalizer To the...
Owners Manual
Page 24
... Rear (-) Speaker Output Lead (Green/Black) & Left Front (-) Speaker Output Lead (White/Black) ( Left Front (+) Speaker Output Lead (White) ) Front/Subwoofer Output RCA Connectors RED is right and WHITE is left. ~ Fuse Holder (10A) + RCA Extension Cable (Sold Separately) To prevent external noise from entering the audio system. • Locate the unit and route the leads at least 10cm away from the car harness. • Keep the battery power...
... Rear (-) Speaker Output Lead (Green/Black) & Left Front (-) Speaker Output Lead (White/Black) ( Left Front (+) Speaker Output Lead (White) ) Front/Subwoofer Output RCA Connectors RED is right and WHITE is left. ~ Fuse Holder (10A) + RCA Extension Cable (Sold Separately) To prevent external noise from entering the audio system. • Locate the unit and route the leads at least 10cm away from the car harness. • Keep the battery power...
Owners Manual
Page 25
... product. 5 Service performed by over-driving the speaker (amplifier level is required. 3 You must reside in the United States, Puerto Rico or Canada. [WHAT IS COVERED: This Warranty covers defects in materials or workmanship (parts and labor) in your Alpine car audio product has been installed in the product. [WHAT IS NOT COVERED: This Warranty does not cover the following number for...
... product. 5 Service performed by over-driving the speaker (amplifier level is required. 3 You must reside in the United States, Puerto Rico or Canada. [WHAT IS COVERED: This Warranty covers defects in materials or workmanship (parts and labor) in your Alpine car audio product has been installed in the product. [WHAT IS NOT COVERED: This Warranty does not cover the following number for...


