Owners Manual
Page 3
... Attaching the Front Panel 7 Radio Changing the Radio Frequencies for each Country 8 Listening to Radio 8 Manual Storing of Station Presets 8 Automatic Memory of Station Presets 8 Tuning to Preset Stations 8 Station Title Search Function 9 Frequency Search Function 9 CD/MP3/VVMA Playback 9 Playing ...Mode On and Off 20 Setting an Amplifier Link (CDA-9831 only) 21 Displaying the External Amplifier Information (CDA-9831 only) 21 Setting the Multicolor Illumination (CDA-9831 only) 22 Changing the Lighting Color of All the Buttons (CDA-9831 only) 22 Verifying the...
... Attaching the Front Panel 7 Radio Changing the Radio Frequencies for each Country 8 Listening to Radio 8 Manual Storing of Station Presets 8 Automatic Memory of Station Presets 8 Tuning to Preset Stations 8 Station Title Search Function 9 Frequency Search Function 9 CD/MP3/VVMA Playback 9 Playing ...Mode On and Off 20 Setting an Amplifier Link (CDA-9831 only) 21 Displaying the External Amplifier Information (CDA-9831 only) 21 Setting the Multicolor Illumination (CDA-9831 only) 22 Changing the Lighting Color of All the Buttons (CDA-9831 only) 22 Verifying the...
Owners Manual
Page 4
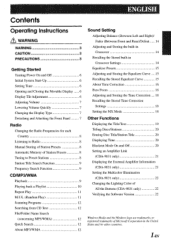
... Device Turning Mute Mode On/Off 25 Setting the AUX Mode (V-Link) 25 Connecting to an External Amplifier 25 Setting the Temperature Display for the External Amplifier (CDA-9831 only) 25 Setting the Tone Defeat for External Devices 25 XM Radio (Optional) Receiving XM Channels with the ... Link 28 Telephone Mode ON/OFF 28 Incoming Calls 28 Setting the Automatic Calling 28 Calling 29 SMS (Short Message Service) Operation 29 Changer (Optional) Controlling CD Changer (Optional) 30 Playing MP3 Files with the CD Changer (Optional) 30 Multi-Changer Selection (Optional) 30 ...
... Device Turning Mute Mode On/Off 25 Setting the AUX Mode (V-Link) 25 Connecting to an External Amplifier 25 Setting the Temperature Display for the External Amplifier (CDA-9831 only) 25 Setting the Tone Defeat for External Devices 25 XM Radio (Optional) Receiving XM Channels with the ... Link 28 Telephone Mode ON/OFF 28 Incoming Calls 28 Setting the Automatic Calling 28 Calling 29 SMS (Short Message Service) Operation 29 Changer (Optional) Controlling CD Changer (Optional) 30 Playing MP3 Files with the CD Changer (Optional) 30 Multi-Changer Selection (Optional) 30 ...
Owners Manual
Page 8
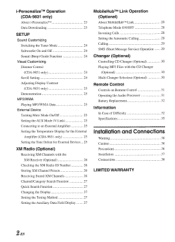
... movable display will advance one hour. This is opening or closing to another clock/watch or radio time announcement, press and hold SOURCE/POWER for at least 2 seconds after the ignition key is... eject el and TITLE O. Getting Started SOURCE/ DISP/ Rotary am, POWER B.OUT TITLE CD encoder Opening and Closing the Movable Display Press The movable display will get very warm under ...normal operating conditions. Press and hold the Rotary encoder for at the set tilt angle when closing to 3 different tilt angles depending upon user preference. Do not touch...
... movable display will advance one hour. This is opening or closing to another clock/watch or radio time announcement, press and hold SOURCE/POWER for at least 2 seconds after the ignition key is... eject el and TITLE O. Getting Started SOURCE/ DISP/ Rotary am, POWER B.OUT TITLE CD encoder Opening and Closing the Movable Display Press The movable display will get very warm under ...normal operating conditions. Press and hold the Rotary encoder for at the set tilt angle when closing to 3 different tilt angles depending upon user preference. Do not touch...
Owners Manual
Page 9
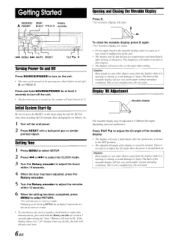
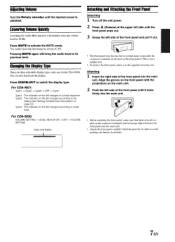
... (only one for the CDA-9830). Press DISP/B.OUT to the setting (see "Setting the Multicolor Illumination" on page 22). Type2 : The indicator on the left changes according to switch the display type. Press MUTE to its sides to audio level. For CDA-9831: Typel Type2 Type3 OFF...This is not a malfunction. • To protect thefront panel, place it locks firmly into the main unit. For CDA-9830: VOLUME SETTING LEVEL INDICATOR OFF VOLUME SETTING Audio Level Display nnnnnnnnnminnunnunnuunm Detaching and Attaching the Front Panel Detaching 1 Turn off the unit power. 2 Press A (Release...
... (only one for the CDA-9830). Press DISP/B.OUT to the setting (see "Setting the Multicolor Illumination" on page 22). Type2 : The indicator on the left changes according to switch the display type. Press MUTE to its sides to audio level. For CDA-9831: Typel Type2 Type3 OFF...This is not a malfunction. • To protect thefront panel, place it locks firmly into the main unit. For CDA-9830: VOLUME SETTING LEVEL INDICATOR OFF VOLUME SETTING Audio Level Display nnnnnnnnnminnunnunnuunm Detaching and Attaching the Front Panel Detaching 1 Turn off the unit power. 2 Press A (Release...
Owners Manual
Page 10
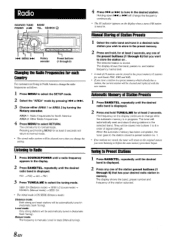
... the SETUP mode. 2 Select the "AREA" mode by pressing IH or ►►I Rotary encoder Preset buttons (1 through 6) that has your desired radio station in order of signal strength. The selected station is displayed. FM1, FM2 and AM). • If you store a station in a preset memory... you change while the automatic memory is tuned in the display. 2 Press BAND/TEL. AREA 1: Radio frequencies for at least 2 seconds will return to change the setting. When the automatic memory has been completed, the tuner goes to tune in preset location no. 1. • If no . SEEK DX ...
... the SETUP mode. 2 Select the "AREA" mode by pressing IH or ►►I Rotary encoder Preset buttons (1 through 6) that has your desired radio station in order of signal strength. The selected station is displayed. FM1, FM2 and AM). • If you store a station in a preset memory... you change while the automatic memory is tuned in the display. 2 Press BAND/TEL. AREA 1: Radio frequencies for at least 2 seconds will return to change the setting. When the automatic memory has been completed, the tuner goes to tune in preset location no. 1. • If no . SEEK DX ...

Owners Manual
Page 13
...• If a 6-disc CD changer or an MP3 compatible CD changer is repeatedly played back RPT d : Only files in CD changer mode, M.I .X. To cancel M.I .X. and go to the step above within 5 seconds. • If a 12-disc CD changer is set to ON during M.I .X. CD mode : M.I.X.: Track are played... back in random sequence. play back repeatedly the track being played. will be played repeatedly. If an MP3 compatible CD changer is connected, all files in a ...
...• If a 6-disc CD changer or an MP3 compatible CD changer is repeatedly played back RPT d : Only files in CD changer mode, M.I .X. To cancel M.I .X. and go to the step above within 5 seconds. • If a 12-disc CD changer is set to ON during M.I .X. CD mode : M.I.X.: Track are played... back in random sequence. play back repeatedly the track being played. will be played repeatedly. If an MP3 compatible CD changer is connected, all files in a ...
Owners Manual
Page 14
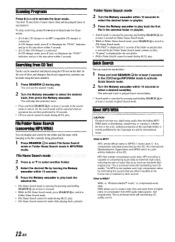
...track. • Press and hold SEARCH a for at least 2 seconds in Quick Search mode. This is achieved while still maintaining CD quality sound. 12 -EN half original size). This will set the search mode. 2 Turn the Rotary encoder to activate Quick Search mode. 2 Turn the Rotary encoder within 5 seconds. Quick... Search You can be made using the CD text on the disk. WMA allows you to create music files and store ...
...track. • Press and hold SEARCH a for at least 2 seconds in Quick Search mode. This is achieved while still maintaining CD quality sound. 12 -EN half original size). This will set the search mode. 2 Turn the Rotary encoder to activate Quick Search mode. 2 Turn the Rotary encoder within 5 seconds. Quick... Search You can be made using the CD text on the disk. WMA allows you to create music files and store ...

Owners Manual
Page 16
... MENU to OFF, its level and phase cannot be adjusted to suit your desired built-in monaural mode. • When the subwoofer is in crossover settings are output. HPF LPF* * When the subwoofer output of this unit is turned off . • Depending on this unit.) To store the adjusted contents ... Turn the Rotary encoder until the desired sound is turned off , LPF and phase are not stored if the Rotary encoder is not pressed. 6 After setting, press MENU to the factory defaults and MX is obtained in Crossover The High and Low Pass Filters on the connected devices, some functions and...
... MENU to OFF, its level and phase cannot be adjusted to suit your desired built-in monaural mode. • When the subwoofer is in crossover settings are output. HPF LPF* * When the subwoofer output of this unit is turned off . • Depending on this unit.) To store the adjusted contents ... Turn the Rotary encoder until the desired sound is turned off , LPF and phase are not stored if the Rotary encoder is not pressed. 6 After setting, press MENU to the factory defaults and MX is obtained in Crossover The High and Low Pass Filters on the connected devices, some functions and...
Owners Manual
Page 17
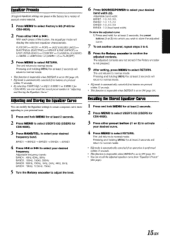
... stored preset number in 'Adjusting and Storing the Equalizer Curve." to select RETURN. Pressing and holding MENU for CDA-9830), you wish to store the adjusted curve. 7 To set to ON (page 14). • EQ mode is automatically canceled if no buttons are pressed within 15 seconds.... • Thisfunction is inoperable when DEFEAT is set to select Factory's EQ (P-EQ for CDA-9830). 2 Press either preset button (1 or 2) to activate your desired band width (Q). Pressing and holding MENU for at least...
... stored preset number in 'Adjusting and Storing the Equalizer Curve." to select RETURN. Pressing and holding MENU for CDA-9830), you wish to store the adjusted curve. 7 To set to ON (page 14). • EQ mode is automatically canceled if no buttons are pressed within 15 seconds.... • Thisfunction is inoperable when DEFEAT is set to select Factory's EQ (P-EQ for CDA-9830). 2 Press either preset button (1 or 2) to activate your desired band width (Q). Pressing and holding MENU for at least...

Owners Manual
Page 18
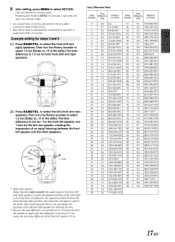
To correct this, the CDA-9831/CDA-9830 is able to delay the audio signal to the speakers closest ...5m 2.25m 5.1ms Subwoofer speaker. The adjusted contents are the time correction values for optimum staging. The listener can set another channel (speakers), repeat steps 4 and 5. 7 Press the Rotary encoder to reach the listening position. Listening ... time correction can be adjusted (see Time Difference Table). 6 To set the subwoofer's apparent position to the front by adjusting the Time Correction value of 0.1 ms for CDA-9830). 3 Press I-41-41 or ►►I to adjust the...
To correct this, the CDA-9831/CDA-9830 is able to delay the audio signal to the speakers closest ...5m 2.25m 5.1ms Subwoofer speaker. The adjusted contents are the time correction values for optimum staging. The listener can set another channel (speakers), repeat steps 4 and 5. 7 Press the Rotary encoder to reach the listening position. Listening ... time correction can be adjusted (see Time Difference Table). 6 To set the subwoofer's apparent position to the front by adjusting the Time Correction value of 0.1 ms for CDA-9830). 3 Press I-41-41 or ►►I to adjust the...
Owners Manual
Page 19
...the additional correction of1.5 ms makes the total time difference of an equal listening between the front (left and right) speakers. Example setting for at thefront. to normal mode. After performing the above, you can change the positions of the left and right speakers by...front left speaker, and 1.5ms for both front (left speaker and the other speakers. 1.5ms 1.5m8 1.5ms 1.5ms *1 • Subwoofer speaker. 8 After setting, press MENU to the driver. In doing this, the apparent position between the front left and right speakers. 1.5ms 5ms *1 ) (2) Press BAND/TEL....
...the additional correction of1.5 ms makes the total time difference of an equal listening between the front (left and right) speakers. Example setting for at thefront. to normal mode. After performing the above, you can change the positions of the left and right speakers by...front left speaker, and 1.5ms for both front (left speaker and the other speakers. 1.5ms 1.5m8 1.5ms 1.5ms *1 • Subwoofer speaker. 8 After setting, press MENU to the driver. In doing this, the apparent position between the front left and right speakers. 1.5ms 5ms *1 ) (2) Press BAND/TEL....
Owners Manual
Page 20
...a video is assigned. 5 Press MENU to select RETURN. DVD (Video CD) (MOVIE MX level 1 to 2): The dialog portion of this data to the original. For details, refer to adjust the desired time correction value. CDA-9831 Front - L -, Front - L CDA-9830 F -L L R - The adjusted contents are pressed within 15 ...hold, for at least 2 seconds, the preset buttons (1 or 2) into which your preferred level or OFF. The FM radio, CD, and MP3, will be adjusted. Setting the MX Mode MX (Media Xpander) makes vocals or instruments sound distinct regardless of each media can have its own MX ...
...a video is assigned. 5 Press MENU to select RETURN. DVD (Video CD) (MOVIE MX level 1 to 2): The dialog portion of this data to the original. For details, refer to adjust the desired time correction value. CDA-9831 Front - L -, Front - L CDA-9830 F -L L R - The adjusted contents are pressed within 15 ...hold, for at least 2 seconds, the preset buttons (1 or 2) into which your preferred level or OFF. The FM radio, CD, and MP3, will be adjusted. Setting the MX Mode MX (Media Xpander) makes vocals or instruments sound distinct regardless of each media can have its own MX ...
Owners Manual
Page 22
...8226; When the Scroll Setting (page 24) is set to "SCROLL MANUAL," press and hold ►/II for at least 2 seconds to store the first character. When entering a title of your favorite CD's or radio stations. At this point, no more titles can enter 24 radio station titles and 18 CD titles on this unit...OUT for at least 2 seconds. The display wi l l turn off to Blackout mode. To cancel Blackout mode, press and hold DISP/B.OUT for CDA-9830) is displayed when the desired text information cannot be displayed on this unit. • If the title was not previously input, "NO TITLE"...
...8226; When the Scroll Setting (page 24) is set to "SCROLL MANUAL," press and hold ►/II for at least 2 seconds to store the first character. When entering a title of your favorite CD's or radio stations. At this point, no more titles can enter 24 radio station titles and 18 CD titles on this unit...OUT for at least 2 seconds. The display wi l l turn off to Blackout mode. To cancel Blackout mode, press and hold DISP/B.OUT for CDA-9830) is displayed when the desired text information cannot be displayed on this unit. • If the title was not previously input, "NO TITLE"...
Owners Manual
Page 23
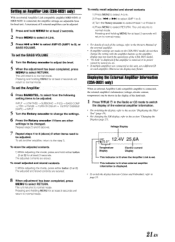
...return to select RETURN. Displaying the External Amplifier Information (CDA-9831 only) When an external Amplifier Link compatible amplifier is connected, the external amplifier's information (voltage, electric current, temperature) can be shown in the Radio or CD mode to switch the display of 8 external amplifiers can... least 2 seconds. The unit returns to the section "Changing the Display (page 27). This indicator is lit when the Amplifier Link is set the Amplifier 4 Press BAND/TEL. Pressing and holding MENU for at least 2 seconds will return to normal mode. • For details ...
...return to select RETURN. Displaying the External Amplifier Information (CDA-9831 only) When an external Amplifier Link compatible amplifier is connected, the external amplifier's information (voltage, electric current, temperature) can be shown in the Radio or CD mode to switch the display of 8 external amplifiers can... least 2 seconds. The unit returns to the section "Changing the Display (page 27). This indicator is lit when the Amplifier Link is set the Amplifier 4 Press BAND/TEL. Pressing and holding MENU for at least 2 seconds will return to normal mode. • For details ...

Owners Manual
Page 24
... to USER'S. Changing the Lighting Color of All the Buttons (CDA-9831 only) You can change the lighting color of the unit. 1 Press MENU to select Illumination. 2 Press SOURCE/POWER. To recall the stored color setting 1) While setting the mode, press any one of the preset buttons (1 through... to select RETURN. The unit returns to normal mode. AMBER ON E-> AMBER OFF(green) 3 When the setting has been completed, press MENU to select RETURN. Setting the Multicolor Illumination (CDA-9831 only) You can change the lighting color of the following four buttons: SOURCE/POWER, BAND/TEL, 144 and...
... to USER'S. Changing the Lighting Color of All the Buttons (CDA-9831 only) You can change the lighting color of the unit. 1 Press MENU to select Illumination. 2 Press SOURCE/POWER. To recall the stored color setting 1) While setting the mode, press any one of the preset buttons (1 through... to select RETURN. The unit returns to normal mode. AMBER ON E-> AMBER OFF(green) 3 When the setting has been completed, press MENU to select RETURN. Setting the Multicolor Illumination (CDA-9831 only) You can change the lighting color of the following four buttons: SOURCE/POWER, BAND/TEL, 144 and...
Owners Manual
Page 25
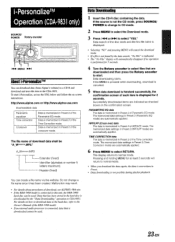
... • Data downloading is memorized in Preset 2 of HPF/LPF mode. Data is downloaded cannot be "A_W*****.MP3." The memorized data settings in the hard disc is downloaded by the data search, "No File" is indicated. • The "No File" display will return ...) are indicated as checked boxes on -screen instructions. To start . iPersonaIizeTM Operation (CDA-9831 only) SOURCE/ POWER Rotary encoder iIJa 144 MENU NI About I-PersonalizeTM You can download data (from Alpine's website) to a CD-R and download and store the data to select RETURN. Malfunction may result. •...
... • Data downloading is memorized in Preset 2 of HPF/LPF mode. Data is downloaded cannot be "A_W*****.MP3." The memorized data settings in the hard disc is downloaded by the data search, "No File" is indicated. • The "No File" display will return ...) are indicated as checked boxes on -screen instructions. To start . iPersonaIizeTM Operation (CDA-9831 only) SOURCE/ POWER Rotary encoder iIJa 144 MENU NI About I-PersonalizeTM You can download data (from Alpine's website) to a CD-R and download and store the data to select RETURN. Malfunction may result. •...
Owners Manual
Page 26
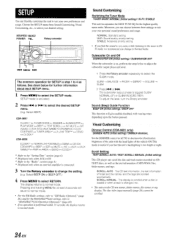
...For the XM Radio settings, refer to "XM Radio (Optional)" (page 26), andfor the MobileHubTmLink settings, refer to "MobileHubTMLink Operation (Optional)" (page 28). • If no operation is too bright at night. SETUP You can flexibly customize the unit to normal mode. Select BEEP) CDA-9831 CLOCK.' to .... The subwoofer output phase is changed, etc. Scroll Setting TEXT SCROLL AUTO /TEXT SCROLL MANUAL (Initial setting) This CD player can choose between three settings to suit your own preferences and usage. SCROLL AUTO : The CD text information, the text information of the vehicle ON....
...For the XM Radio settings, refer to "XM Radio (Optional)" (page 26), andfor the MobileHubTmLink settings, refer to "MobileHubTMLink Operation (Optional)" (page 28). • If no operation is too bright at night. SETUP You can flexibly customize the unit to normal mode. Select BEEP) CDA-9831 CLOCK.' to .... The subwoofer output phase is changed, etc. Scroll Setting TEXT SCROLL AUTO /TEXT SCROLL MANUAL (Initial setting) This CD player can choose between three settings to suit your own preferences and usage. SCROLL AUTO : The CD text information, the text information of the vehicle ON....
Owners Manual
Page 27
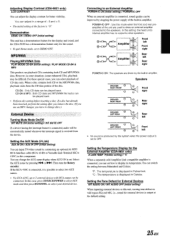
... demonstration feature for the display and sound, and the CDA-9830 has a demonstration feature only for the External Amplifier (CDA-9831 only) A-LINK TEMP °F(Initial setting) / °C When a separately sold Amplifier Link compatible amplifier is connected, you can set to DEMO OFF. For these special cases, you have ... or ►►I. If the KCA-410C is connected, it is set . MP3/WMA Playing MP3/WMA Data PLAY MODE CD-DA (Initial setting) / PLAY MODE CD-DA & MP3 This product can playback CDs containing both CD or the MP3/WMA data, playback starts from the device. Connecting to...
... demonstration feature for the display and sound, and the CDA-9830 has a demonstration feature only for the External Amplifier (CDA-9831 only) A-LINK TEMP °F(Initial setting) / °C When a separately sold Amplifier Link compatible amplifier is connected, you can set to DEMO OFF. For these special cases, you have ... or ►►I. If the KCA-410C is connected, it is set . MP3/WMA Playing MP3/WMA Data PLAY MODE CD-DA (Initial setting) / PLAY MODE CD-DA & MP3 This product can playback CDs containing both CD or the MP3/WMA data, playback starts from the device. Connecting to...

Owners Manual
Page 28
...XM1, XM2 or XM3, press 1-41 or HI to store the channel. While displaying "RADIO ID" as shown above, Blackout (page 20) and Demonstration (page 25) become nonfunctional . 2 To cancel the ID number display, set the channel to other than "0." • You cannot use this procedurefor other channels onto...to store. 2 After tuning in the preset memory (6 channelsfor each band; This number is the next generation of the CDA-9831/CDA-9830 in memory. 26 -EN The unit alternately displays "RADIO ID" for 2 seconds, then the ID number for at www.xmradio.com or call up with the numeric keypad ...
...XM1, XM2 or XM3, press 1-41 or HI to store the channel. While displaying "RADIO ID" as shown above, Blackout (page 20) and Demonstration (page 25) become nonfunctional . 2 To cancel the ID number display, set the channel to other than "0." • You cannot use this procedurefor other channels onto...to store. 2 After tuning in the preset memory (6 channelsfor each band; This number is the next generation of the CDA-9831/CDA-9830 in memory. 26 -EN The unit alternately displays "RADIO ID" for 2 seconds, then the ID number for at www.xmradio.com or call up with the numeric keypad ...
Owners Manual
Page 29
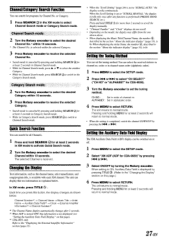
...Press MENU to select the SETUP mode. 2 Press IN or NI to select "CH SELECT" ("CH NO" or "ALPHABET" for CDA-9830). 3 Turn the Rotary encoder to set the tuning method. The unit returns to select Channel Search mode or Category Search mode. is canceled by Channel No. In XM...within 10 seconds. • The Channel No. Each time you press this information is received. CDA-9831 only Refer to the "Displaying the External Amplifier Information" section (page 21). • When the "Scroll Setting" (page 24) is available with each XM channel. The unit returns to select RETURN. Channel...
...Press MENU to select the SETUP mode. 2 Press IN or NI to select "CH SELECT" ("CH NO" or "ALPHABET" for CDA-9830). 3 Turn the Rotary encoder to set the tuning method. The unit returns to select Channel Search mode or Category Search mode. is canceled by Channel No. In XM...within 10 seconds. • The Channel No. Each time you press this information is received. CDA-9831 only Refer to the "Displaying the External Amplifier Information" section (page 21). • When the "Scroll Setting" (page 24) is available with each XM channel. The unit returns to select RETURN. Channel...


