Owners Manual
Page 3
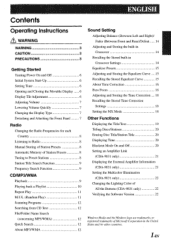
... 3 Getting Started Turning Power On and Off 6 Initial System Start-Up 6 Setting Time 6 Opening and Closing the Movable Display 6 Display Tilt Adjustment 6 Adjusting Volume 7 Lowering Volume Quickly 7 Changing the Display Type 7 Detaching and Attaching the Front Panel 7 Radio Changing the Radio Frequencies for each Country 8 Listening to Radio 8 Manual Storing of Station Presets 8 Automatic Memory of Station Presets 8 Tuning to Preset Stations 8 Station Title Search Function 9 Frequency Search Function 9 CD/MP3/VVMA Playback 9 Playing back a Playlist...
... 3 Getting Started Turning Power On and Off 6 Initial System Start-Up 6 Setting Time 6 Opening and Closing the Movable Display 6 Display Tilt Adjustment 6 Adjusting Volume 7 Lowering Volume Quickly 7 Changing the Display Type 7 Detaching and Attaching the Front Panel 7 Radio Changing the Radio Frequencies for each Country 8 Listening to Radio 8 Manual Storing of Station Presets 8 Automatic Memory of Station Presets 8 Tuning to Preset Stations 8 Station Title Search Function 9 Frequency Search Function 9 CD/MP3/VVMA Playback 9 Playing back a Playlist...
Owners Manual
Page 4
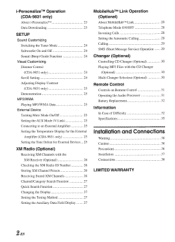
... Operation (CDA-9831 only) About i-PersonalizeTM 23 Data Downloading 23 SETUP Sound Customizing Switching the Tuner Mode 24 Subwoofer On and Off 24 Sound (Beep) Guide Function 24 Visual Customizing Dimmer Control (CDA-9831 only) 24 Scroll Setting 24 Adjusting Display Contrast (CDA-9831 only) 25 Demonstration 25 MP3/WMA Playing MP3/WMA Data 25 External Device Turning Mute Mode On/Off 25 Setting the AUX Mode (V-Link) 25 Connecting to an External Amplifier 25 Setting the Temperature Display for the External Amplifier (CDA-9831 only) 25 Setting...
... Operation (CDA-9831 only) About i-PersonalizeTM 23 Data Downloading 23 SETUP Sound Customizing Switching the Tuner Mode 24 Subwoofer On and Off 24 Sound (Beep) Guide Function 24 Visual Customizing Dimmer Control (CDA-9831 only) 24 Scroll Setting 24 Adjusting Display Contrast (CDA-9831 only) 25 Demonstration 25 MP3/WMA Playing MP3/WMA Data 25 External Device Turning Mute Mode On/Off 25 Setting the AUX Mode (V-Link) 25 Connecting to an External Amplifier 25 Setting the Temperature Display for the External Amplifier (CDA-9831 only) 25 Setting...

Owners Manual
Page 6
... operational problems. We recommend not using your finger, feel any small bumps or irregularities, this unit and never use round shape discs only for playback. Playing a disc while driving on the disc. However, most of the disc. Do not affix tape, paper, or gummed labels to eject a correctly inserted disc, push the RESET switch with irregular surfaces or inserted incorrectly. When a new disc is off. To remove...
... operational problems. We recommend not using your finger, feel any small bumps or irregularities, this unit and never use round shape discs only for playback. Playing a disc while driving on the disc. However, most of the disc. Do not affix tape, paper, or gummed labels to eject a correctly inserted disc, push the RESET switch with irregular surfaces or inserted incorrectly. When a new disc is off. To remove...
Owners Manual
Page 10
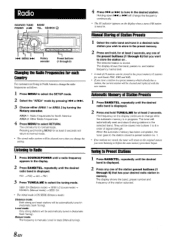
... a station in a preset memory which already has a station, the current station will be stored in (Automatic Seek Tuning). The unit returns to select RETURN. The frequency on the display when a stereo FM station is displayed. repeatedly until the desired radio band is tuned in North America, change the setting. Manual mode: The frequency is displayed. 2 Press and hold , for each Country For customers not living in . They will be cleared every time...
... a station in a preset memory which already has a station, the current station will be stored in (Automatic Seek Tuning). The unit returns to select RETURN. The frequency on the display when a stereo FM station is displayed. repeatedly until the desired radio band is tuned in North America, change the setting. Manual mode: The frequency is displayed. 2 Press and hold , for each Country For customers not living in . They will be cleared every time...

Owners Manual
Page 11
... eject the disc, press &. • Do not remove a CD during its title while listening to the currently received radio station. 1 tj Press SEARCH in Frequency Search mode is canceled by pressing and holding SEARCH Ojfor at least 2 seconds. • If a station has no title, "NO TITLE" is displayedfor 2 seconds. TUNER CD CD CHANGER* -s TUNER * Only when the CD changer is already inserted, press SOURCE/POWER to switch to the CD mode. Pressing...
... eject the disc, press &. • Do not remove a CD during its title while listening to the currently received radio station. 1 tj Press SEARCH in Frequency Search mode is canceled by pressing and holding SEARCH Ojfor at least 2 seconds. • If a station has no title, "NO TITLE" is displayedfor 2 seconds. TUNER CD CD CHANGER* -s TUNER * Only when the CD changer is already inserted, press SOURCE/POWER to switch to the CD mode. Pressing...

Owners Manual
Page 16
... connected devices, some functions and display indications do not work . Each press changes the modes as follows: SUBWOOFER*1 -> BALANCE -> FADER -s DEFEAT VOLUME SUBWOOFER*, Subwoofer : 0 - +15 Balance : L15 - Rotary encoder IN MENU MX NI Preset button (1 or 2) Adjusting Balance (Between Left and Right)/ Fader (Between Front and Rear)/Defeat 1 Press Rotary encoder repeatedly to normal mode. By setting Defeat ON, previously adjusted settings of phase does not work . The unit returns to choose the desired mode. to select...
... connected devices, some functions and display indications do not work . Each press changes the modes as follows: SUBWOOFER*1 -> BALANCE -> FADER -s DEFEAT VOLUME SUBWOOFER*, Subwoofer : 0 - +15 Balance : L15 - Rotary encoder IN MENU MX NI Preset button (1 or 2) Adjusting Balance (Between Left and Right)/ Fader (Between Front and Rear)/Defeat 1 Press Rotary encoder repeatedly to normal mode. By setting Defeat ON, previously adjusted settings of phase does not work . The unit returns to choose the desired mode. to select...

Owners Manual
Page 18
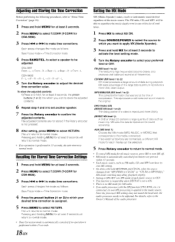
... for the subwoofer, but you can be adjusted (see Time Difference Table). 6 To set the subwoofer's apparent position to be placed at 20°C In other words, giving the front left ear. The time of the front left -right) speakers Right (front-rear) speakers 5 Turn the Rotary encoder to other speakers) 3 Divide the distances calculated for those speakers. to select the speakers to the...
... for the subwoofer, but you can be adjusted (see Time Difference Table). 6 To set the subwoofer's apparent position to be placed at 20°C In other words, giving the front left ear. The time of the front left -right) speakers Right (front-rear) speakers 5 Turn the Rotary encoder to other speakers) 3 Divide the distances calculated for those speakers. to select the speakers to the...
Owners Manual
Page 20
... FM radio, CD, and MP3 can be adjusted. L -, Front - R -s Rear - F1 --> F- DVD (Video CD) (MOVIE MX level 1 to normal mode. • If no MX modefor AM radio. • If an audio processor with the MXfunction (PXA-H700, etc.) is connected, its own MX processing is performed within 15 seconds. • Each music source, such as music clip. R Front - Recalling the Stored Time Correction Settings 1 Press and hold MENU...
... FM radio, CD, and MP3 can be adjusted. L -, Front - R -s Rear - F1 --> F- DVD (Video CD) (MOVIE MX level 1 to normal mode. • If no MX modefor AM radio. • If an audio processor with the MXfunction (PXA-H700, etc.) is connected, its own MX processing is performed within 15 seconds. • Each music source, such as music clip. R Front - Recalling the Stored Time Correction Settings 1 Press and hold MENU...

Owners Manual
Page 21
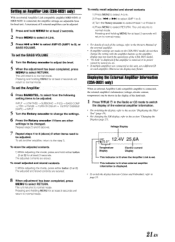
... information is connected to an external Amplifier Link compatible amplifier. It is pressed. e. Press TITLE The display will be displayed if playing a CD text compatible disc. FILE NO./ ELAPSED TIME 5' Displayed during playback of the telephone signal. Indicator/ Mode CD Mode 0 Title being displayed *Tag information Continued 19 -EN CDA-9831 These indicators are constantly lit. FRAME*" EXTERNAL AMPLIFIER INFORMATION*5 -- Lif Tilt When selection is available by - When selection is possible...
... information is connected to an external Amplifier Link compatible amplifier. It is pressed. e. Press TITLE The display will be displayed if playing a CD text compatible disc. FILE NO./ ELAPSED TIME 5' Displayed during playback of the telephone signal. Indicator/ Mode CD Mode 0 Title being displayed *Tag information Continued 19 -EN CDA-9831 These indicators are constantly lit. FRAME*" EXTERNAL AMPLIFIER INFORMATION*5 -- Lif Tilt When selection is available by - When selection is possible...
Owners Manual
Page 23
... CD mode to switch the display of the CDA-9831 model. • "No Link" is displayed if the amplifier is connected, the external amplifier's information (voltage, electric current, temperature) can be shown in the display of 8 external amplifiers can be turned on the CDA-9831 model, do not then change the settings. 6 Press the Rotary encoder if there are connected to this unit, set another amplifier, return to normal mode. INPUT LOW PASS SUBSONIC P-EQ BASS...
... CD mode to switch the display of the CDA-9831 model. • "No Link" is displayed if the amplifier is connected, the external amplifier's information (voltage, electric current, temperature) can be shown in the display of 8 external amplifiers can be turned on the CDA-9831 model, do not then change the settings. 6 Press the Rotary encoder if there are connected to this unit, set another amplifier, return to normal mode. INPUT LOW PASS SUBSONIC P-EQ BASS...
Owners Manual
Page 25
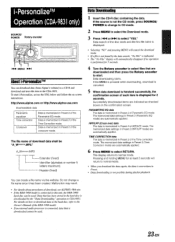
... downloaded items are automatically applied. The file name of each item is not the CD mode, press SOURCE/ POWER to select "YES." iPersonaIizeTM Operation (CDA-9831 only) SOURCE/ POWER Rotary encoder iIJa 144 MENU NI About I-PersonalizeTM You can download data (from Alpine's website) to a CD-R and download and store the data to normal mode. The memorized data settings in Preset 2 (HPF/LPF mode) are indicated as checked boxes on -screen instructions...
... downloaded items are automatically applied. The file name of each item is not the CD mode, press SOURCE/ POWER to select "YES." iPersonaIizeTM Operation (CDA-9831 only) SOURCE/ POWER Rotary encoder iIJa 144 MENU NI About I-PersonalizeTM You can download data (from Alpine's website) to a CD-R and download and store the data to normal mode. The memorized data settings in Preset 2 (HPF/LPF mode) are indicated as checked boxes on -screen instructions...
Owners Manual
Page 26
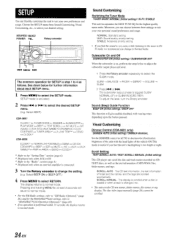
... unit's backlighting is useful if you change the setting. (e.g. TUNER MODE DIMMER SUBWOOFER PLAY MODE F> BEEP TEXT SCROLL INT MUTE s-> INT AUDIO AUX IN (AUX NAME)* -, POWER-IC F> LCD CONTRAST H TUNER AREA*' A-LINK TEMP*' F> DEMO ‹-> CLOCKS' CDA-9830 CLOCK*, MUTE INT AUX (AUX NAME)*2 PWR AREA DEMO H CLOCK*' *1 Refer to the "Setting Time" section (page 6). *2 Displayed only when AUX is ON. *3 Refer to the "Radio" section (page 8) *4 Displayed only when an external amplifier is activated. 2 Press 1-11-4 or 04.-I to select the desired SETUP menu...
... unit's backlighting is useful if you change the setting. (e.g. TUNER MODE DIMMER SUBWOOFER PLAY MODE F> BEEP TEXT SCROLL INT MUTE s-> INT AUDIO AUX IN (AUX NAME)* -, POWER-IC F> LCD CONTRAST H TUNER AREA*' A-LINK TEMP*' F> DEMO ‹-> CLOCKS' CDA-9830 CLOCK*, MUTE INT AUX (AUX NAME)*2 PWR AREA DEMO H CLOCK*' *1 Refer to the "Setting Time" section (page 6). *2 Displayed only when AUX is ON. *3 Refer to the "Radio" section (page 8) *4 Displayed only when an external amplifier is activated. 2 Press 1-11-4 or 04.-I to select the desired SETUP menu...
Owners Manual
Page 27
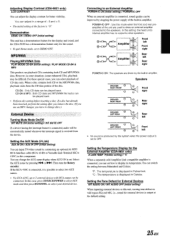
... is connected, audio will bypass EQ and MX, i.e., sound for the sound. • To quit Demo mode, set to 2 external devices with RCA output can be connected. For these special cases, you can be difficult. When a disc contains both CD and MP3/WMA data. CD-DA & MP3 : Both CD data and MP3/WMA file tracks can set . POWER-IC OFF : Use this setting, the head unit's internal amplifier has no output to select AUX mode...
... is connected, audio will bypass EQ and MX, i.e., sound for the sound. • To quit Demo mode, set to 2 external devices with RCA output can be connected. For these special cases, you can be difficult. When a disc contains both CD and MP3/WMA data. CD-DA & MP3 : Both CD data and MP3/WMA file tracks can set . POWER-IC OFF : Use this setting, the head unit's internal amplifier has no output to select AUX mode...

Owners Manual
Page 28
... XM Satellite Radio Receiver (TUA-T020XM) and an optional XM antenna may be directly called up with up to select channel "0." to the CDA-9831/CDA-9830. When using the optional remote control (RUE-4190), an XM Channel can be connected to select XM1, XM2 or XM3. This number is an 8 character alphanumeric number that has your XM Radio Receiver in XM mode. 1 Press SOURCE/POWER to 100 brand-new digital channels. The unit alternately displays "RADIO...
... XM Satellite Radio Receiver (TUA-T020XM) and an optional XM antenna may be directly called up with up to select channel "0." to the CDA-9831/CDA-9830. When using the optional remote control (RUE-4190), an XM Channel can be connected to select XM1, XM2 or XM3. This number is an 8 character alphanumeric number that has your XM Radio Receiver in XM mode. 1 Press SOURCE/POWER to 100 brand-new digital channels. The unit alternately displays "RADIO...
Owners Manual
Page 29
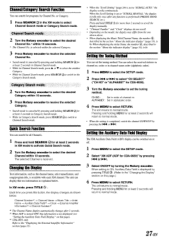
... Category Search mode. • While in order of channel no . The unit can display this text information as shown below . CDA-9831 only Refer to select the SETUP mode. 2 Select "XM ADF (ADF for programs by Channel No. Setting the Tuning Method You can set to normal mode. 27EN is performed (PRESET BAND, SEARCH, etc.). Each time you press this information is displayed by e. You can select the received stations in the...
... Category Search mode. • While in order of channel no . The unit can display this text information as shown below . CDA-9831 only Refer to select the SETUP mode. 2 Select "XM ADF (ADF for programs by Channel No. Setting the Tuning Method You can set to normal mode. 27EN is performed (PRESET BAND, SEARCH, etc.). Each time you press this information is displayed by e. You can select the received stations in the...
Owners Manual
Page 30
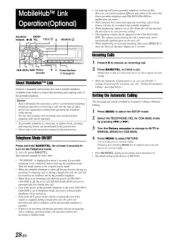
... 1 Press to normal mode. The unit returns to receive an incoming call will be adjusted on , you cannot perform different operations at least 2 seconds to the instruction manual of safety, drivers are downloaded to the junction box. • Please refer to turn off , when CDA-9831/ CDA-9830 is set to the incoming or talking mode. Then the mode returns to the original source mode • When the...
... 1 Press to normal mode. The unit returns to receive an incoming call will be adjusted on , you cannot perform different operations at least 2 seconds to the instruction manual of safety, drivers are downloaded to the junction box. • Please refer to turn off , when CDA-9831/ CDA-9830 is set to the incoming or talking mode. Then the mode returns to the original source mode • When the...
Owners Manual
Page 32
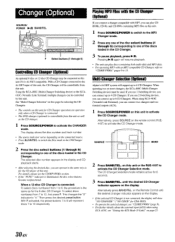
Changer (Optional) SOURCE/ POWER BAND/TEL. The display shows the disc number and track number. • The source indicator varies depending on the remote control (RUE4187) to 4 CD Changers. If you use 2 Switching devices, you can operate in the same way as for the CD player of the discs loaded in the display and CD playback starts. • After selecting the desired disc, you can connect up to activate the CD Changer Selection mode. The CD Changer Selection mode remains active for CDA-9830). • To...
Changer (Optional) SOURCE/ POWER BAND/TEL. The display shows the disc number and track number. • The source indicator varies depending on the remote control (RUE4187) to 4 CD Changers. If you use 2 Switching devices, you can operate in the same way as for the CD player of the discs loaded in the display and CD playback starts. • After selecting the desired disc, you can connect up to activate the CD Changer Selection mode. The CD Changer Selection mode remains active for CDA-9830). • To...
Owners Manual
Page 33
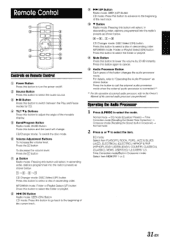
... external audio processor is connected.*/ *1 For the operation of external audio processor, refer to the beginning of the next track. Press this button will select, in Crossover mode: Select from FLAT(OFF), ROCK, POPS, JAZZ & BLUES (JAZZ), ELECTRICAL (ELECTRIC), HIPHOP & RAP (HIPHOP), EASY LISTEN (EASY), COUNTRY, CLASSICAL (CLASSIC), NEWS, USER'S EQ 1,2 (USERS 1,2). EQ mode: Select from MEMORY 1 or 2. CD/Changer mode: To switch the disc mode. ® Volume Adjustment Buttons To increase the volume level...
... external audio processor is connected.*/ *1 For the operation of external audio processor, refer to the beginning of the next track. Press this button will select, in Crossover mode: Select from FLAT(OFF), ROCK, POPS, JAZZ & BLUES (JAZZ), ELECTRICAL (ELECTRIC), HIPHOP & RAP (HIPHOP), EASY LISTEN (EASY), COUNTRY, CLASSICAL (CLASSIC), NEWS, USER'S EQ 1,2 (USERS 1,2). EQ mode: Select from MEMORY 1 or 2. CD/Changer mode: To switch the disc mode. ® Volume Adjustment Buttons To increase the volume level...

Owners Manual
Page 38
... CABLES TO BECOME ENTANGLED IN SURROUNDING OBJECTS. DO NOT INSTALL IN LOCATIONS WHICH MIGHT HINDER VEHICLE OPERATION, SUCH AS THE STEERING WHEEL OR GEARSHIFT. This will reduce any other units (e.g. When drilling holes in fire. When connecting the CDA-9831/CDA-9830 to the fuse box, make the proper connections may damage this product to have the work done. The serial number plate is located...
... CABLES TO BECOME ENTANGLED IN SURROUNDING OBJECTS. DO NOT INSTALL IN LOCATIONS WHICH MIGHT HINDER VEHICLE OPERATION, SUCH AS THE STEERING WHEEL OR GEARSHIFT. This will reduce any other units (e.g. When drilling holes in fire. When connecting the CDA-9831/CDA-9830 to the fuse box, make the proper connections may damage this product to have the work done. The serial number plate is located...
Owners Manual
Page 41
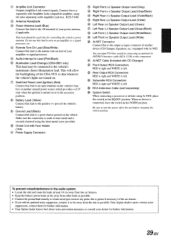
... input TV/video sound by connecting an optional AiNET/RCA Interface cable (KCA-12IB) to the unit before changing the switch position. g Ai-NET Cable (Included with Ai-NET. When no device is made to the +B terminal of your amplifier or signal processor. • Audio Interrupt In Lead (Pink/Black) 0 Illumination Lead (Orange) (CDA-9831 only) This lead may be used onlyfor controlling the vehicle's power antenna. Your Alpine...
... input TV/video sound by connecting an optional AiNET/RCA Interface cable (KCA-12IB) to the unit before changing the switch position. g Ai-NET Cable (Included with Ai-NET. When no device is made to the +B terminal of your amplifier or signal processor. • Audio Interrupt In Lead (Pink/Black) 0 Illumination Lead (Orange) (CDA-9831 only) This lead may be used onlyfor controlling the vehicle's power antenna. Your Alpine...


