Owners Manual
Page 1
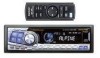
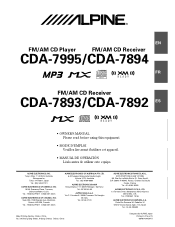
..., Charles De Gaulle Cedex, France Tel.: 01-48 63 89 89 ALPINE ELECTRONICS OF U.K., LTD. 13 Tanners Drive, Blakelands, Milton Keynes MK14 5BU, U.K. R EN FM/AM CD Player FM/AM CD Receiver CDA-7995/CDA-7894 FR FM/AM CD Receiver CDA-7893/CDA-7892 ES ES • OWNER'S MANUAL Please read before using this equipment. • MODE D'EMPLOI Veuillez lire...
..., Charles De Gaulle Cedex, France Tel.: 01-48 63 89 89 ALPINE ELECTRONICS OF U.K., LTD. 13 Tanners Drive, Blakelands, Milton Keynes MK14 5BU, U.K. R EN FM/AM CD Player FM/AM CD Receiver CDA-7995/CDA-7894 FR FM/AM CD Receiver CDA-7893/CDA-7892 ES ES • OWNER'S MANUAL Please read before using this equipment. • MODE D'EMPLOI Veuillez lire...
Owners Manual
Page 3
... an External Amplifier (CDA-7894/CDA-7893/CDA-7892 Only) .. 16 Setting the Defeat of the External Input ......... 16 Demonstration 17 Adjusting Display Contrast (CDA-7995 only 17 Radio Operation Manual Tuning 18 Automatic Seek Tuning 18 Manual Storing of Station Presets 18 Automatic Memory of Station Presets 19 Tuning to Preset Stations 19 CD Player Operation Opening and Closing...
... an External Amplifier (CDA-7894/CDA-7893/CDA-7892 Only) .. 16 Setting the Defeat of the External Input ......... 16 Demonstration 17 Adjusting Display Contrast (CDA-7995 only 17 Radio Operation Manual Tuning 18 Automatic Seek Tuning 18 Manual Storing of Station Presets 18 Automatic Memory of Station Presets 19 Tuning to Preset Stations 19 CD Player Operation Opening and Closing...
Owners Manual
Page 8
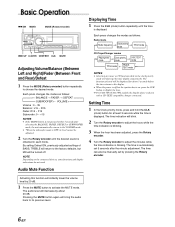
...The audio level will bring the audio back to display the time. •∗ For CDA-7893/CDA-7892 models, the display above is obtained in the clock priority mode will be adjusted. ... the time is blinking. The time can also be turned off but MX will be manually set 5 seconds after selecting the BALANCE, FADER, DEFEAT or SUBWOOFER mode, the unit ...pressing the Rotary encoder. Each press changes the modes as follows: Radio mode → Radio frequency → Clock priority → mode TITLE mode CD Player/Changer modes → Playing time mode → Clock priority mode...
...The audio level will bring the audio back to display the time. •∗ For CDA-7893/CDA-7892 models, the display above is obtained in the clock priority mode will be adjusted. ... the time is blinking. The time can also be turned off but MX will be manually set 5 seconds after selecting the BALANCE, FADER, DEFEAT or SUBWOOFER mode, the unit ...pressing the Rotary encoder. Each press changes the modes as follows: Radio mode → Radio frequency → Clock priority → mode TITLE mode CD Player/Changer modes → Playing time mode → Clock priority mode...
Owners Manual
Page 11
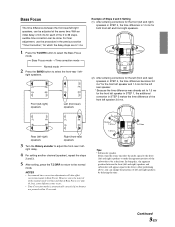
...the delay steps are pressed within 15 seconds. 3.0ms 1.5ms 1.5ms 1.5ms ∗ 1.5ms Tips * Subwoofer speaker. However, since the interval of the manual mode is 0.1ms and that of Bass Focus is 1 step (0.3ms), some difference may occur. • Time Correction mode is 1.5 ms for both front-...RR Front (left-right) speakers FL FR → RL RR Left (front-rear) speakers Example of the 0 to the driver. NOTES • Any manual time correction adjustments will appear equal to 39 steps, audible time correction can be adjusted at the front. Delay (turn the rotary encoder) the audio...
...the delay steps are pressed within 15 seconds. 3.0ms 1.5ms 1.5ms 1.5ms ∗ 1.5ms Tips * Subwoofer speaker. However, since the interval of the manual mode is 0.1ms and that of Bass Focus is 1 step (0.3ms), some difference may occur. • Time Correction mode is 1.5 ms for both front-...RR Front (left-right) speakers FL FR → RL RR Left (front-rear) speakers Example of the 0 to the driver. NOTES • Any manual time correction adjustments will appear equal to 39 steps, audible time correction can be adjusted at the front. Delay (turn the rotary encoder) the audio...

Owners Manual
Page 14
...when the desired text information cannot be displayed when an MP3 file contains no Text data. Radio mode: ↓ FREQUENCY DISPLAY ↓ CLOCK DISPLAY ↓ TITLE DISPLAY CD mode: (Text is displayed for the CDA-7893/CDA7892 models when a compatible changer with this device, depending on the character type. •...; The CD changer must also be CD Text compatible for the Text information to be displayed. • When the Scroll Setting (refer to page 15) is set to "SCROLL MANUAL", press and hold the TITLE button for the CDA-7893/CDA7892 models. ∗2 If an ...
...when the desired text information cannot be displayed when an MP3 file contains no Text data. Radio mode: ↓ FREQUENCY DISPLAY ↓ CLOCK DISPLAY ↓ TITLE DISPLAY CD mode: (Text is displayed for the CDA-7893/CDA7892 models when a compatible changer with this device, depending on the character type. •...; The CD changer must also be CD Text compatible for the Text information to be displayed. • When the Scroll Setting (refer to page 15) is set to "SCROLL MANUAL", press and hold the TITLE button for the CDA-7893/CDA7892 models. ∗2 If an ...
Owners Manual
Page 16
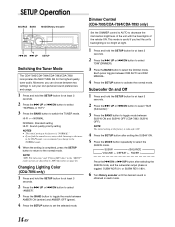
... the BAND button to toggle mode between DIM AUTO and DIM MANUAL. 4 Press the SETUP button to activate the normal mode. SETUP Operation SOURCE BAND MODE/Rotary encoder g DN f UP SETUP Switching the Tuner Mode The CDA-7995/CDA-7894/CDA-7893/CDA-7892 incorporates the MAX TUNE SQ for at least 3 seconds.... f UP or g DN button to select "NORMAL or HI-FI." 3 Press the BAND button to switch the TUNER mode. Dimmer Control (CDA-7995/CDA-7894/CDA-7893 only) Set the DIMMER control to AUTO to the normal mode. Moreover, you change to the NORMAL mode. 4 When the setting is very noisy...
... the BAND button to toggle mode between DIM AUTO and DIM MANUAL. 4 Press the SETUP button to activate the normal mode. SETUP Operation SOURCE BAND MODE/Rotary encoder g DN f UP SETUP Switching the Tuner Mode The CDA-7995/CDA-7894/CDA-7893/CDA-7892 incorporates the MAX TUNE SQ for at least 3 seconds.... f UP or g DN button to select "NORMAL or HI-FI." 3 Press the BAND button to switch the TUNER mode. Dimmer Control (CDA-7995/CDA-7894/CDA-7893 only) Set the DIMMER control to AUTO to the normal mode. Moreover, you change to the NORMAL mode. 4 When the setting is very noisy...

Owners Manual
Page 17
...MANUAL (For CDA-7892 model: MANU is displayed). • SCR AUTO: the CD text information, the text information of MP3 files, folder names, and ID3 tags. (This function can be used for CDA-7893/CDA-7892 models if the changer compatible with CD-...SETUP button again to return to normal operation. NOTE The initial setting at the factory is "SCR MANUAL." • The unit scrolls CD text names, folder names, file names or ID3 tag display. NOTE When using the Versatile Link ... BAND button to turn on or off the MUTE mode. Scroll Setting This CD player can connect two external inputs.
...MANUAL (For CDA-7892 model: MANU is displayed). • SCR AUTO: the CD text information, the text information of MP3 files, folder names, and ID3 tags. (This function can be used for CDA-7893/CDA-7892 models if the changer compatible with CD-...SETUP button again to return to normal operation. NOTE The initial setting at the factory is "SCR MANUAL." • The unit scrolls CD text names, folder names, file names or ID3 tag display. NOTE When using the Versatile Link ... BAND button to turn on or off the MUTE mode. Scroll Setting This CD player can connect two external inputs.
Owners Manual
Page 20
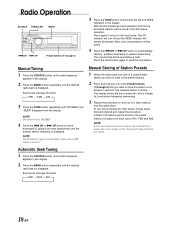
... g DN or f UP button to 5 other bands, simply select the band desired and repeat the procedure. The display shows the band, preset No. Manual Tuning 1 Press the SOURCE button until a radio frequency appears in the display. 2 Press the BAND button repeatedly until the desired station frequency is tuned in.... Manual Storing of Station Presets 1 Select the radio band and tune in a desired radio station you wish to store in the preset memory. 2 Press and hold any one of 18 stations can ...
... g DN or f UP button to 5 other bands, simply select the band desired and repeat the procedure. The display shows the band, preset No. Manual Tuning 1 Press the SOURCE button until a radio frequency appears in the display. 2 Press the BAND button repeatedly until the desired station frequency is tuned in.... Manual Storing of Station Presets 1 Select the radio band and tune in a desired radio station you wish to store in the preset memory. 2 Press and hold any one of 18 stations can ...
Owners Manual
Page 28
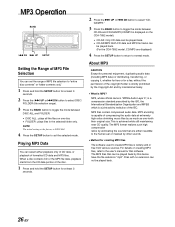
.... • DISC ALL : plays all the files on one -tenth their original size. For details on the CDA-7892 model). • CD-DA: Only CD data can be played back. • CD-DA/MP3: Both CD data and MP3 file tracks can set the selected mode. MP3 encoding is capable of compressing the audio... to select DISC/ FOLDER (file selection range). 3 Press the BAND button to toggle the mode between CD-DA and CD-DA/MP3 (CD/MP3 is displayed on creating MP3 files, refer to the user's manual for creating MP3 files The software used to create MP3 files is a joint activity institution of the IEC...
.... • DISC ALL : plays all the files on one -tenth their original size. For details on the CDA-7892 model). • CD-DA: Only CD data can be played back. • CD-DA/MP3: Both CD data and MP3 file tracks can set the selected mode. MP3 encoding is capable of compressing the audio... to select DISC/ FOLDER (file selection range). 3 Press the BAND button to toggle the mode between CD-DA and CD-DA/MP3 (CD/MP3 is displayed on creating MP3 files, refer to the user's manual for creating MP3 files The software used to create MP3 files is a joint activity institution of the IEC...
Owners Manual
Page 31
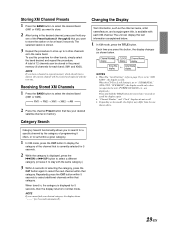
... as shown below . 1 In XM mode, press the TITLE button. The unit can be cleared and replaced with each band; When the CD Text Scroll Setting is set to "SCR MANUAL" (CDA-7892: "SCR MANU"), the display scrolls only when you operate the unit (POWER ON, BAND, etc., are displayed.) Press and hold...
... as shown below . 1 In XM mode, press the TITLE button. The unit can be cleared and replaced with each band; When the CD Text Scroll Setting is set to "SCR MANUAL" (CDA-7892: "SCR MANU"), the display scrolls only when you operate the unit (POWER ON, BAND, etc., are displayed.) Press and hold...
Owners Manual
Page 32
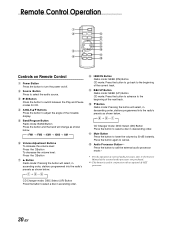
...; ∗ For the operation of external audio processor, refer to lower the volume by 20 dB instantly. " Mute Button Press the button to the Owner's Manual of the external audio processor you purchased. ∗∗ This button is used in descending order. Remote Control Operation 1 2 5 6 7 8 9 3... Lbutton To decrease the volume level: Press the Kbutton 7 8 Button Radio mode: Pressing the button will select, in ascending order, stations programmed into the radio's presets as shown below. → 1 → 2 ... 6 CD Changer mode: DISC Select (UP) Button Press the button to select ...
...; ∗ For the operation of external audio processor, refer to lower the volume by 20 dB instantly. " Mute Button Press the button to the Owner's Manual of the external audio processor you purchased. ∗∗ This button is used in descending order. Remote Control Operation 1 2 5 6 7 8 9 3... Lbutton To decrease the volume level: Press the Kbutton 7 8 Button Radio mode: Pressing the button will select, in ascending order, stations programmed into the radio's presets as shown below. → 1 → 2 ... 6 CD Changer mode: DISC Select (UP) Button Press the button to select ...
Owners Manual
Page 38
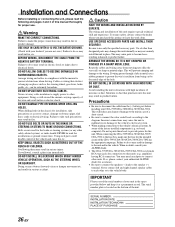
...to do so may not securely install the unit in damage to have the work done. If so, please contact your ALPINE dealer. • The CDA-7995/CDA-7894/CDA-7893/CDA-7892 uses female RCA-type jacks for this product to the unit and/or the vehicle. Never connect left and right channel...result in the chassis for installations or ground connections. and results in locations with the manual to the diagram. Caution HAVE THE WIRING AND INSTALLATION DONE BY EXPERTS. The wiring and installation of this manual thoroughly for the brake or steering systems (or any chance of moisture or dust....
...to do so may not securely install the unit in damage to have the work done. If so, please contact your ALPINE dealer. • The CDA-7995/CDA-7894/CDA-7893/CDA-7892 uses female RCA-type jacks for this product to the unit and/or the vehicle. Never connect left and right channel...result in the chassis for installations or ground connections. and results in locations with the manual to the diagram. Caution HAVE THE WIRING AND INSTALLATION DONE BY EXPERTS. The wiring and installation of this manual thoroughly for the brake or steering systems (or any chance of moisture or dust....

Owners Manual
Page 43
...covers defects in materials or workmanship (parts and labor) in effect for one of any questions, please contact your nearest Authorized Alpine Service Center. Alpine will pay the return shipping charges. 2 You should provide a detailed description of the problem(s) for payment of the telephone...). 2 Damage caused by accident, abuse, negligence, misuse, improper connections, improper operation or failure to follow instructions contained in the Owner's manual. 3 Damage caused by act of God, including without limitation, earthquake, fire, flood, storms or other acts of nature. 4 Any ...
...covers defects in materials or workmanship (parts and labor) in effect for one of any questions, please contact your nearest Authorized Alpine Service Center. Alpine will pay the return shipping charges. 2 You should provide a detailed description of the problem(s) for payment of the telephone...). 2 Damage caused by accident, abuse, negligence, misuse, improper connections, improper operation or failure to follow instructions contained in the Owner's manual. 3 Damage caused by act of God, including without limitation, earthquake, fire, flood, storms or other acts of nature. 4 Any ...


