
User Manual
Page 1
TABLE OF CONTENTS Special notes on LCD monitors 1 Information for your safety and comfort 2 Unpacking 5 Screen position adjustment 6 Connecting the power cord 7 Safety precaution 7 Cleaning your monitor 7 Power saving 8 DDC 8 Connector Pin Assingment 9 Standard Timing Table 11 Installation 12 User controls 13 How to adjust a setting 14 Troubleshooting 20
TABLE OF CONTENTS Special notes on LCD monitors 1 Information for your safety and comfort 2 Unpacking 5 Screen position adjustment 6 Connecting the power cord 7 Safety precaution 7 Cleaning your monitor 7 Power saving 8 DDC 8 Connector Pin Assingment 9 Standard Timing Table 11 Installation 12 User controls 13 How to adjust a setting 14 Troubleshooting 20
User Manual
Page 2
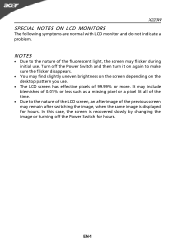
... a problem. Turn off the Power Switch for hours. It may include blemishes of 0.01% or less such as a missing pixel or a pixel lit all of the time. · Due to make sure the flicker disappears. · You may flicker during initial use . · The LCD screen has effective pixels of the previous screen may remain after switching the image, when the same image is recovered slowly by changing...
... a problem. Turn off the Power Switch for hours. It may include blemishes of 0.01% or less such as a missing pixel or a pixel lit all of the time. · Due to make sure the flicker disappears. · You may flicker during initial use . · The LCD screen has effective pixels of the previous screen may remain after switching the image, when the same image is recovered slowly by changing...
User Manual
Page 3
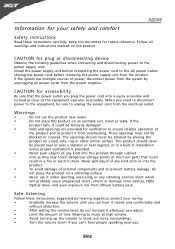
... comfortably and without distortion. • After setting the volume level, do not place the product on a vibrating surface. • Never use this product near water. • Do not place this product through cabinet slots as they may touch dangerous voltage points or short-out parts that the power outlet you plug the power cord into the product. • To...
... comfortably and without distortion. • After setting the volume level, do not place the product on a vibrating surface. • Never use this product near water. • Do not place this product through cabinet slots as they may touch dangerous voltage points or short-out parts that the power outlet you plug the power cord into the product. • To...

User Manual
Page 4
... operating instructions Note: Adjust only those controls that are also at risk of other controls may lead to qualified service personnel. X223W Product servicing Do not attempt to service this product from staying too long in one fixed posture • avoid slouching forward and/or leaning backward • stand up and walk around regularly to remove the strain on the recorded image...
... operating instructions Note: Adjust only those controls that are also at risk of other controls may lead to qualified service personnel. X223W Product servicing Do not attempt to service this product from staying too long in one fixed posture • avoid slouching forward and/or leaning backward • stand up and walk around regularly to remove the strain on the recorded image...

User Manual
Page 5
...; using a task light • changing the display's viewing angle • using a glare-reduction filter • using the product on how to reduce eyestrain. X223W • take breaks regularly, and do not recommend using a display visor, such as a piece of your vision Long viewing hours, wearing incorrect glasses or contact lenses, glare, excessive room lighting, poorly focused screens, very small typefaces and low-contrast displays could...
...; using a task light • changing the display's viewing angle • using a glare-reduction filter • using the product on how to reduce eyestrain. X223W • take breaks regularly, and do not recommend using a display visor, such as a piece of your vision Long viewing hours, wearing incorrect glasses or contact lenses, glare, excessive room lighting, poorly focused screens, very small typefaces and low-contrast displays could...

User Manual
Page 6
X223W UNPACKING Please check the following items are present when you unpack the box, and save the packing materials in case you will need to ship or transport the monitor in future. · LCD Monitor · 15-pin D-Sub Cable · DVI Cable · AC Power Cord (Only Dual-Input Model) · User Manual · Quick Start Guide X223W X223W EN-5
X223W UNPACKING Please check the following items are present when you unpack the box, and save the packing materials in case you will need to ship or transport the monitor in future. · LCD Monitor · 15-pin D-Sub Cable · DVI Cable · AC Power Cord (Only Dual-Input Model) · User Manual · Quick Start Guide X223W X223W EN-5
User Manual
Page 8
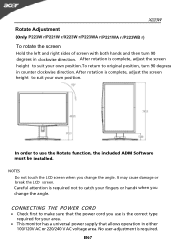
... your own position.To return to make sure that the power cord you use the Rotate function, the included ADM Software must be installed. CONNECTING THE POWER CORD · Check first to original position, turn 90 degrees in clockwise direction. After rotation is complete, adjust the screen height to catch your own position. It may cause damage or break the LCD screen. X223W Rotate Adjustment (Only To rotate the screen Hold the...
... your own position.To return to make sure that the power cord you use the Rotate function, the included ADM Software must be installed. CONNECTING THE POWER CORD · Check first to original position, turn 90 degrees in clockwise direction. After rotation is complete, adjust the screen height to catch your own position. It may cause damage or break the LCD screen. X223W Rotate Adjustment (Only To rotate the screen Hold the...

User Manual
Page 9
... other light sources may reflect on the power cord to avoid damage to the cable. · Do not expose the monitor to rain, excessive moisture, or dust. · Do not cover the ventilation slots or openings of H05VV-F cord and plug rated 10 A, 250 V. The recovery time from giving shock or scratch to the screen, as indicated by the amber-color power LED. X223W · Plug one...
... other light sources may reflect on the power cord to avoid damage to the cable. · Do not expose the monitor to rain, excessive moisture, or dust. · Do not cover the ventilation slots or openings of H05VV-F cord and plug rated 10 A, 250 V. The recovery time from giving shock or scratch to the screen, as indicated by the amber-color power LED. X223W · Plug one...
User Manual
Page 10
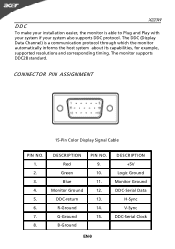
... also supports DDC protocol. CONNECTOR PIN ASSIGNMENT 15-Pin Color Display Signal Cable PIN NO. 1. 2. 3. 4. 5. 6. 7. 8. DESCRIPTION +5V Logic Ground Monitor Ground DDC-Serial Data H-Sync V-Sync DDC-Serial Clock EN-9 DESCRIPTION Red Green Blue Monitor Ground DDC-return R-Ground G-Ground B-Ground PIN NO. 9. 10. 11. 12. 13. 14. 15. The DDC (Display Data Channel) is able to Plug and Play with your system if your installation easier, the monitor...
... also supports DDC protocol. CONNECTOR PIN ASSIGNMENT 15-Pin Color Display Signal Cable PIN NO. 1. 2. 3. 4. 5. 6. 7. 8. DESCRIPTION +5V Logic Ground Monitor Ground DDC-Serial Data H-Sync V-Sync DDC-Serial Clock EN-9 DESCRIPTION Red Green Blue Monitor Ground DDC-return R-Ground G-Ground B-Ground PIN NO. 9. 10. 11. 12. 13. 14. 15. The DDC (Display Data Channel) is able to Plug and Play with your system if your installation easier, the monitor...
User Manual
Page 12
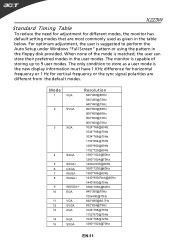
... perform the Auto Setup under Windows "Full Screen" pattern or using the pattern in the floppy disk provided. X223W Standard Timing Table To reduce the need for adjustment for vertical frequency or the sync signal polarities are most commonly used as a user mode is suggested to 9 user modes. The monitor is matched, the user can store their preferred modes in the table below. Mode 1 2 3 4 5 6 7 8 9 10 11 12 13 14 15 VGA SVGA...
... perform the Auto Setup under Windows "Full Screen" pattern or using the pattern in the floppy disk provided. X223W Standard Timing Table To reduce the need for adjustment for vertical frequency or the sync signal polarities are most commonly used as a user mode is suggested to 9 user modes. The monitor is matched, the user can store their preferred modes in the table below. Mode 1 2 3 4 5 6 7 8 9 10 11 12 13 14 15 VGA SVGA...

User Manual
Page 13
... of the 24-pin DVI cable to the back of the monitor and connect the other end to your host system, please follow the steps as given below: Steps 1. 1-1 Connect Video Cable a. X223W INSTALLATION To install the monitor to the computer's port. 2. This sequence is very important. 4. EN-12 Make sure both the monitor and computer are powered-OFF. Connect the VGA video cable to the computer. 1-2 Digital Cable (Only Dual-Input Model) a. b. b.
... of the 24-pin DVI cable to the back of the monitor and connect the other end to your host system, please follow the steps as given below: Steps 1. 1-1 Connect Video Cable a. X223W INSTALLATION To install the monitor to the computer's port. 2. This sequence is very important. 4. EN-12 Make sure both the monitor and computer are powered-OFF. Connect the VGA video cable to the computer. 1-2 Digital Cable (Only Dual-Input Model) a. b. b.
User Manual
Page 14
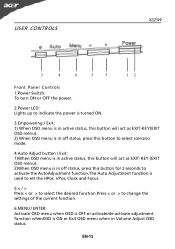
... USER CONTROLS X223W 3 4 6 5 5 12 Front Panel Controls 1.Power Switch: To turn ON or OFF the power. 2.Power LED: Lights up to indicate the power is turned ON. 3.Empowering / Exit: 1) When OSD menu is in active status, this button will act as EXIT-KEY(EXIT OSD menu). 2) When OSD menu is in off status, press this button to select scenario mode. 4.Auto Adjust button / Exit: 1)When OSD menu is in active status, this button will act as EXIT-KEY (EXIT OSD menu...
... USER CONTROLS X223W 3 4 6 5 5 12 Front Panel Controls 1.Power Switch: To turn ON or OFF the power. 2.Power LED: Lights up to indicate the power is turned ON. 3.Empowering / Exit: 1) When OSD menu is in active status, this button will act as EXIT-KEY(EXIT OSD menu). 2) When OSD menu is in off status, press this button to select scenario mode. 4.Auto Adjust button / Exit: 1)When OSD menu is in active status, this button will act as EXIT-KEY (EXIT OSD menu...
User Manual
Page 15
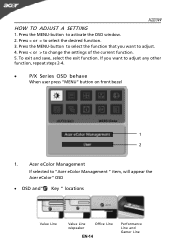
X223W HOW TO ADJUST A SETTING 1. Press the MENU-button to change the settings of the current function. 5. Press < or > to activate the OSD window. 2. If you want to adjust. 4. Press the MENU-button to select the function that you want to adjust any other function, repeat steps 2-4. · P/X Series OSD behave When user press "MENU" button on front bezel 1 2 1. Acer eColor Management If selected to select the desired function. 3. Press...
X223W HOW TO ADJUST A SETTING 1. Press the MENU-button to change the settings of the current function. 5. Press < or > to activate the OSD window. 2. If you want to adjust. 4. Press the MENU-button to select the function that you want to adjust any other function, repeat steps 2-4. · P/X Series OSD behave When user press "MENU" button on front bezel 1 2 1. Acer eColor Management If selected to select the desired function. 3. Press...
User Manual
Page 18
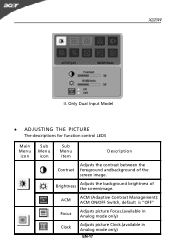
Only Dual Input Model · ADJUSTING THE PICTURE The descriptions for function control LEDS Main Menu icon Sub Menu icon Sub Menu item Description Contrast Adjusts the contrast between the foreground andbackground of the screenimage. X223W II. Brightness Adjusts the background brightness of the screen image. ACM ACM (Adaptive Contrast Management): ACM ON/OFF Switch, default is "OFF" Focus Adjusts picture Focus.(available in Analog mode only) Clock Adjusts picture Clock.(available in Analog mode only) EN-17
Only Dual Input Model · ADJUSTING THE PICTURE The descriptions for function control LEDS Main Menu icon Sub Menu icon Sub Menu item Description Contrast Adjusts the contrast between the foreground andbackground of the screenimage. X223W II. Brightness Adjusts the background brightness of the screen image. ACM ACM (Adaptive Contrast Management): ACM ON/OFF Switch, default is "OFF" Focus Adjusts picture Focus.(available in Analog mode only) Clock Adjusts picture Clock.(available in Analog mode only) EN-17
User Manual
Page 19
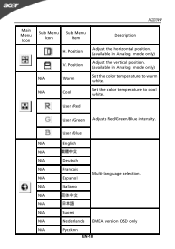
User /Red User /Green Adjusts Red/Green/Blue intensity. Set the color temperature to warm white. N/A Espanol N/A Italiano N/A N/A N/A Suomi N/A Nederlands EMEA version OSD only N/A Pyccknn EN-18 X223W Main Menu Icon Sub Menu Sub Menu Icon Item H. Position V. User /Blue N/A English N/A N/A Deutsch N/A Francais Multi-language selection. Position N/A Warm N/A Cool Description Adjust the horizontal position. (available in Analog mode only) Adjust the vertical position. (available in Analog mode only) Set the color temperature to cool white.
User /Red User /Green Adjusts Red/Green/Blue intensity. Set the color temperature to warm white. N/A Espanol N/A Italiano N/A N/A N/A Suomi N/A Nederlands EMEA version OSD only N/A Pyccknn EN-18 X223W Main Menu Icon Sub Menu Sub Menu Icon Item H. Position V. User /Blue N/A English N/A N/A Deutsch N/A Francais Multi-language selection. Position N/A Warm N/A Cool Description Adjust the horizontal position. (available in Analog mode only) Adjust the vertical position. (available in Analog mode only) Set the color temperature to cool white.

User Manual
Page 21
... vertical refresh timing. · Wait for servicing, please check the troubleshooting list below to see if you can self-diagnose the problem. (VGA Mode) Problems Current Status Remedy LED ON · Using OSD, adjust brightness and contrast to maximum or reset to the monitor. Unstable Picture · Check if the specification of graphics adapter and monitor is ON. X223W TROUBLESHOOTING Before sending your LCD monitor for a few seconds after adjusting the size of the image before changing or disconnecting the signal cable...
... vertical refresh timing. · Wait for servicing, please check the troubleshooting list below to see if you can self-diagnose the problem. (VGA Mode) Problems Current Status Remedy LED ON · Using OSD, adjust brightness and contrast to maximum or reset to the monitor. Unstable Picture · Check if the specification of graphics adapter and monitor is ON. X223W TROUBLESHOOTING Before sending your LCD monitor for a few seconds after adjusting the size of the image before changing or disconnecting the signal cable...

User Manual
Page 22
EN-21 (DVI Mode) X223W Problems No Picture Current Status Remedy LED ON · Using OSD, adjust brightness and contrast to maximum or reset to the monitor. LED displays amber color · Check if video signal cable is properly connected at the back of monitor. · Check if the power of computer system is properly connected to their default settings. LED OFF · Check the power switch. · Check if AC power cord is ON.
EN-21 (DVI Mode) X223W Problems No Picture Current Status Remedy LED ON · Using OSD, adjust brightness and contrast to maximum or reset to the monitor. LED displays amber color · Check if video signal cable is properly connected at the back of monitor. · Check if the power of computer system is properly connected to their default settings. LED OFF · Check the power switch. · Check if AC power cord is ON.
User Manual
Page 23
...that may not cause harmful interference, and (2) this declaration: Product: 22" LCD Monitor Model Number: X223W SKU Number: X223W xxx ("x" = 0~9, a ~ z, or A ~ Z) Name of Responsible Party: Acer America Corporation Address of the FCC Rules. X223W Acer America Corporation 333 West San Carlos St., San Jose CA 95110,...A. Contact Person: Acer Representative Phone No.: 254-298-4000 Fax No.: 254-298-4147 EN-22 Tel : 254-298-4000 Fax : 254-298-4147 www.acer.com Federal Communications Commission Declaration of Conformity This device complies with Part 15 of Responsible Party...
...that may not cause harmful interference, and (2) this declaration: Product: 22" LCD Monitor Model Number: X223W SKU Number: X223W xxx ("x" = 0~9, a ~ z, or A ~ Z) Name of Responsible Party: Acer America Corporation Address of the FCC Rules. X223W Acer America Corporation 333 West San Carlos St., San Jose CA 95110,...A. Contact Person: Acer Representative Phone No.: 254-298-4000 Fax No.: 254-298-4147 EN-22 Tel : 254-298-4000 Fax : 254-298-4147 www.acer.com Federal Communications Commission Declaration of Conformity This device complies with Part 15 of Responsible Party...

User Manual
Page 24
... medium road, Huangpu District, Shanghai, China Contact Person: Mr. Easy Lai Tel: 886-2-8691-3089 Fax: 886-2-8691-3000 E-mail: easy_lai@acer.com.tw Hereby declare that: Product: Trade Name: Model Number: SKU Number: 22" LCD Monitor Acer X223W X223W xxx ("x" = 0~9, a ~ z, A ~ Z or Blank) Is compliant with the essential requirements and other relevant provisions of the same product will continue comply...
... medium road, Huangpu District, Shanghai, China Contact Person: Mr. Easy Lai Tel: 886-2-8691-3089 Fax: 886-2-8691-3000 E-mail: easy_lai@acer.com.tw Hereby declare that: Product: Trade Name: Model Number: SKU Number: 22" LCD Monitor Acer X223W X223W xxx ("x" = 0~9, a ~ z, A ~ Z or Blank) Is compliant with the essential requirements and other relevant provisions of the same product will continue comply...

User Manual
Page 25
X223W Note: The statement above is applicable only to Acer LCD Monitor with an ENERGY STAR logo. EN-24 This product has been shipped enabled for power management: * Activate display' Sleep mode within 15 minutes of user inactivity. * Activate computer's Sleep mode within 30 minutes of user inactivity. * Wake the computer from Sleep mode by pushing power button.
X223W Note: The statement above is applicable only to Acer LCD Monitor with an ENERGY STAR logo. EN-24 This product has been shipped enabled for power management: * Activate display' Sleep mode within 15 minutes of user inactivity. * Activate computer's Sleep mode within 30 minutes of user inactivity. * Wake the computer from Sleep mode by pushing power button.


