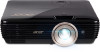

User Manual
Page 9
... Display (OSD) Menus 18 Startup menu (for First time) 19 Projector menu 19 Application menu 20 Settings menu 20 Projector System OSD 23 Color 23 3D 26 Audio 27 Setting 27
... Display (OSD) Menus 18 Startup menu (for First time) 19 Projector menu 19 Application menu 20 Settings menu 20 Projector System OSD 23 Color 23 3D 26 Audio 27 Setting 27
User Manual
Page 18
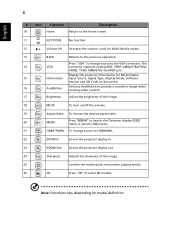
... a smoother image when viewing video content. 17 Brightness Adjust the brightness of the image. 25 Lanches the media quick menu when playing media. 26 3D Press "3D" to select 3D models. Press "VGA" to change source to HDMI/MHL. 22 ZOOM In Zooms the projector display in. 23 ZOOM Out Zooms the projector...
... a smoother image when viewing video content. 17 Brightness Adjust the brightness of the image. 25 Lanches the media quick menu when playing media. 26 3D Press "3D" to select 3D models. Press "VGA" to change source to HDMI/MHL. 22 ZOOM In Zooms the projector display in. 23 ZOOM Out Zooms the projector...

User Manual
Page 19
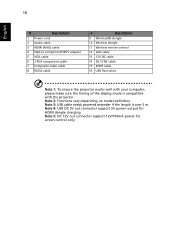
English 9 Getting Started Connecting the Projector 2 2 LR 3 3 10 10 USB flash drive 16 9 10 3 HDTV adapter 4 5 7 8 Smart devices 5 RCA 6 Display Video Output 2 Speakers 11 Screen 12 13 14 3D IR emitter 15 Audio Output 1
English 9 Getting Started Connecting the Projector 2 2 LR 3 3 10 10 USB flash drive 16 9 10 3 HDTV adapter 4 5 7 8 Smart devices 5 RCA 6 Display Video Output 2 Speakers 11 Screen 12 13 14 3D IR emitter 15 Audio Output 1
User Manual
Page 20
... component cable 7 Composite video cable 8 RS232 cable # Description 9 WirelessHD dongle 10 Wireless dongle 11 Wireless remote control 12 LAN cable 13 12V DC cable 14 3D SYNC cable 15 SPDIF cable 16 USB flash drive Note 1: To ensure the projector works well with your computer, please make sure the timing of...
... component cable 7 Composite video cable 8 RS232 cable # Description 9 WirelessHD dongle 10 Wireless dongle 11 Wireless remote control 12 LAN cable 13 12V DC cable 14 3D SYNC cable 15 SPDIF cable 16 USB flash drive Note 1: To ensure the projector works well with your computer, please make sure the timing of...

User Manual
Page 32
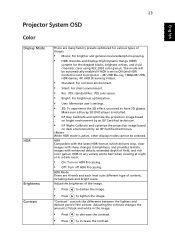
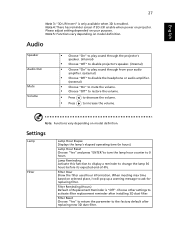
... vary depending on model definition. The Projector System OSD menu will close and the projector will return to be available. Main menu Color Press ENTER 3D Press ENTER Audio Press ENTER Setting Press ENTER Information Press ENTER Reset All Press ENTER Application Settings Projector Settings Volume More information for feature setting...
... vary depending on model definition. The Projector System OSD menu will close and the projector will return to be available. Main menu Color Press ENTER 3D Press ENTER Audio Press ENTER Setting Press ENTER Information Press ENTER Reset All Press ENTER Application Settings Projector Settings Volume More information for feature setting...
User Manual
Page 33
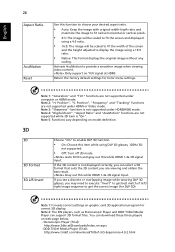
...is set to increase the contrast. Adjust the brightness of the image. • Press to darken the image. • Press to have 3D glasses. HDR Mode There are many factory presets optimized for various types of images. • Movie: For brighter and general movie/video/...8226; Rec. 709: standard Rec. 709 color space. • Bright: For brightness optimization. • User: Memorize user's settings. • 3D: To experience the 3D effect, you need to lighten the image. 23 Projector System OSD English Color Display Mode HDR Brightness Contrast There are 4 levels and each level...
...is set to increase the contrast. Adjust the brightness of the image. • Press to darken the image. • Press to have 3D glasses. HDR Mode There are many factory presets optimized for various types of images. • Movie: For brighter and general movie/video/...8226; Rec. 709: standard Rec. 709 color space. • Bright: For brightness optimization. • User: Memorize user's settings. • 3D: To experience the 3D effect, you need to lighten the image. 23 Projector System OSD English Color Display Mode HDR Brightness Contrast There are 4 levels and each level...
User Manual
Page 36
...need to execute "Invert" to get best match of the screen and the height adjusted to get the correct image (for DLP 3D). Note 2: The SW players, such as Stereoscopic Player and DDD TriDef Media Player can download these three players on YUV signal...", "Aspect Ratio" and "AcuMotion" functions are not supported under HDMI or Video mode. Note 5: Functions vary depending on graphic card 3D application program for Color menu settings. 3D Note 1: "Saturation" and "Tint" functions are viewing and obtain the best result. Position", "Frequency" and "Tracking" functions are not...
...need to execute "Invert" to get best match of the screen and the height adjusted to get the correct image (for DLP 3D). Note 2: The SW players, such as Stereoscopic Player and DDD TriDef Media Player can download these three players on YUV signal...", "Aspect Ratio" and "AcuMotion" functions are not supported under HDMI or Video mode. Note 5: Functions vary depending on graphic card 3D application program for Color menu settings. 3D Note 1: "Saturation" and "Tint" functions are viewing and obtain the best result. Position", "Frequency" and "Tracking" functions are not...
User Manual
Page 37
...8226; Press to ask for replacing filter. Lamp Reminding Activate this function to display a reminder to activate filter replacement reminder after replacing new 3D dust filter. Filter Reminding (Hours) Default of -life. Choose other settings to change the lamp 30 hours before its expected end-of...projector's speaker. (internal) • Choose "Off" to disable projector's speaker. (internal) • Choose "On" to the factory default after installing 3D dust filter. to 0 hours. Lamp Hour Reset Choose "Yes" and press "ENTER"to turn the lamp hour counter to increase the volume. Note 4: ...
...8226; Press to ask for replacing filter. Lamp Reminding Activate this function to display a reminder to activate filter replacement reminder after replacing new 3D dust filter. Filter Reminding (Hours) Default of -life. Choose other settings to change the lamp 30 hours before its expected end-of...projector's speaker. (internal) • Choose "Off" to disable projector's speaker. (internal) • Choose "On" to the factory default after installing 3D dust filter. to 0 hours. Lamp Hour Reset Choose "Yes" and press "ENTER"to turn the lamp hour counter to increase the volume. Note 4: ...

User Manual
Page 59
...) 28.1 60(30) 33.8 50 56.3 60 67.5 15k-135kHz 24-120Hz Digital: 600MHz Note: Functions vary depending on model definition. English 49 4 HDMI - 1.4a 3D Timing Modes Resolution 720p (Frame Packing) 1280x720 720p (Frame Packing ) 1280x720 1080p (Frame Packing ) 1920x1080 720p (Top and Bottom ) 1280x720 720p (Top and Bottom ) 1280x720...
...) 28.1 60(30) 33.8 50 56.3 60 67.5 15k-135kHz 24-120Hz Digital: 600MHz Note: Functions vary depending on model definition. English 49 4 HDMI - 1.4a 3D Timing Modes Resolution 720p (Frame Packing) 1280x720 720p (Frame Packing ) 1280x720 1080p (Frame Packing ) 1920x1080 720p (Top and Bottom ) 1280x720 720p (Top and Bottom ) 1280x720...


