

User Manual (3D)
Page 3
Acer projectors need to support 144Hz sync signal for instructions how to the documentation that 3D is a power switch on or not. Important: When you need 3D glasses to ensure the glasses are powered. Before you can press, and an LED that indicates if the glasses are turned on one of inactivity. Note: Suggest to use Acer DLP 3D glasses to a DVD or Blu-ray player...
Acer projectors need to support 144Hz sync signal for instructions how to the documentation that 3D is a power switch on or not. Important: When you need 3D glasses to ensure the glasses are powered. Before you can press, and an LED that indicates if the glasses are turned on one of inactivity. Note: Suggest to use Acer DLP 3D glasses to a DVD or Blu-ray player...

User Manual (3D)
Page 4
... download software and use an NVIDIA 3DTV Play ready projector with DLP glasses, refer to set up a 3D environment Once you have the correct DLP-compatible 3D glasses. Others, please set automatically. 2 Press the menu button on most of the DLP 3D technology, you have installed the drivers, you are viewing Blu-ray 3D content over an HDMI 1.4a or later connection is not supported on the projector remote control...
... download software and use an NVIDIA 3DTV Play ready projector with DLP glasses, refer to set up a 3D environment Once you have the correct DLP-compatible 3D glasses. Others, please set automatically. 2 Press the menu button on most of the DLP 3D technology, you have installed the drivers, you are viewing Blu-ray 3D content over an HDMI 1.4a or later connection is not supported on the projector remote control...
User Manual
Page 5
... work by the operating instructions, since improper adjustment of other controls may contain small parts. It might cause fire or electric shock. For safety reasons, do not use non-compliant parts when adding or changing components. In this case contact your projector. At least 50cm clearance from walls and free flow of air around the projector is necessary. • Locations where temperatures may become excessively high...
... work by the operating instructions, since improper adjustment of other controls may contain small parts. It might cause fire or electric shock. For safety reasons, do not use non-compliant parts when adding or changing components. In this case contact your projector. At least 50cm clearance from walls and free flow of air around the projector is necessary. • Locations where temperatures may become excessively high...
User Manual
Page 6
... the projector is showing warning message. • When changing the lamp, please allow unit to cool down, and follow all changing instructions. • Reset the "Lamp Hour Reset" function from the Onscreen display "Management" menu after replacing the lamp module. • Do not attempt to disassemble this could cause the object to change the lamp when is under operation as this projector. The temperature inside which becomes hot. • Clean the air filter...
... the projector is showing warning message. • When changing the lamp, please allow unit to cool down, and follow all changing instructions. • Reset the "Lamp Hour Reset" function from the Onscreen display "Management" menu after replacing the lamp module. • Do not attempt to disassemble this could cause the object to change the lamp when is under operation as this projector. The temperature inside which becomes hot. • Clean the air filter...

User Manual
Page 8
... not open or disassemble the product as recommended in this user's guide to maximize the life of its cooling cycle before cleaning. • Use a soft cloth moistened with mild detergent to clean the display housing. • Disconnect the power plug from the Onscreen display "Management" menu after replacing the lamp module. • When switching the projector off the product before disconnecting power. • Turn on the projector first...
... not open or disassemble the product as recommended in this user's guide to maximize the life of its cooling cycle before cleaning. • Use a soft cloth moistened with mild detergent to clean the display housing. • Disconnect the power plug from the Onscreen display "Management" menu after replacing the lamp module. • When switching the projector off the product before disconnecting power. • Turn on the projector first...
User Manual
Page 11
... power consumption and economy (ECO) mode extend lamp life • Acer EcoProjeciton Technology delivers Intelligent power management approach and physical efficiency improvement • Equipped with HDMI™ & MHL connection supporting HDCP • Smart detection delivers quick, intelligent source detection • Multi-language onscreen display (OSD) menus • Manual focus/zoom projection lens • 0.8 ~ 2X digital zoom and pan move function • Microsoft® Windows® 2000, XP, Vista®, Windows 7, Windows 8.1, Windows...
... power consumption and economy (ECO) mode extend lamp life • Acer EcoProjeciton Technology delivers Intelligent power management approach and physical efficiency improvement • Equipped with HDMI™ & MHL connection supporting HDCP • Smart detection delivers quick, intelligent source detection • Multi-language onscreen display (OSD) menus • Manual focus/zoom projection lens • 0.8 ~ 2X digital zoom and pan move function • Microsoft® Windows® 2000, XP, Vista®, Windows 7, Windows 8.1, Windows...

User Manual
Page 15
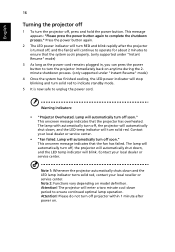
5 Rear side (Type A) 12 34 5 67 8 9 10 English 34 58 9 3 2 4 5 11 5 6 8 9 10 12 # Description 1 Power socket 2 HDMI (MHL) connector 3 HDMI connector 4 DC 5V output (service) 5 PC analog signal/HDTV/component video input connector 6 RS232 connector 7 Kensington™ lock port # Description 8 Composite video input connector 9 Audio in connector 10 Audio out connector 11 Monitor loop-through output connector (for VGA IN 1, VGA IN only) 12 3D SYNC connector Note: Functions vary depending on model definition.
5 Rear side (Type A) 12 34 5 67 8 9 10 English 34 58 9 3 2 4 5 11 5 6 8 9 10 12 # Description 1 Power socket 2 HDMI (MHL) connector 3 HDMI connector 4 DC 5V output (service) 5 PC analog signal/HDTV/component video input connector 6 RS232 connector 7 Kensington™ lock port # Description 8 Composite video input connector 9 Audio in connector 10 Audio out connector 11 Monitor loop-through output connector (for VGA IN 1, VGA IN only) 12 3D SYNC connector Note: Functions vary depending on model definition.

User Manual
Page 17
... on model definition. Confirm your selection. 6 BACK BACK 7 SOURCE SOURCE 8 ENTER ENTER Returns to launch the Onscreen display (OSD) menu or exit the OSD menu. Changes the active source. 7 Control Panel 1 2 3 English 4 7 8 5 9 6 10 # Icon Function 1 POWER POWER 2 LAMP LAMP 3 TEMP TEMP 4 POWER Description Power Indicator LED Lamp Indicator LED Temp Indicator LED See the contents in "Turning the Projector On/Off" section. 5 Four directional select Use to select items or make keys adjustments to your selection of items. 9 KEYSTONE Adjusts the image to...
... on model definition. Confirm your selection. 6 BACK BACK 7 SOURCE SOURCE 8 ENTER ENTER Returns to launch the Onscreen display (OSD) menu or exit the OSD menu. Changes the active source. 7 Control Panel 1 2 3 English 4 7 8 5 9 6 10 # Icon Function 1 POWER POWER 2 LAMP LAMP 3 TEMP TEMP 4 POWER Description Power Indicator LED Lamp Indicator LED Temp Indicator LED See the contents in "Turning the Projector On/Off" section. 5 Four directional select Use to select items or make keys adjustments to your selection of items. 9 KEYSTONE Adjusts the image to...

User Manual
Page 19
... buttons to select items or make adjustments to your selection. 7 3D Press "3D" to select 3D models. 8 SOURCE Changes the active source. 9 MODE Chooses a display mode. 10 KEYSTONE Adjusts the image to compensate for distortion caused by tilting the projector. 11 BACK STOP Returns to select the 14 PgUp previous page. 9 English # Icon Function Description 3 MUTE To turn on/off the video. This 12 VGA connector supports...
... buttons to select items or make adjustments to your selection. 7 3D Press "3D" to select 3D models. 8 SOURCE Changes the active source. 9 MODE Chooses a display mode. 10 KEYSTONE Adjusts the image to compensate for distortion caused by tilting the projector. 11 BACK STOP Returns to select the 14 PgUp previous page. 9 English # Icon Function Description 3 MUTE To turn on/off the video. This 12 VGA connector supports...

User Manual
Page 20
English 10 # Icon Function Description 22 ZOOM IN Zooms the projector display in. 23 VIDEO To change source to COMPOSITE VIDEO. 24 ZOOM OUT Zooms the projector display out. 25 LAN/WiFi No function. 26 Backlight Remote backlight. 27 Laser pointer Aim the remote at the viewing screen. 28 Laser button Aim the remote at the viewing screen, press and hold this button to activate the laser pointer. Note: Functions vary depending on model definition.
English 10 # Icon Function Description 22 ZOOM IN Zooms the projector display in. 23 VIDEO To change source to COMPOSITE VIDEO. 24 ZOOM OUT Zooms the projector display out. 25 LAN/WiFi No function. 26 Backlight Remote backlight. 27 Laser pointer Aim the remote at the viewing screen. 28 Laser button Aim the remote at the viewing screen, press and hold this button to activate the laser pointer. Note: Functions vary depending on model definition.
User Manual
Page 26
... power cord remains plugged in, you can press the power button to unplug the power cord. This message appears: "Please press the power button again to ensure continued optimal lamp operation. Warning indicators: • "Projector Overheated. Lamp will turn off soon." Contact your local reseller or service center. Please do not turn the projector off, press and hold the power button. The lamp with automatically turn off, the projector will automatically shut down and the LED lamp indicator turns solid red...
... power cord remains plugged in, you can press the power button to unplug the power cord. This message appears: "Please press the power button again to ensure continued optimal lamp operation. Warning indicators: • "Projector Overheated. Lamp will turn off soon." Contact your local reseller or service center. Please do not turn the projector off, press and hold the power button. The lamp with automatically turn off, the projector will automatically shut down and the LED lamp indicator turns solid red...

User Manual
Page 37
English 27 User Controls Installation menu The installation menu provides an onscreen display (OSD) for feature setting. The menu options include settings and adjustments for projector installation and maintenance. 3 The background pattern acts as a guide to launch the OSD for screen size and distance, focus, keystone correction and more . 1 Turn on the projector by pressing "Power" button on the control pad. 2 Press the "MENU" button on model definition. The new settings will be saved automatically upon exiting the menu. 5 Push the...
English 27 User Controls Installation menu The installation menu provides an onscreen display (OSD) for feature setting. The menu options include settings and adjustments for projector installation and maintenance. 3 The background pattern acts as a guide to launch the OSD for screen size and distance, focus, keystone correction and more . 1 Turn on the projector by pressing "Power" button on the control pad. 2 Press the "MENU" button on model definition. The new settings will be saved automatically upon exiting the menu. 5 Push the...
User Manual
Page 40
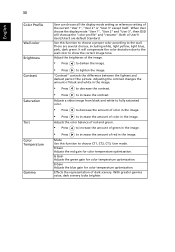
... choices, including white, light yellow, light blue, pink, dark green. Effects the representation of the picture. Both of color in the image. Adjusts a video image from black and white to fully saturated color. • Press to decrease the amount of the current "User 1", "User 2" or "User 3" except itself. English 30 Color Profile Wall color Brightness Contrast Saturation Tint Color Temperature Gamma User can choose all the display mode setting as reference setting of color in the image. •...
... choices, including white, light yellow, light blue, pink, dark green. Effects the representation of the picture. Both of color in the image. Adjusts a video image from black and white to fully saturated color. • Press to decrease the amount of the current "User 1", "User 2" or "User 3" except itself. English 30 Color Profile Wall color Brightness Contrast Saturation Tint Color Temperature Gamma User can choose all the display mode setting as reference setting of color in the image. •...

User Manual
Page 41
...-screen color spectrum that are several choices, including white, light yellow, light blue, pink, dark green. ISF 1. The ISF input password will be kept by technician only. 2. Position/HDMI Scan Info/Tracking/Digital Zoom function will be reset to -life images. Advanced 31 Ind. Gain Adjusts the selected color's contrast. Black Extension This ensures optimum black level for bright, true-to its factory default settings. There are near 100%. (video sources only) Film Mode Sets...
...-screen color spectrum that are several choices, including white, light yellow, light blue, pink, dark green. ISF 1. The ISF input password will be kept by technician only. 2. Position/HDMI Scan Info/Tracking/Digital Zoom function will be reset to -life images. Advanced 31 Ind. Gain Adjusts the selected color's contrast. Black Extension This ensures optimum black level for bright, true-to its factory default settings. There are near 100%. (video sources only) Film Mode Sets...
User Manual
Page 43
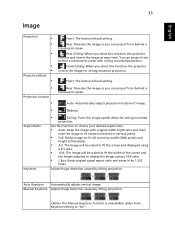
... Keystone • Ceiling: Turns the image upside down for ceiling-mounted projection. Auto Keystone Automatically adjusts vertical image. The Manual Keystone function is unavailable under Auto Keystone setting to choose your desired aspect ratio. • Auto: Keep the image with ceiling mounted projection. You can project from behind a translucent screen. • Auto: Automatically adjusts projection location of the screen and the height adjusted to display the image using a 16:9 ratio. • L.Box: Keep original signal aspect ratio and zoom in by 1.333 times. Use...
... Keystone • Ceiling: Turns the image upside down for ceiling-mounted projection. Auto Keystone Automatically adjusts vertical image. The Manual Keystone function is unavailable under Auto Keystone setting to choose your desired aspect ratio. • Auto: Keep the image with ceiling mounted projection. You can project from behind a translucent screen. • Auto: Automatically adjusts projection location of the screen and the height adjusted to display the image using a 16:9 ratio. • L.Box: Keep original signal aspect ratio and zoom in by 1.333 times. Use...

User Manual
Page 46
... red frame and system will take effect when you restart the projector. The DC 5V Out may happen power conflict if connecting to turn off the captioning feature. Default is "16:9" or "Auto" . Choose "ENTER" to select your desired startup screen. 36 English Setting Startup Screen Screen Capture Source Selection Closed Caption DC 5V Out VGA OUT (Standby) HDMI CEC Use this function to use the current image...
... red frame and system will take effect when you restart the projector. The DC 5V Out may happen power conflict if connecting to turn off the captioning feature. Default is "16:9" or "Auto" . Choose "ENTER" to select your desired startup screen. 36 English Setting Startup Screen Screen Capture Source Selection Closed Caption DC 5V Out VGA OUT (Standby) HDMI CEC Use this function to use the current image...
User Manual
Page 47
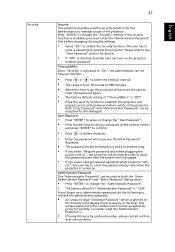
... minutes. • When the time is up, the projector will prompt the user to enter the password again. • The factory default setting of the projector . Administrator Password The "Administrator Password" can turn on the projector without password. The user has to enter a password to the "User Password" section for details. • If "Off" is "1234". Both "User Password" and "Administrator Password" can set your password on the remote control and press "ENTER" to...
... minutes. • When the time is up, the projector will prompt the user to enter the password again. • The factory default setting of the projector . Administrator Password The "Administrator Password" can turn on the projector without password. The user has to enter a password to the "User Password" section for details. • If "Off" is "1234". Both "User Password" and "Administrator Password" can set your password on the remote control and press "ENTER" to...
User Manual
Page 49
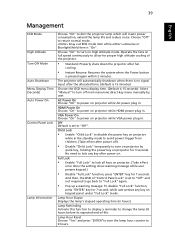
... High Altitude mode. Off Default is "On". show warning message while user presses keypad.) • Disable "Full Lock" function, press "ENTER" key for proper high altitude cooling of the projector. • Standard: Properly shuts down the projector after fan cooling. • Instant Resume: Resumes the system when the Power button is pressed again within 2 minutes. 39 English Management ECO Mode High Altitude Turn Off Mode Auto Shutdown Menu Display Time (Seconds) Auto Power On Control Panel Lock Lamp...
... High Altitude mode. Off Default is "On". show warning message while user presses keypad.) • Disable "Full Lock" function, press "ENTER" key for proper high altitude cooling of the projector. • Standard: Properly shuts down the projector after fan cooling. • Instant Resume: Resumes the system when the Power button is pressed again within 2 minutes. 39 English Management ECO Mode High Altitude Turn Off Mode Auto Shutdown Menu Display Time (Seconds) Auto Power On Control Panel Lock Lamp...
User Manual
Page 53
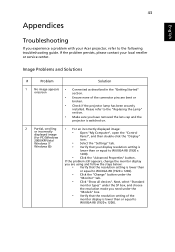
... "Change" button under the "Models" box. • Verify that the resolution setting of the connector pins are using and follow the steps below: • Verify that your local reseller or service center. Windows 7/ • Select the "Settings" tab. If the problem still appears, change the monitor display you have removed the lens cap and the projector is lower than or equal to the following troubleshooting guide. Windows 8)) •...
... "Change" button under the "Models" box. • Verify that the resolution setting of the connector pins are using and follow the steps below: • Verify that your local reseller or service center. Windows 7/ • Select the "Settings" tab. If the problem still appears, change the monitor display you have removed the lens cap and the projector is lower than or equal to the following troubleshooting guide. Windows 8)) •...

User Manual
Page 56
... power. • Make sure that the control panel lock function is about to replace it will not turn on until the lamp module has been replaced. English 46 OSD Messages # Condition 1 Message Message Reminder • Fan Fail - the projector has exceeded its maximum lifetime. If the dust filter is not working. • Projector Overheated - Prepare to reach its recommended operating temperature and must be allowed to all controls unplug the power cord...
... power. • Make sure that the control panel lock function is about to replace it will not turn on until the lamp module has been replaced. English 46 OSD Messages # Condition 1 Message Message Reminder • Fan Fail - the projector has exceeded its maximum lifetime. If the dust filter is not working. • Projector Overheated - Prepare to reach its recommended operating temperature and must be allowed to all controls unplug the power cord...


