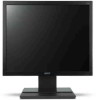
User Manual
Page 2
... contents hereof and specifically disclaims the implied warranties of purchase information in any form or by photocopy, recording or otherwise, without the prior written permission of such revisions or changes. All correspondence concerning your computer. Acer LCD Monitor User's Guide Model number Serial number Date of purchase Place of purchase Acer and the Acer logo are registered trademarks of this manual or supplementary documents...
... contents hereof and specifically disclaims the implied warranties of purchase information in any form or by photocopy, recording or otherwise, without the prior written permission of such revisions or changes. All correspondence concerning your computer. Acer LCD Monitor User's Guide Model number Serial number Date of purchase Place of purchase Acer and the Acer logo are registered trademarks of this manual or supplementary documents...
User Manual
Page 3
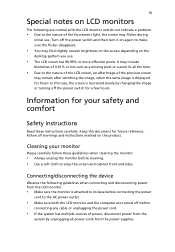
...; You may remain after switching the image, when the same image is displayed for a few hours. Information for future reference. Turn off the power switch for hours. Follow all power cords from the power supplies. Cleaning your safety and comfort Safety instructions Read these guidelines when cleaning the monitor: • Always unplug the monitor before cleaning. • Use a soft cloth to wipe the screen and cabinet front and sides...
...; You may remain after switching the image, when the same image is displayed for a few hours. Information for future reference. Turn off the power switch for hours. Follow all power cords from the power supplies. Cleaning your safety and comfort Safety instructions Read these guidelines when cleaning the monitor: • Always unplug the monitor before cleaning. • Use a soft cloth to wipe the screen and cabinet front and sides...
User Manual
Page 4
... Accessibility Be sure that the power outlet you plug the power cord into this product through cabinet slots as they may touch dangerous voltage points or short-out parts that the total The openings should never be operated from the electrical outlet. This product should never be blocked or covered. Warnings • Do not use it from overheating. Do...
... Accessibility Be sure that the power outlet you plug the power cord into this product through cabinet slots as they may touch dangerous voltage points or short-out parts that the total The openings should never be operated from the electrical outlet. This product should never be blocked or covered. Warnings • Do not use it from overheating. Do...
User Manual
Page 5
... with the supplied power supply cord set , make sure that the new power cord meets the following the operating instructions If you to rain or water • the product has been dropped or the case has been damaged • the product exhibits a distinct change in too many devices. Product servicing Do not attempt to service this product yourself, as opening or removing covers may result...
... with the supplied power supply cord set , make sure that the new power cord meets the following the operating instructions If you to rain or water • the product has been dropped or the case has been damaged • the product exhibits a distinct change in too many devices. Product servicing Do not attempt to service this product yourself, as opening or removing covers may result...

User Manual
Page 6
... Information Acer is strongly committed to environmental protection and views recycling, in the form of salvaging and disposal of used equipment, as grain, dust or metal powders. We at service stations. For more information and help when recycling, please go to reduce the environmental impact of our other controls may contain small parts. Potentially explosive environments Switch off...
... Information Acer is strongly committed to environmental protection and views recycling, in the form of salvaging and disposal of used equipment, as grain, dust or metal powders. We at service stations. For more information and help when recycling, please go to reduce the environmental impact of our other controls may contain small parts. Potentially explosive environments Switch off...

User Manual
Page 7
Nevertheless, some pixels may occasionally misfire or appear as black or red dots. For more information on the recorded image and does not constitute a malfunction. vii Disposal instructions Do not throw this electronic device into ...the trash when discarding. To minimize pollution and ensure utmost protection of the global environment, please recycle. This has no effect on the Waste from Electrical and Electronics Equipment (WEEE) regulations, visit http://www.acer‐group.com/public/Sustainability/ LCD pixel statement The LCD...
Nevertheless, some pixels may occasionally misfire or appear as black or red dots. For more information on the recorded image and does not constitute a malfunction. vii Disposal instructions Do not throw this electronic device into ...the trash when discarding. To minimize pollution and ensure utmost protection of the global environment, please recycle. This has no effect on the Waste from Electrical and Electronics Equipment (WEEE) regulations, visit http://www.acer‐group.com/public/Sustainability/ LCD pixel statement The LCD...
User Manual
Page 8
... of working conditions, personal health and other musculoskeletal disorders. Finding your comfort zone Find your comfort zone by pushing the power button. viii This product has been shipped enabled for power management: • Activate display's Sleep mode within 15 minutes of user inactivity. • Activate computer's Sleep mode within 30 minutes of eyestrain and headaches after long hours of the monitor, using...
... of working conditions, personal health and other musculoskeletal disorders. Finding your comfort zone Find your comfort zone by pushing the power button. viii This product has been shipped enabled for power management: • Activate display's Sleep mode within 15 minutes of user inactivity. • Activate computer's Sleep mode within 30 minutes of eyestrain and headaches after long hours of the monitor, using...

User Manual
Page 9
... faces the window or any light source • minimizing room light by looking away from the monitor and focusing on how to reduce eyestrain. Display • Keep your display clean. • Keep your head at a higher level than the top edge of the display so your eyes. The following work habits to an awkward viewing angle. • Avoid looking at bright light sources, such as open windows, for...
... faces the window or any light source • minimizing room light by looking away from the monitor and focusing on how to reduce eyestrain. Display • Keep your display clean. • Keep your head at a higher level than the top edge of the display so your eyes. The following work habits to an awkward viewing angle. • Avoid looking at bright light sources, such as open windows, for...
User Manual
Page 11
... This device complies with Part 15 of Responsible Party: Acer America Corporation 333 West San Carlos St. Operation is subject to the following local Manufacturer /Importer is responsible for this device must accept any interference received, including interference that may not cause harmful interference, and (2) this declaration: Product: LCD Monitor Model Number: V196L SKU Number: V196L xxxxxx ("x" = 0~9, a ~ z, or A ~ Z) Name...
... This device complies with Part 15 of Responsible Party: Acer America Corporation 333 West San Carlos St. Operation is subject to the following local Manufacturer /Importer is responsible for this device must accept any interference received, including interference that may not cause harmful interference, and (2) this declaration: Product: LCD Monitor Model Number: V196L SKU Number: V196L xxxxxx ("x" = 0~9, a ~ z, or A ~ Z) Name...
User Manual
Page 12
... Accessibility Safe listening Warnings Using electrical power Product servicing Additional safety information IT equipment recycling information Disposal instructions LCD pixel statement Tips and information for comfortable use Federal Communications Commission Declaration of Conformity Unpacking Attaching/removing the base Screen position adjustment Connecting the power cord Power saving Display Data Channel (DDC) Connector pin assignment Standard timing table Installation User controls How to adjust a setting Acer eColor Management User Troubleshooting VGA mode DVI mode 1 iii iii iii iii...
... Accessibility Safe listening Warnings Using electrical power Product servicing Additional safety information IT equipment recycling information Disposal instructions LCD pixel statement Tips and information for comfortable use Federal Communications Commission Declaration of Conformity Unpacking Attaching/removing the base Screen position adjustment Connecting the power cord Power saving Display Data Channel (DDC) Connector pin assignment Standard timing table Installation User controls How to adjust a setting Acer eColor Management User Troubleshooting VGA mode DVI mode 1 iii iii iii iii...

User Manual
Page 13
LCD monitor Quick start guide Audio Cable (Option) LCD monitor D-sub cable (Option) DVI cable (Option) AC power cord Audio Cable (Option) English 1 Unpacking Please check that the following items are present when you unpack the box, and save the packing materials in case you need to ship or transport the monitor in the future.
LCD monitor Quick start guide Audio Cable (Option) LCD monitor D-sub cable (Option) DVI cable (Option) AC power cord Audio Cable (Option) English 1 Unpacking Please check that the following items are present when you unpack the box, and save the packing materials in case you need to ship or transport the monitor in the future.

User Manual
Page 14
use a cloth to hold the edges of your hands to avoid scratching the screen. English 2 Attaching the Base Note: Remove the monitor and monitor base from its packaging. Screen position adjustment To optimize the viewing position, you can be adjusted to remove the base. Remove: Reverse the steps to 25 degrees up or 5 degrees down on a stable surface -- The monitor can adjust the monitor tilt by using both of the monitor as shown below. Carefully place the monitor face-down . 25
use a cloth to hold the edges of your hands to avoid scratching the screen. English 2 Attaching the Base Note: Remove the monitor and monitor base from its packaging. Screen position adjustment To optimize the viewing position, you can be adjusted to remove the base. Remove: Reverse the steps to 25 degrees up or 5 degrees down on a stable surface -- The monitor can adjust the monitor tilt by using both of the monitor as shown below. Carefully place the monitor face-down . 25
User Manual
Page 15
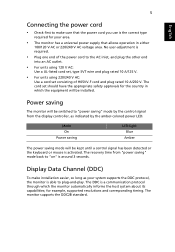
Power saving The monitor will be switched to "power saving" mode by the amber-colored power LED. for your system supports the DDC protocol, the monitor is the correct type required for example, supported resolutions and corresponding timing. Mode On Power saving LED light Blue Amber The power saving mode will be kept until a control signal has been detected or the keyboard or mouse is required. • Plug one end of H05VV-F cord and plug rated 10 A/250 V. The monitor supports the...
Power saving The monitor will be switched to "power saving" mode by the amber-colored power LED. for your system supports the DDC protocol, the monitor is the correct type required for example, supported resolutions and corresponding timing. Mode On Power saving LED light Blue Amber The power saving mode will be kept until a control signal has been detected or the keyboard or mouse is required. • Plug one end of H05VV-F cord and plug rated 10 A/250 V. The monitor supports the...

User Manual
Page 17
Description 1 TMDS data 2- 2 TMDS data 2+ 3 TMDS data 2/4 shield 4 NC 5 NC 6 DDC clock 7 DDC data 8 NC 9 TMDS data 1- 10 TMDS data 1+ 11 TMDS data 1/3 shield 12 NC PIN No. 7 English 24-pin color display signal cable* PIN No. Description 13 NC 14 +5 V power 15 GND (return for +5 V hsync.vsync) 16 Hot-plug detection 17 TMDS data 0- 18 TMDS data 0+ 19 TMDS data 0/5 shield 20 NC 21 NC 22 TMDS clock shield 23 TMDS clock+ 24 DDC TMDS clock-
Description 1 TMDS data 2- 2 TMDS data 2+ 3 TMDS data 2/4 shield 4 NC 5 NC 6 DDC clock 7 DDC data 8 NC 9 TMDS data 1- 10 TMDS data 1+ 11 TMDS data 1/3 shield 12 NC PIN No. 7 English 24-pin color display signal cable* PIN No. Description 13 NC 14 +5 V power 15 GND (return for +5 V hsync.vsync) 16 Hot-plug detection 17 TMDS data 0- 18 TMDS data 0+ 19 TMDS data 0/5 shield 20 NC 21 NC 22 TMDS clock shield 23 TMDS clock+ 24 DDC TMDS clock-
User Manual
Page 19
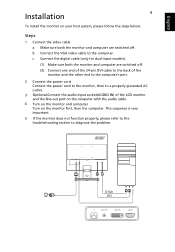
... Turn on your host system, please follow the steps below: Steps 1 Connect the video cable a Make sure both the monitor and computer are switched off. This sequence is very important. 5 If the monitor does not function properly, please refer to the troubleshooting section to the computer. POWER AUDIO IN DVI-D IN VGA IN D-Sub DVI AUDIO IN DVI-D IN VGA IN b Connect the VGA video cable to diagnose the problem. English Installation To install the monitor...
... Turn on your host system, please follow the steps below: Steps 1 Connect the video cable a Make sure both the monitor and computer are switched off. This sequence is very important. 5 If the monitor does not function properly, please refer to the troubleshooting section to the computer. POWER AUDIO IN DVI-D IN VGA IN D-Sub DVI AUDIO IN DVI-D IN VGA IN b Connect the VGA video cable to diagnose the problem. English Installation To install the monitor...
User Manual
Page 21
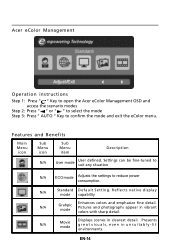
... Menu icon Sub Menu icon Sub Menu item Description N/A User mode User defined. N/A Movie mode Displays scenes in vibrant colors with sharp detail. Acer eColor Management Operation instructions Step 1: Press " " Key to open the Acer eColor Management OSD and access the scenario modes Step 2: Press " " or " " to select the mode Step 3: Press " AUTO " Key to reduce power consumption. Settings can be fine-tuned to suit any situation N/A ECO mode Adjusts the settings...
... Menu icon Sub Menu icon Sub Menu item Description N/A User mode User defined. N/A Movie mode Displays scenes in vibrant colors with sharp detail. Acer eColor Management Operation instructions Step 1: Press " " Key to open the Acer eColor Management OSD and access the scenario modes Step 2: Press " " or " " to select the mode Step 3: Press " AUTO " Key to reduce power consumption. Settings can be fine-tuned to suit any situation N/A ECO mode Adjusts the settings...
User Manual
Page 22
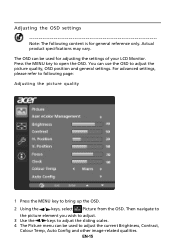
... for adjusting the settings of your LCD Monitor. Press the MENU key to adjust the picture quality, OSD position and general settings. Actual product specifications may vary. The OSD can be used for general reference only. You can be used to adjust the current Brightness, Contrast, Colour Temp, Auto Config and other image-related qualities. Adjusting the OSD settings Note: The following page: Adjusting the picture quality 1 Press the MENU key to bring up the OSD. 2 Using...
... for adjusting the settings of your LCD Monitor. Press the MENU key to adjust the picture quality, OSD position and general settings. Actual product specifications may vary. The OSD can be used for general reference only. You can be used to adjust the current Brightness, Contrast, Colour Temp, Auto Config and other image-related qualities. Adjusting the OSD settings Note: The following page: Adjusting the picture quality 1 Press the MENU key to bring up the OSD. 2 Using...

User Manual
Page 24
Then navigate to the feature you wish to adjust. 3 The Setting menu can be used to bring up the OSD. 2 Using the / keys, select Setting from the OSD. Adjusting the setting 1 Press the MENU key to adjust the screen Menu Language and other important settings. EN-17
Then navigate to the feature you wish to adjust. 3 The Setting menu can be used to bring up the OSD. 2 Using the / keys, select Setting from the OSD. Adjusting the setting 1 Press the MENU key to adjust the screen Menu Language and other important settings. EN-17
User Manual
Page 26
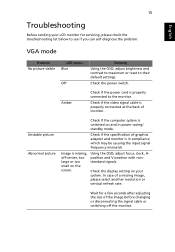
...your LCD monitor for servicing, please check the troubleshooting list below to their default settings. Check the display setting on the screen. VGA mode Problem No picture visible LED status Blue Off Remedy Using the OSD, adjust brightness and contrast to maximum or reset to see if you can self-diagnose the problem. Check if the video signal cable is in power saving/ standby mode. Using the OSD, adjust focus, clock, Hposition and V-position with nonstandard signals. In case of monitor. 15 English Troubleshooting Before sending your system. Check the power switch...
...your LCD monitor for servicing, please check the troubleshooting list below to their default settings. Check the display setting on the screen. VGA mode Problem No picture visible LED status Blue Off Remedy Using the OSD, adjust brightness and contrast to maximum or reset to see if you can self-diagnose the problem. Check if the video signal cable is in power saving/ standby mode. Using the OSD, adjust focus, clock, Hposition and V-position with nonstandard signals. In case of monitor. 15 English Troubleshooting Before sending your system. Check the power switch...
User Manual
Page 27
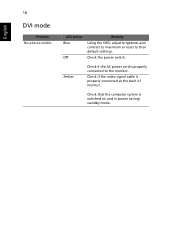
Check that the computer system is properly connected at the back of monitor. Amber Check if the AC power cord is properly connected to their default settings. English 16 DVI mode Problem No picture visible LED status Blue Off Remedy Using the OSD, adjust brightness and contrast to maximum or reset to the monitor. Check if the video signal cable is switched on and in power saving/ standby mode. Check the power switch.
Check that the computer system is properly connected at the back of monitor. Amber Check if the AC power cord is properly connected to their default settings. English 16 DVI mode Problem No picture visible LED status Blue Off Remedy Using the OSD, adjust brightness and contrast to maximum or reset to the monitor. Check if the video signal cable is switched on and in power saving/ standby mode. Check the power switch.

