TravelMate 4070 Service Guide
Page 27
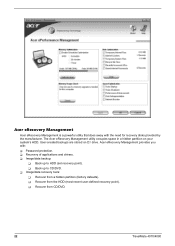
.../DVD. 22 TravelMate 4070/4080 T Image/data backup: T Back up to HDD (set recovery point). T Recover from a hidden partition (factory defaults). User-created backups are stored on your system's HDD. T Recovery of applications and drivers. T Back up to CD/DVD. T Recover from the HDD (most recent user-defined recovery point). Acer eRecovery Management provides...
.../DVD. 22 TravelMate 4070/4080 T Image/data backup: T Back up to HDD (set recovery point). T Recover from a hidden partition (factory defaults). User-created backups are stored on your system's HDD. T Recovery of applications and drivers. T Back up to CD/DVD. T Recover from the HDD (most recent user-defined recovery point). Acer eRecovery Management provides...
TravelMate 4070 Service Guide
Page 39
... the driver version and operating system. The complete list of USB port Location Serial port function control Specification 2.0 USB 2.0 3 Two on the front side Enable/Disable by the performance of battery cell Specification SANYO PANASONIC PANASONIC (RoHS) SANYO LI-ION 4UR18650F-2-QC141 SIMPPLO SONY Lithium-ION 4400mAH 14.8V 8 34 TravelMate 4070/4080...
... the driver version and operating system. The complete list of USB port Location Serial port function control Specification 2.0 USB 2.0 3 Two on the front side Enable/Disable by the performance of battery cell Specification SANYO PANASONIC PANASONIC (RoHS) SANYO LI-ION 4UR18650F-2-QC141 SIMPPLO SONY Lithium-ION 4400mAH 14.8V 8 34 TravelMate 4070/4080...

TravelMate 4070 Service Guide
Page 55
... 1. After one to floppy drive. 4. Then you can see the LCD screen with the backlight is not completely loaded. NOTE: Do not install memory-related drivers (XMS, EMS, DPMI) when you use the Phlash. Press Fn and ESC key together for the following conditions: T New versions of this product to create...
... 1. After one to floppy drive. 4. Then you can see the LCD screen with the backlight is not completely loaded. NOTE: Do not install memory-related drivers (XMS, EMS, DPMI) when you use the Phlash. Press Fn and ESC key together for the following conditions: T New versions of this product to create...

TravelMate 4070 Service Guide
Page 57
... vary in size. To disassemble the computer, you need the following tools: T Wrist grounding strap and conductive mat for preventing electrostatic discharge T Flat-bladed screw driver T Phillips screw driver T Tweezers T Plastic Flat-bladed screw driver T Hexed Screw Driver NOTE: The screws for maintenance and troubleshooting.
... vary in size. To disassemble the computer, you need the following tools: T Wrist grounding strap and conductive mat for preventing electrostatic discharge T Flat-bladed screw driver T Phillips screw driver T Tweezers T Plastic Flat-bladed screw driver T Hexed Screw Driver NOTE: The screws for maintenance and troubleshooting.
TravelMate 4070 Service Guide
Page 63
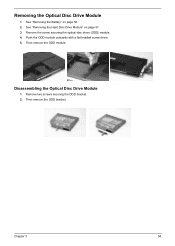
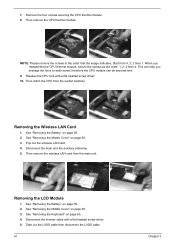
Push the ODD module outwards with a flat headed screw driver. 5. Then remove the ODD module. Disassembling the Optical Disc Drive Module 1. Remove two screws securing the ODD bracket. 2. Chapter 3 58 See "Removing the Battery" on page 57. 3. See "Removing the Hard Disc Drive Module" on page 56. 2. Remove the screw securing the optical disc drove (ODD) module. 4. Then remove the ODD bracket. Removing the Optical Disc Drive Module 1.
Push the ODD module outwards with a flat headed screw driver. 5. Then remove the ODD module. Disassembling the Optical Disc Drive Module 1. Remove two screws securing the ODD bracket. 2. Chapter 3 58 See "Removing the Battery" on page 57. 3. See "Removing the Hard Disc Drive Module" on page 56. 2. Remove the screw securing the optical disc drove (ODD) module. 4. Then remove the ODD bracket. Removing the Optical Disc Drive Module 1.
TravelMate 4070 Service Guide
Page 66
... page 60. 3. See "Removing the Keyboard" on page 60. 3. Release the CPU lock with a flat headed screw driver. 5. See "Removing the Middle Cover" on page 60. 4. Disconnect the inverter cable with a flat headed screw driver. 10. See "Removing the Battery" on page 56. 2. Then detch the CPU from 4, 3, 2 then 1. 7. When you average...
... page 60. 3. See "Removing the Keyboard" on page 60. 3. Release the CPU lock with a flat headed screw driver. 5. See "Removing the Middle Cover" on page 60. 4. Disconnect the inverter cable with a flat headed screw driver. 10. See "Removing the Battery" on page 56. 2. Then detch the CPU from 4, 3, 2 then 1. 7. When you average...

TravelMate 4070 Service Guide
Page 71
... Bracket, the Touchpad Board and the Touchpad 1. See "Removing the Middle Cover" on page 60. 4. Then remove the touchpad bracket. 11. Use a flat headed screw driver to detach the touchpad board. 12. Chapter 3 66 See "Removing the Keyboard" on page 60. 3. See "Removing the Power Board" on page 56. 2. Pull back...
... Bracket, the Touchpad Board and the Touchpad 1. See "Removing the Middle Cover" on page 60. 4. Then remove the touchpad bracket. 11. Use a flat headed screw driver to detach the touchpad board. 12. Chapter 3 66 See "Removing the Keyboard" on page 60. 3. See "Removing the Power Board" on page 56. 2. Pull back...

TravelMate 4070 Service Guide
Page 78
...: 1. Replace the main board. The label can cause damage to the drive or can cause damage to the drive or cause the drive to a controller, driver, or diskette. Do the following to fail. Reconnect the external diskette drive/DVD-ROM module. 2. Follow the instructions in the message window. If the error...
...: 1. Replace the main board. The label can cause damage to the drive or can cause damage to the drive or cause the drive to a controller, driver, or diskette. Do the following to fail. Reconnect the external diskette drive/DVD-ROM module. 2. Follow the instructions in the message window. If the error...

TravelMate 4070 Service Guide
Page 91
.... See "S4 Sleeping State" on page 36. Action in Windows doesn't go higher than 90%. Remove battery pack and let it cool for 2 hours. Audio driver Speaker System board Speaker System board Action in Sequence Power Management-Related Symptoms Symptom / Error Action in Sequence PCMCIA slot assembly System board PCMCIA slot...
.... See "S4 Sleeping State" on page 36. Action in Windows doesn't go higher than 90%. Remove battery pack and let it cool for 2 hours. Audio driver Speaker System board Speaker System board Action in Sequence Power Management-Related Symptoms Symptom / Error Action in Sequence PCMCIA slot assembly System board PCMCIA slot...

TravelMate 4070 Service Guide
Page 92
... to execute "Load Default Settings", then reboot system. Action in Sequence Internal modem does not work correctly. Onboard Devices Configuration Run printer self-test. Device driver Device cable Device System board Keyboard/Touchpad-Related Symptoms Symptom / Error Keyboard (one or more keys) does not work . Touchpad does not work . External display...
... to execute "Load Default Settings", then reboot system. Action in Sequence Internal modem does not work correctly. Onboard Devices Configuration Run printer self-test. Device driver Device cable Device System board Keyboard/Touchpad-Related Symptoms Symptom / Error Keyboard (one or more keys) does not work . Touchpad does not work . External display...

TravelMate 4070 User's Guide
Page 15
...need for recovery disks provided by the manufacturer. Note: If your Acer ezDock. Empowering Technology 5 Acer eRecovery Management Acer eRecovery Management is a powerful utility that does away with : • Password protection. • Recovery of applications and drivers. • Image/data backup: • Back up to HDD...; Recover from CD/DVD. To ensure the best results when recovering your system using a CD or Acer eRecovery Management, detach all peripherals (except the external Acer ODD, if your computer has one), including your computer did not come with a Recovery CD or ...
...need for recovery disks provided by the manufacturer. Note: If your Acer ezDock. Empowering Technology 5 Acer eRecovery Management Acer eRecovery Management is a powerful utility that does away with : • Password protection. • Recovery of applications and drivers. • Image/data backup: • Back up to HDD...; Recover from CD/DVD. To ensure the best results when recovering your system using a CD or Acer eRecovery Management, detach all peripherals (except the external Acer ODD, if your computer has one), including your computer did not come with a Recovery CD or ...

TravelMate 4070 User's Guide
Page 48
... for an extended period of time and cannot carry the computer with you: • AC adapter • Spare, fully-charged battery pack(s) • Additional printer driver files if you plan to use your computer at home. With a second AC adapter, you can cause condensation. If you use another printer Preparing the...
... for an extended period of time and cannot carry the computer with you: • AC adapter • Spare, fully-charged battery pack(s) • Additional printer driver files if you plan to use your computer at home. With a second AC adapter, you can cause condensation. If you use another printer Preparing the...
TravelMate 4070 User's Guide
Page 49
... . If not, purchase a power cord that are appropriate for the country to which you are traveling • Spare, fully-charged battery packs • Additional printer driver files if you plan to use converter kits sold for appliances to power the computer. • If you are moving from country to country. Preparing...
... . If not, purchase a power cord that are appropriate for the country to which you are traveling • Spare, fully-charged battery packs • Additional printer driver files if you plan to use converter kits sold for appliances to power the computer. • If you are moving from country to country. Preparing...

TravelMate 4070 User's Guide
Page 59
... image to re-install. Re-install bundled software without CD Acer eRecovery Management stores pre-loaded software internally for easy driver and application re-installation. 1 Boot to Windows XP. 2 Press + to open the Acer eRecovery Management utility. 3 Enter the password to bring up ... The default password is six zeros. 4 In the Acer eRecovery Management window, select Recovery actions and click Next. 5 In the Recovery settings window, select Reinstall applications/drivers and click Next. 6 Select the desired driver/application and follow the instructions on screen to proceed.
... image to re-install. Re-install bundled software without CD Acer eRecovery Management stores pre-loaded software internally for easy driver and application re-installation. 1 Boot to Windows XP. 2 Press + to open the Acer eRecovery Management utility. 3 Enter the password to bring up ... The default password is six zeros. 4 In the Acer eRecovery Management window, select Recovery actions and click Next. 5 In the Recovery settings window, select Reinstall applications/drivers and click Next. 6 Select the desired driver/application and follow the instructions on screen to proceed.


