TravelMate 3010 Service Guide
Page 6
Chapter 1 System Specifications 1 Features 1 Block Diagram 3 TM 3010 Outlook View 4 Indicators 9 Easy-Launch Buttons 10 Touchpad 12 Using the System Utilities 16 Acer Empowering Technology 19 Hardware Specifications and Configurations 29 Chapter 2 System Utilities 38 BIOS Setup Utility 38 Main 40... Removing the Battery Pack 52 Removing the miniPCI/Memory/HDD Module/Keyboard . . . 53 Seperate the LCD module and main unit 55 Disassemble the main unit 56 LCD module disassembly 59 HDD Disassembly and Reassembly 61 Chapter 4 Troubleshooting 62 System Check Procedures 63 Power-On Self...
Chapter 1 System Specifications 1 Features 1 Block Diagram 3 TM 3010 Outlook View 4 Indicators 9 Easy-Launch Buttons 10 Touchpad 12 Using the System Utilities 16 Acer Empowering Technology 19 Hardware Specifications and Configurations 29 Chapter 2 System Utilities 38 BIOS Setup Utility 38 Main 40... Removing the Battery Pack 52 Removing the miniPCI/Memory/HDD Module/Keyboard . . . 53 Seperate the LCD module and main unit 55 Disassemble the main unit 56 LCD module disassembly 59 HDD Disassembly and Reassembly 61 Chapter 4 Troubleshooting 62 System Check Procedures 63 Power-On Self...
TravelMate 3010 Service Guide
Page 7
... Upgradeable to 2GB Memory for 32bit OS, 4G for 64bit OS Display T T T 12.1" WXGA 200-nit high-brightness TFT LCD 1280x800 pixel resolution 16:10 viewing ratio, supporting simultaneous mlti-window viewing via Acer GridVista Graphics T UMA VRAM T UMA T DVMT3.0, share 8MB, up to 128MB in mind. Here are just a few of...
... Upgradeable to 2GB Memory for 32bit OS, 4G for 64bit OS Display T T T 12.1" WXGA 200-nit high-brightness TFT LCD 1280x800 pixel resolution 16:10 viewing ratio, supporting simultaneous mlti-window viewing via Acer GridVista Graphics T UMA VRAM T UMA T DVMT3.0, share 8MB, up to 128MB in mind. Here are just a few of...

TravelMate 3010 Service Guide
Page 8
...(dual-band tri-mode 802.11 a/b/g) Wi-Fi CERTIFIEDTM T 2 built-in PIFA type Antenna (which has to be placed on the top of LCD on the sides of LCD latch) T Bluetooth 2.0 +EDR(Enhanced Data Rate) I/O Ports T T T T T T T T T T T T T 3 external USB 2.0 ports IEEE 1394 port (6-pin) Ethernet (RJ-45) port Modem (RJ-11) port External...
...(dual-band tri-mode 802.11 a/b/g) Wi-Fi CERTIFIEDTM T 2 built-in PIFA type Antenna (which has to be placed on the top of LCD on the sides of LCD latch) T Bluetooth 2.0 +EDR(Enhanced Data Rate) I/O Ports T T T T T T T T T T T T T 3 external USB 2.0 ports IEEE 1394 port (6-pin) Ethernet (RJ-45) port Modem (RJ-11) port External...

TravelMate 3010 Service Guide
Page 10
Open View # Item Description 1 Camera 1.3 Mega Pixel CMOS video camera with a desktop PC. TM 3010 Outlook View A general introduction of ports allow you to show the status of the computer's functions and components. 5 Palmrest COmfortable support area... center and right) buttons; the center button serves as you would with 225 degree rotation feature. 2 Display screen Also called Liquid-Crystal Display(LCD), displays computer output. 3 Easy-launch buttons Buttons for launching frequently used programs. 4 Status indicators Light-Emitting Diodes(LEDs) that light up to...
Open View # Item Description 1 Camera 1.3 Mega Pixel CMOS video camera with a desktop PC. TM 3010 Outlook View A general introduction of ports allow you to show the status of the computer's functions and components. 5 Palmrest COmfortable support area... center and right) buttons; the center button serves as you would with 225 degree rotation feature. 2 Display screen Also called Liquid-Crystal Display(LCD), displays computer output. 3 Easy-launch buttons Buttons for launching frequently used programs. 4 Status indicators Light-Emitting Diodes(LEDs) that light up to...
TravelMate 3010 Service Guide
Page 12
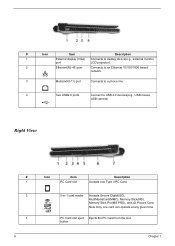
Note: # Icon Item Description 1 External display (VGA) Connects to display device(e.g., external monitor, port LCD projector) 2 # Icon ItemEthernet(RJ-45) poDretscriptioCn onnects to an Ethernet 10/100/1000 based network. # Icon Item Description 3 Modem(RJ-11) port Connects to a phone ...
Note: # Icon Item Description 1 External display (VGA) Connects to display device(e.g., external monitor, port LCD projector) 2 # Icon ItemEthernet(RJ-45) poDretscriptioCn onnects to an Ethernet 10/100/1000 based network. # Icon Item Description 3 Modem(RJ-11) port Connects to a phone ...

TravelMate 3010 Service Guide
Page 15
..." on page 10 # Item Description # Item "Launch keys" on page 10 Description The power, battery and wireless communication status indicators are visible even when the LCD display is charging. NOTE: The lights shows amber when the battery is # closeItde. NOTE: The lights showns green when in AC mode. Chapter 1 9 Bluetooth # Icon...
..." on page 10 # Item Description # Item "Launch keys" on page 10 Description The power, battery and wireless communication status indicators are visible even when the LCD display is charging. NOTE: The lights shows amber when the battery is # closeItde. NOTE: The lights showns green when in AC mode. Chapter 1 9 Bluetooth # Icon...
TravelMate 3010 Service Guide
Page 32
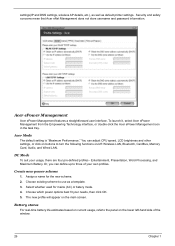
...lower left-hand side of your own profiles. settings(IP and DNS settings, wireless AP details, etc.), as well as a template. 3. Acer ePower Management Acer ePower Management features a straightforward user interface. You can define up to turn the following functions on buttons to three of the window. 26 Chapter... usage, referto the panel on the main screen. DC Mode To suit your needs, then click OK. 5. Or, you can adjust CPU speed, LCD brightness and other settings, or click on /off: Wireless LAN, Bluetooth, CardBus, Memory Card, Audio, and Wired LAN. Select whether used for the...
...lower left-hand side of your own profiles. settings(IP and DNS settings, wireless AP details, etc.), as well as a template. 3. Acer ePower Management Acer ePower Management features a straightforward user interface. You can define up to turn the following functions on buttons to three of the window. 26 Chapter... usage, referto the panel on the main screen. DC Mode To suit your needs, then click OK. 5. Or, you can adjust CPU speed, LCD brightness and other settings, or click on /off: Wireless LAN, Bluetooth, CardBus, Memory Card, Audio, and Wired LAN. Select whether used for the...

TravelMate 3010 Service Guide
Page 36
... modules) DDRII SDRAM Standard 533/667 MHz 1.8V You can install memory modules in 2 antenna(Has to be placed on the top of LCD on the sides of LCD latch) Wi-Fi, WPA2, WMM, CCX V3/V4 Modem Interface Item Data modem data baud rate (bps) Supports modem protocol Modem connector type...
... modules) DDRII SDRAM Standard 533/667 MHz 1.8V You can install memory modules in 2 antenna(Has to be placed on the top of LCD on the sides of LCD latch) Wi-Fi, WPA2, WMM, CCX V3/V4 Modem Interface Item Data modem data baud rate (bps) Supports modem protocol Modem connector type...

TravelMate 3010 Service Guide
Page 38
... : Identify Pin (Note 1) B/I : Battery-In Pin TS : Connect to Thermister SMD : SMBus data interface I/O pin SMC : SMBus clock interface I/O pin GND : Battery Negative Terminal 12.1" LCD Panel Item Vendor & model name Screen Diagonal (mm) Active Area (mm) Display resolution (pixels) Pixel Pitch(mm) Pixel Arrangement Display Mode 32 AUO B121EW01 V3...
... : Identify Pin (Note 1) B/I : Battery-In Pin TS : Connect to Thermister SMD : SMBus data interface I/O pin SMC : SMBus clock interface I/O pin GND : Battery Negative Terminal 12.1" LCD Panel Item Vendor & model name Screen Diagonal (mm) Active Area (mm) Display resolution (pixels) Pixel Pitch(mm) Pixel Arrangement Display Mode 32 AUO B121EW01 V3...

TravelMate 3010 Service Guide
Page 39
12.1" LCD Panel Item Surface Treatment Typical White Luminance (cd/m2) also called Brightness Contrast Ratio Response Time (Optical Rise Time+Fall Time)msec Normal Input Voltage ...
12.1" LCD Panel Item Surface Treatment Typical White Luminance (cd/m2) also called Brightness Contrast Ratio Response Time (Optical Rise Time+Fall Time)msec Normal Input Voltage ...
TravelMate 3010 Service Guide
Page 46
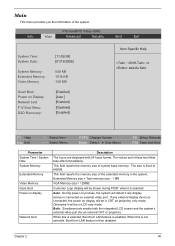
... display will be shown during POST when it will detect if any external display device is fixed to 640KB. Both: Simultaneously enable both the integrated LCD screen and the system's external video port (for an external CRT or projector). This field reports the memory size of the extended memory in these... 24 hours format. PhoenixBIOS Setup Utility Info. Auto: During power on external video port. Otherwise it is connected on process, the system will be in LCD only mode.
... display will be shown during POST when it will detect if any external display device is fixed to 640KB. Both: Simultaneously enable both the integrated LCD screen and the system's external video port (for an external CRT or projector). This field reports the memory size of the extended memory in these... 24 hours format. PhoenixBIOS Setup Utility Info. Auto: During power on external video port. Otherwise it is connected on process, the system will be in LCD only mode.

TravelMate 3010 Service Guide
Page 59
... pop out the miniPCI and remove it over. Pull the HDD out and remove it . Removing the HDD 1. Removing the keyboard 1. Chapter 3 53 Open the LCD panel. 2. Remove the two screws that secure the HDD. 2.
... pop out the miniPCI and remove it over. Pull the HDD out and remove it . Removing the HDD 1. Removing the keyboard 1. Chapter 3 53 Open the LCD panel. 2. Remove the two screws that secure the HDD. 2.
TravelMate 3010 Service Guide
Page 61
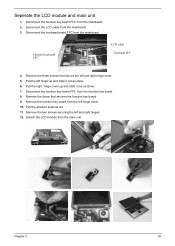
... from the mainboard. 2. Disconnect the function key board FFC from the mainboard. 3. Pull the wireless antenna out. 11. Chapter 3 55 Seperate the LCD module and main unit 1. Disconnect the LCD cable from the function key board. 8. Remove the three screws that secures the function key board. 9. Remove the two screws securing the... the screw that secure the left hinge up and slide it out as show . 6. Remove the function key board from the main unit. Detach the LCD module from the left and right hinges. 12. Function keyboard FFC...
... from the mainboard. 2. Disconnect the function key board FFC from the mainboard. 3. Pull the wireless antenna out. 11. Chapter 3 55 Seperate the LCD module and main unit 1. Disconnect the LCD cable from the function key board. 8. Remove the three screws that secures the function key board. 9. Remove the two screws securing the... the screw that secure the left hinge up and slide it out as show . 6. Remove the function key board from the main unit. Detach the LCD module from the left and right hinges. 12. Function keyboard FFC...

TravelMate 3010 Service Guide
Page 65
... Release the latches one by one. Pull the bezel a little bit forward that secure the LCD bezel. 3. Remove the screw securing the CCD. 12. LCD module disassembly 1. Remove the LCD from the cover assembly. Remvoe the CCD from the cover assembly. 11. Remove the six screws... that paralleled LCD cover and remove the LCD bezel. 5. Remove the inverter board. 9. Need to right. 4. Disconnect the LCD cable from left to follow the following disassembly pictures from the inverter board. 8. Disconnect...
... Release the latches one by one. Pull the bezel a little bit forward that secure the LCD bezel. 3. Remove the screw securing the CCD. 12. LCD module disassembly 1. Remove the LCD from the cover assembly. Remvoe the CCD from the cover assembly. 11. Remove the six screws... that paralleled LCD cover and remove the LCD bezel. 5. Remove the inverter board. 9. Need to right. 4. Disconnect the LCD cable from left to follow the following disassembly pictures from the inverter board. 8. Disconnect...

TravelMate 3010 Service Guide
Page 66
Remove the two screws that secure the left LCD bracket from the cover assembly. 14. Disconnect the LCD cable from the LCD. 18. 13. Remove the right LCD bracket from the LCD. 21. This completes the LCD disassembly. 60 Chapter 3 Remove the wireless antenna from the LCD. 16. Remove the left LCD bracket. 15. Tear off the tape on theLCD cable. 20. Turn the LCD back. 19. Remove the two screws that secure the right LCD bracket. 17.
Remove the two screws that secure the left LCD bracket from the cover assembly. 14. Disconnect the LCD cable from the LCD. 18. 13. Remove the right LCD bracket from the LCD. 21. This completes the LCD disassembly. 60 Chapter 3 Remove the wireless antenna from the LCD. 16. Remove the left LCD bracket. 15. Tear off the tape on theLCD cable. 20. Turn the LCD back. 19. Remove the two screws that secure the right LCD bracket. 17.

TravelMate 3010 Service Guide
Page 68
Non-Acer products, prototype cards, or modified options can perform visual inspection before you can give false errors and invalid system responses. 1. LCD display problems or others). Go To "Power System Check" on screen. Verify the symptoms by repeating the same operation. 3. Use the following table with the ...
Non-Acer products, prototype cards, or modified options can perform visual inspection before you can give false errors and invalid system responses. 1. LCD display problems or others). Go To "Power System Check" on screen. Verify the symptoms by repeating the same operation. 3. Use the following table with the ...
TravelMate 3010 Service Guide
Page 74
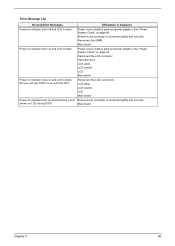
... source (battery pack and power adapter.) See "Power System Check" on page 64 Reconnect the LCD connector Hard disk drive LCD cable LCD inverter LCD Main board Power-on indicator turns on and LCD is blank. Power-on indicator turns on page 64 Ensure every connector is connected tightly and correctly... POST. Power source (battery pack and power adapter.) See "Power System Check" on and LCD is blank. LCD cable LCD inverter LCD Main board Power-on indicator turns on indicator turns off and LCD is blank. Error Message List No beep Error Messages FRU/Action in Sequence Power-on and a...
... source (battery pack and power adapter.) See "Power System Check" on page 64 Reconnect the LCD connector Hard disk drive LCD cable LCD inverter LCD Main board Power-on indicator turns on and LCD is blank. Power-on indicator turns on page 64 Ensure every connector is connected tightly and correctly... POST. Power source (battery pack and power adapter.) See "Power System Check" on and LCD is blank. LCD cable LCD inverter LCD Main board Power-on indicator turns on indicator turns off and LCD is blank. Error Message List No beep Error Messages FRU/Action in Sequence Power-on and a...
TravelMate 3010 Service Guide
Page 79
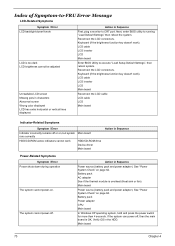
... "Load Setup Default Settings", then reboot system. Keyboard (if the brightness function key doesn't work LCD is too dark LCD brightness cannot be adjusted Unreadable LCD screen Missing pels in Sequence Power-Related Symptoms Symptom / Error Power shuts down during operation The system...System Check" on page 64. Verify OS in Sequence Power source (battery pack and power adapter). LCD cable LCD inverter LCD Main board Reconnect the LCD cable LCD cable LCD Main board Indicator-Related Symptoms Symptom / Error Indicator incorrectly remains off . Main board Power source (battery...
... "Load Setup Default Settings", then reboot system. Keyboard (if the brightness function key doesn't work LCD is too dark LCD brightness cannot be adjusted Unreadable LCD screen Missing pels in Sequence Power-Related Symptoms Symptom / Error Power shuts down during operation The system...System Check" on page 64. Verify OS in Sequence Power source (battery pack and power adapter). LCD cable LCD inverter LCD Main board Reconnect the LCD cable LCD cable LCD Main board Indicator-Related Symptoms Symptom / Error Indicator incorrectly remains off . Main board Power source (battery...
TravelMate 3010 Service Guide
Page 80
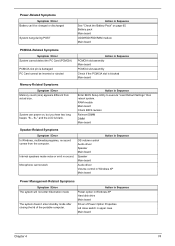
... control in upper case Main board Chapter 4 74 Action in Sequence See "Check the Battery Pack" on , but you hear two long beeps: "B--, B--" and the LCD is blank. Internal speakers make noise or emit no sound comes from actual size.
... control in upper case Main board Chapter 4 74 Action in Sequence See "Check the Battery Pack" on , but you hear two long beeps: "B--, B--" and the LCD is blank. Internal speakers make noise or emit no sound comes from actual size.
TravelMate 3010 Service Guide
Page 81
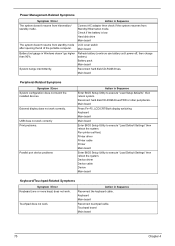
..."Load Setup defaults", then reboot system. Refresh battery (continue use battery until power off, then charge battery). Main board Press Fn+F5, LCD/CRT/Both display switching Keyboard Main board Main board Enter BIOS Setup Utility to execute "Load Default Settings" then reboot the system. Device driver...Symptom / Error Keyboard (one or more keys) does not work . Connect AC adapter then check if the system resumes from standby mode LCD cover switch after opening the lid of the portable computer. Printer driver Printer cable Printer Main board Enter BIOS Setup Utility to execute "...
..."Load Setup defaults", then reboot system. Refresh battery (continue use battery until power off, then charge battery). Main board Press Fn+F5, LCD/CRT/Both display switching Keyboard Main board Main board Enter BIOS Setup Utility to execute "Load Default Settings" then reboot the system. Device driver...Symptom / Error Keyboard (one or more keys) does not work . Connect AC adapter then check if the system resumes from standby mode LCD cover switch after opening the lid of the portable computer. Printer driver Printer cable Printer Main board Enter BIOS Setup Utility to execute "...


