

TravelMate 220 Service Guide
Page 7
... 1 System Introduction 1 Features 1 System Block Diagram 3 Board Layout 4 Top View 4 Bottom View 5 Panel 6 Front Panel 6 Left Panel 7 Right Panel 8 Rear Panel 8 Bottom Panel 9 Indicators 10 Keyboard 11 Special keys 11 Hot Keys 13 Touchpad 15 Touchpad basics 15 Hardware Specifications and Configurations 17 Chapter 2 System Utilities 30 BIOS Setup Utility 30... the LCD 56 Removing the Hinge Caps 56 Removing the Middle Cover 56 Removing the Launch Board 56 Removing the Cable Cover 57 Removing the Keyboard 57 Removing the LCD Module 58 VII
... 1 System Introduction 1 Features 1 System Block Diagram 3 Board Layout 4 Top View 4 Bottom View 5 Panel 6 Front Panel 6 Left Panel 7 Right Panel 8 Rear Panel 8 Bottom Panel 9 Indicators 10 Keyboard 11 Special keys 11 Hot Keys 13 Touchpad 15 Touchpad basics 15 Hardware Specifications and Configurations 17 Chapter 2 System Utilities 30 BIOS Setup Utility 30... the LCD 56 Removing the Hinge Caps 56 Removing the Middle Cover 56 Removing the Launch Board 56 Removing the Cable Cover 57 Removing the Keyboard 57 Removing the LCD Module 58 VII
TravelMate 220 Service Guide
Page 8
... Bracket 76 Removing the Modem Cable 77 Chapter 4 Troubleshooting 78 System Check Procedures 79 External Diskette Drive Check 79 External CD-ROM Drive Check 79 Keyboard or Auxiliary Input Device Check 80 Memory Check 80 Power System Check 80 Touchpad Check 82 Power-On Self-Test (POST) Error Message 83 Index...
... Bracket 76 Removing the Modem Cable 77 Chapter 4 Troubleshooting 78 System Check Procedures 79 External Diskette Drive Check 79 External CD-ROM Drive Check 79 Keyboard or Auxiliary Input Device Check 80 Memory Check 80 Power System Check 80 Touchpad Check 82 Power-On Self-Test (POST) Error Message 83 Index...
TravelMate 220 Service Guide
Page 10
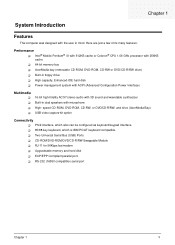
... designed with 256KB cache ! 64-bit memory bus ! Here are just a few of its many features: Performance ! PS/2 interface, which also can be configured as keyboard/keypad interface. ! 85/88 key keyboard, which is IBM PC/AT keyboard compatible. ! Two Universal Serial Bus (USB) Ports !
... designed with 256KB cache ! 64-bit memory bus ! Here are just a few of its many features: Performance ! PS/2 interface, which also can be configured as keyboard/keypad interface. ! 85/88 key keyboard, which is IBM PC/AT keyboard compatible. ! Two Universal Serial Bus (USB) Ports !
TravelMate 220 Service Guide
Page 11
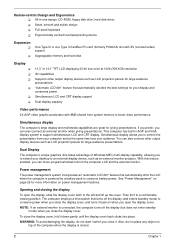
... display system to the left and lift up the cover. NOTE: If an external monitor is closed. 2 Chapter 1 Human-centric Design and Ergonomics ! Full-sized keyboard ! Ergonomically centred touchpad pointing device Expansion ! ! If you prefer, you open the display, slide the display cover latch to support simultaneous LCD and CRT display...
... display system to the left and lift up the cover. NOTE: If an external monitor is closed. 2 Chapter 1 Human-centric Design and Ergonomics ! Full-sized keyboard ! Ergonomically centred touchpad pointing device Expansion ! ! If you prefer, you open the display, slide the display cover latch to support simultaneous LCD and CRT display...
TravelMate 220 Service Guide
Page 13
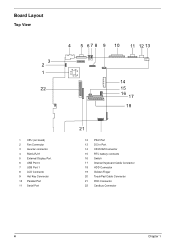
Board Layout Top View 3 2 1 22 4 5 6 7 8 9 10 11 12 13 14 15 16 17 18 1 CPU (on board) 2 Fan Connector 3 Inverter connector 4 RJ45+RJ11 5 External Display Port 6 USB Port 0 7 USB Port 1 8 LCD Connecto 9 Hot Key Connector 10 Parallel Port 11 Serial Port 21 12 PS/2 Port 13 DC-in Port 14 CD-ROM Connector 15 RTC battery connecto 16 Switch 17 Internal Keyboard Cable Connector 18 HDD Connector 19 Golden Finger 20 TouchPad Cable Connector 21 FDD Connector 22 Cardbus Connector 4 Chapter 1
Board Layout Top View 3 2 1 22 4 5 6 7 8 9 10 11 12 13 14 15 16 17 18 1 CPU (on board) 2 Fan Connector 3 Inverter connector 4 RJ45+RJ11 5 External Display Port 6 USB Port 0 7 USB Port 1 8 LCD Connecto 9 Hot Key Connector 10 Parallel Port 11 Serial Port 21 12 PS/2 Port 13 DC-in Port 14 CD-ROM Connector 15 RTC battery connecto 16 Switch 17 Internal Keyboard Cable Connector 18 HDD Connector 19 Golden Finger 20 TouchPad Cable Connector 21 FDD Connector 22 Cardbus Connector 4 Chapter 1
TravelMate 220 Service Guide
Page 15
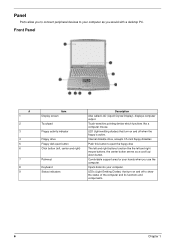
... would with a desktop PC. Internal diskette drive, accepts 3.5-inch floppy diskettes Push this button to eject the floppy disk The left , center and right) Palmrest Keyboard Status indicators Description Also called LCD (Liquid Crystal Display), displays computer output. Comfortable support area for your computer. Panel Ports allow you to connect peripheral...
... would with a desktop PC. Internal diskette drive, accepts 3.5-inch floppy diskettes Push this button to eject the floppy disk The left , center and right) Palmrest Keyboard Status indicators Description Also called LCD (Liquid Crystal Display), displays computer output. Comfortable support area for your computer. Panel Ports allow you to connect peripheral...
TravelMate 220 Service Guide
Page 17
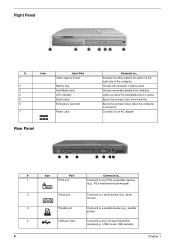
Houses removable media drive modules. Connects to any PS/2-compatible devices (e.g., PS/2 keyboard/mouse/keypad) Connects to a serial device (e.g., serial mouse) Connects to a parallel device (e.g., parallel printer) Connects to ... Houses the computer's battery pack. Lights up when the ...
Houses removable media drive modules. Connects to any PS/2-compatible devices (e.g., PS/2 keyboard/mouse/keypad) Connects to a serial device (e.g., serial mouse) Connects to a parallel device (e.g., parallel printer) Connects to ... Houses the computer's battery pack. Lights up when the ...
TravelMate 220 Service Guide
Page 20
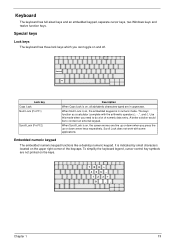
...calculator (complete with some applications. It is on, the screen moves one line up or down arrow keys respectively. To simplify the keyboard legend, cursor-control key symbols are in numeric mode. Embedded numeric keypad The embedded numeric keypad functions like a desktop numeric keypad. Special...-, *, and /). Chapter 1 11 When Num Lock is in uppercase. Use this mode when you need to connect an external keypad. Keyboard The keyboard has full-sized keys and an embedded keypad, separate cursor keys, two Windows keys and twelve function keys. Lock key Caps Lock Num Lock...
...calculator (complete with some applications. It is on, the screen moves one line up or down arrow keys respectively. To simplify the keyboard legend, cursor-control key symbols are in numeric mode. Embedded numeric keypad The embedded numeric keypad functions like a desktop numeric keypad. Special...-, *, and /). Chapter 1 11 When Num Lock is in uppercase. Use this mode when you need to connect an external keypad. Keyboard The keyboard has full-sized keys and an embedded keypad, separate cursor keys, two Windows keys and twelve function keys. Lock key Caps Lock Num Lock...

TravelMate 220 Service Guide
Page 21
...-control keys. Type the letters in a normal manner. NOTE: If an external keyboard or keypad is connected to the computer, the Num Lock feature automatically shifts from the internal keyboard to the external keyboard or keypad. Application key Description Start button. Hold Fn while typing letters on Type...Chapter 1 Combinations with this key perform shortcut functions. Desired access Number keys on embedded keypad Cursor-control keys on embedded keypad Main keyboard keys Num lock on embedded keypad. Windows keys The keyboard has two keys that perform Windows-specific functions.
...-control keys. Type the letters in a normal manner. NOTE: If an external keyboard or keypad is connected to the computer, the Num Lock feature automatically shifts from the internal keyboard to the external keyboard or keypad. Application key Description Start button. Hold Fn while typing letters on Type...Chapter 1 Combinations with this key perform shortcut functions. Desired access Number keys on embedded keypad Cursor-control keys on embedded keypad Main keyboard keys Num lock on embedded keypad. Windows keys The keyboard has two keys that perform Windows-specific functions.

TravelMate 220 Service Guide
Page 23
Keys 3 and 4 starts the Launch Manager application. All four keys can be set the launch keys, run the Acer Launch Manager. 14 Chapter 1 By default, key 1 is used to launch the internet browser and key 2 is used to launch the e-mail application. To set by the user. They are called launch keys. These buttons are designated as key 1, key 2, key 3 and key 4. Launch Keys Located at the top of the keyboard are four buttons.
Keys 3 and 4 starts the Launch Manager application. All four keys can be set the launch keys, run the Acer Launch Manager. 14 Chapter 1 By default, key 1 is used to launch the internet browser and key 2 is used to launch the e-mail application. To set by the user. They are called launch keys. These buttons are designated as key 1, key 2, key 3 and key 4. Launch Keys Located at the top of the keyboard are four buttons.
TravelMate 220 Service Guide
Page 32
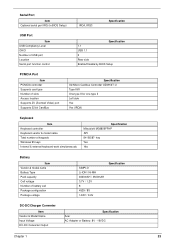
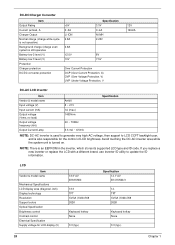
... Item Vendor & Model Name Input Voltage DC-DC Converter Output Specification Acer AC Adapter or Battery: 8V - 19VDC Chapter 1 23 key Yes Yes Battery Item Vendor & model name Battery Type Pack capacity Cell voltage Number of keypads Windows 95 keys Internal & external keyboard work simultaneously Specification Mitsubishi M38859FFHP API 84-/85/87-
... Item Vendor & Model Name Input Voltage DC-DC Converter Output Specification Acer AC Adapter or Battery: 8V - 19VDC Chapter 1 23 key Yes Yes Battery Item Vendor & model name Battery Type Pack capacity Cell voltage Number of keypads Windows 95 keys Internal & external keyboard work simultaneously Specification Mitsubishi M38859FFHP API 84-/85/87-
TravelMate 220 Service Guide
Page 33
...6.5mA Specification NOTE: DC-AC inverter is used to generate very high AC voltage, then support to update the ID information. TFT XVGA (1024x768 262K Keyboard hotkey None 3.3 (typ.) 24 Chapter 1 NOTE: There is also responsible for LCD display (V) 13.3" AV B133XN04 13.3 TFT XVGA (1024x768 262K... Keyboard hotkey None 3.3 (typ.) Specification 14.1" AV B141XN04/3 14. Avoid touching the DC-AC inverter area while the system unit is turned on. LCD Item ...
...6.5mA Specification NOTE: DC-AC inverter is used to generate very high AC voltage, then support to update the ID information. TFT XVGA (1024x768 262K Keyboard hotkey None 3.3 (typ.) 24 Chapter 1 NOTE: There is also responsible for LCD display (V) 13.3" AV B133XN04 13.3 TFT XVGA (1024x768 262K... Keyboard hotkey None 3.3 (typ.) Specification 14.1" AV B141XN04/3 14. Avoid touching the DC-AC inverter area while the system unit is turned on. LCD Item ...
TravelMate 220 Service Guide
Page 35
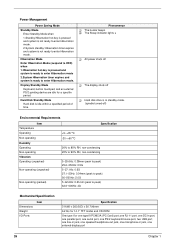
...2.System standby/ Hibernation timer expires and system is not ready to peak) 62.6~500Hz: 4G Mechanical Specification Dimensions Weight I/O Ports Item Specification 311(W) x 260.5(D) x 36.7(H)mm 6.2 lbs for a specifie period. The display shuts off ! Hard disk drive is in jack, one external display port 26 Chapter...is ready to enter Hibernation mode 2.System Hibernation timer expires and system is idle within a specified period of time. Display Standby Mode Keyboard, built-in touchpad, and an external PS/2 pointing device are idle for 14.1" TFT model and CD-ROM One type II ...
...2.System standby/ Hibernation timer expires and system is not ready to peak) 62.6~500Hz: 4G Mechanical Specification Dimensions Weight I/O Ports Item Specification 311(W) x 260.5(D) x 36.7(H)mm 6.2 lbs for a specifie period. The display shuts off ! Hard disk drive is in jack, one external display port 26 Chapter...is ready to enter Hibernation mode 2.System Hibernation timer expires and system is idle within a specified period of time. Display Standby Mode Keyboard, built-in touchpad, and an external PS/2 pointing device are idle for 14.1" TFT model and CD-ROM One type II ...
TravelMate 220 Service Guide
Page 36
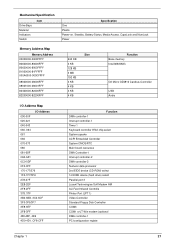
..., 37F 3B0-3BB, 3C0-3DF 3F0-3F5/3F7 3E8-3EF 3F8-3FF 480-48F, 4D6 4D0-4D1, CF8-CFF Function DMA controller-1 Interrupt controller-1 Timer 1 Keyboard controller 8742 chip select System speake ACPI Embedded Controller System CMOS/RTC Main board resources DMA Controller-1 Interrupt controller-2 DMA controller-2 Numeric data processor 2nd...
..., 37F 3B0-3BB, 3C0-3DF 3F0-3F5/3F7 3E8-3EF 3F8-3FF 480-48F, 4D6 4D0-4D1, CF8-CFF Function DMA controller-1 Interrupt controller-1 Timer 1 Keyboard controller 8742 chip select System speake ACPI Embedded Controller System CMOS/RTC Main board resources DMA Controller-1 Interrupt controller-2 DMA controller-2 Numeric data processor 2nd...
TravelMate 220 Service Guide
Page 37
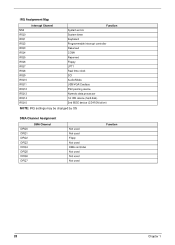
... Map NMI IRQ0 IRQ1 IRQ2 IRQ3 IRQ4 IRQ5 IRQ6 IRQ7 IRQ8 IRQ9 IRQ10 IRQ11 IRQ12 IRQ13 IRQ14 IRQ15 Interrupt Channel Function System errors System timer Keyboard Programmable interrupt controller Reserved COM1 Reserved Floppy LPT1 Real time clock SCI Audio/Mode USB/VGA/Cardbus PS2 pointing device Numeric data processor 1st IDE...
... Map NMI IRQ0 IRQ1 IRQ2 IRQ3 IRQ4 IRQ5 IRQ6 IRQ7 IRQ8 IRQ9 IRQ10 IRQ11 IRQ12 IRQ13 IRQ14 IRQ15 Interrupt Channel Function System errors System timer Keyboard Programmable interrupt controller Reserved COM1 Reserved Floppy LPT1 Real time clock SCI Audio/Mode USB/VGA/Cardbus PS2 pointing device Numeric data processor 1st IDE...
TravelMate 220 Service Guide
Page 50
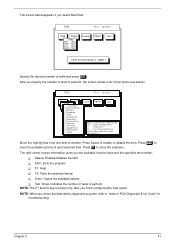
... number of each selected item. Chapter 2 41 ESC: Exits the program ! PQA Vx_x xx-xx-xx D ia g R e s u lt D ia g M A N U A LTTeEstSITte m s A U TO[ ] S yTstEeSmTB oa rd [ ] M emory [ ] Keyboard [ ] Video [ ] Parallel Port [ ] Serial Port [ ] Diskette Drive [ ] Hard Disk [ ] CD-ROM [ ] Coprocessor [ ] P ointing D ev. [ ] Cache SysInfo Option E x it SPACE: mark/unm ark selecting item ES...
... number of each selected item. Chapter 2 41 ESC: Exits the program ! PQA Vx_x xx-xx-xx D ia g R e s u lt D ia g M A N U A LTTeEstSITte m s A U TO[ ] S yTstEeSmTB oa rd [ ] M emory [ ] Keyboard [ ] Video [ ] Parallel Port [ ] Serial Port [ ] Diskette Drive [ ] Hard Disk [ ] CD-ROM [ ] Coprocessor [ ] P ointing D ev. [ ] Cache SysInfo Option E x it SPACE: mark/unm ark selecting item ES...

TravelMate 220 Service Guide
Page 54
...Procedure Flowchart The flowchart on the succeeding page gives you a graphic representation on the entire disassembly sequence and instructs you must first remove the keyboard, then disassemble the inside assembly frame in that need to be removed during servicing. START Battery Bx1 Modem Cover Bx2 CD-ROM Module Ex4... Left & Right Hinge Caps Modem Board CD-Rom Drive Jx2 CD-ROM Transfer Board CD-ROM Drive Chassis Middle Cover LCD Cable Cover Keyboard Dx2 LCD Coaxial Cable Bx1 DIMM Cover Video Capture Kit Covers Ax1 HDD Cover DIMM Fx2 Launch Board HDD Bracket Cx2 HDD HDD Module...
...Procedure Flowchart The flowchart on the succeeding page gives you a graphic representation on the entire disassembly sequence and instructs you must first remove the keyboard, then disassemble the inside assembly frame in that need to be removed during servicing. START Battery Bx1 Modem Cover Bx2 CD-ROM Module Ex4... Left & Right Hinge Caps Modem Board CD-Rom Drive Jx2 CD-ROM Transfer Board CD-ROM Drive Chassis Middle Cover LCD Cable Cover Keyboard Dx2 LCD Coaxial Cable Bx1 DIMM Cover Video Capture Kit Covers Ax1 HDD Cover DIMM Fx2 Launch Board HDD Bracket Cx2 HDD HDD Module...
TravelMate 220 Service Guide
Page 65
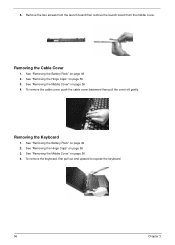
... page 49 2. See "Removing the Battery Pack" on page 49 2. See "Removing the Hinge Caps" on page 56 3. To remove the keyboard, first pull out and upward to expose the keyboard. 56 Chapter 3 5. See "Removing the Hinge Caps" on page 56 3. To remove the cable cover, push the cable cover backward then... launch board then remove the launch board from the middle cover. Removing the Cable Cover 1. See "Removing the Middle Cover" on page 56 4. Removing the Keyboard 1. See "Removing the Middle Cover" on page 56 4.
... page 49 2. See "Removing the Battery Pack" on page 49 2. See "Removing the Hinge Caps" on page 56 3. To remove the keyboard, first pull out and upward to expose the keyboard. 56 Chapter 3 5. See "Removing the Hinge Caps" on page 56 3. To remove the cable cover, push the cable cover backward then... launch board then remove the launch board from the middle cover. Removing the Cable Cover 1. See "Removing the Middle Cover" on page 56 4. Removing the Keyboard 1. See "Removing the Middle Cover" on page 56 4.
TravelMate 220 Service Guide
Page 66
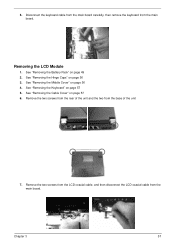
See "Removing the Keyboard" on page 56 4. Remove the two screws from the LCD coaxial cable, and then disconnect the LCD coaxial cable from the base of the unit ... of the unit 7. Removing the LCD Module 1. See "Removing the Battery Pack" on page 57 6. See "Removing the Hinge Caps" on page 56 3. Disconnect the keyboard cable from the main board carefully, then remove the...
See "Removing the Keyboard" on page 56 4. Remove the two screws from the LCD coaxial cable, and then disconnect the LCD coaxial cable from the base of the unit ... of the unit 7. Removing the LCD Module 1. See "Removing the Battery Pack" on page 57 6. See "Removing the Hinge Caps" on page 56 3. Disconnect the keyboard cable from the main board carefully, then remove the...
TravelMate 220 Service Guide
Page 67
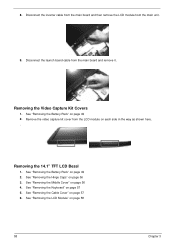
... here. . Remove the video capture kit cover from the LCD module on page 49 2. See "Removing the Middle Cover" on page 57 5. See "Removing the Keyboard" on page 56 4. See "Removing the Cable Cover" on page 49 2. 8. Removing the Video Capture Kit Covers 1. Removing the 14.1" TFT LCD Bezel 1. See "Removing...
... here. . Remove the video capture kit cover from the LCD module on page 49 2. See "Removing the Middle Cover" on page 57 5. See "Removing the Keyboard" on page 56 4. See "Removing the Cable Cover" on page 49 2. 8. Removing the Video Capture Kit Covers 1. Removing the 14.1" TFT LCD Bezel 1. See "Removing...


