TravelMate 240/250 Service Guide
Page 7
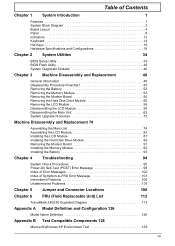
... Panel 6 Indicators 12 Keyboard 14 Hot Keys 16 Hardware Specifications and Configurations 19 Chapter 2 System Utilities 34 BIOS Setup Utility 34 BIOS Flash Utility 46 System Diagnostic Diskette 46 Chapter 3 Machine Disassembly and Replacement 48 General Information 49 Disassembly Procedure ... 106 Undetermined Problems 107 Chapter 5 Jumper and Connector Locations 108 Chapter 6 FRU (Field Replaceable Unit) List 112 TravelMate 240/250 Exploded Diagram 113 Appendix A Model Definition and Configuration 126 Model Name Definition 126 Appendix B Test Compatible Components...
... Panel 6 Indicators 12 Keyboard 14 Hot Keys 16 Hardware Specifications and Configurations 19 Chapter 2 System Utilities 34 BIOS Setup Utility 34 BIOS Flash Utility 46 System Diagnostic Diskette 46 Chapter 3 Machine Disassembly and Replacement 48 General Information 49 Disassembly Procedure ... 106 Undetermined Problems 107 Chapter 5 Jumper and Connector Locations 108 Chapter 6 FRU (Field Replaceable Unit) List 112 TravelMate 240/250 Exploded Diagram 113 Appendix A Model Definition and Configuration 126 Model Name Definition 126 Appendix B Test Compatible Components...

TravelMate 240/250 Service Guide
Page 25
...-s Fn-w Icon Function Hotkey help Setup Description Displays a list of the computer's controls like screen contrast and brightness, volume output and the BIOS Utility. Display toggle Screen blank Touchpad Toggle Speaker on/off . Hot Keys The computer employs hot keys or key combinations to save power. ...(if connected) and both the display screen and external monitor. Press any key to return. Volume up Increases the screen brightness. 16 TravelMate 240/ 250 Puts the computer in the hot key combination. To activate hot keys, press and hold the Fn key before pressing the other ...
...-s Fn-w Icon Function Hotkey help Setup Description Displays a list of the computer's controls like screen contrast and brightness, volume output and the BIOS Utility. Display toggle Screen blank Touchpad Toggle Speaker on/off . Hot Keys The computer employs hot keys or key combinations to save power. ...(if connected) and both the display screen and external monitor. Press any key to return. Volume up Increases the screen brightness. 16 TravelMate 240/ 250 Puts the computer in the hot key combination. To activate hot keys, press and hold the Fn key before pressing the other ...
TravelMate 240/250 Service Guide
Page 28
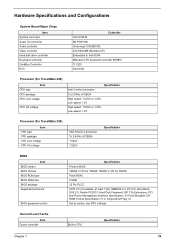
...SW1 settings Second Level Cache Item Cache controller Built-in Intel ICH4 Mitsubish LPC keyboard controller M38857 TI 1520 Intel ICH4 Processor (for TravelMate 240) Item CPU type CPU package CPU core voltage CPU I/O voltage Specification Intel Cerelon processor To 2.0GHz uFCBGA High speed: 1.525V...Major Chips Item System core logic Super I /O voltage Intel Petium 4 processor To 2.4GHz uFCBGA 1.525V 1.525V Specification BIOS Item BIOS vendor BIOS Version BIOS ROM type BIOS ROM size BIOS package Supported protocols BIOS password control Specification Phoenix BIOS TM240 V1.00 for TM240;
...SW1 settings Second Level Cache Item Cache controller Built-in Intel ICH4 Mitsubish LPC keyboard controller M38857 TI 1520 Intel ICH4 Processor (for TravelMate 240) Item CPU type CPU package CPU core voltage CPU I/O voltage Specification Intel Cerelon processor To 2.0GHz uFCBGA High speed: 1.525V...Major Chips Item System core logic Super I /O voltage Intel Petium 4 processor To 2.4GHz uFCBGA 1.525V 1.525V Specification BIOS Item BIOS vendor BIOS Version BIOS ROM type BIOS ROM size BIOS package Supported protocols BIOS password control Specification Phoenix BIOS TM240 V1.00 for TM240;

TravelMate 240/250 Service Guide
Page 34
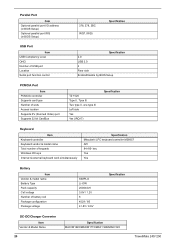
... Parallel Port Item Parallel port controller Number of parallel port Location Connector type Parallel port function control Supports ECP/EPP Optional ECP DMA channel (in BIOS Setup) Specification NS PC87392 1 Rear side 25-pin D-type Enable/Disable by...
... Parallel Port Item Parallel port controller Number of parallel port Location Connector type Parallel port function control Supports ECP/EPP Optional ECP DMA channel (in BIOS Setup) Specification NS PC87392 1 Rear side 25-pin D-type Enable/Disable by...
TravelMate 240/250 Service Guide
Page 35
... keyboard controller M38857 API 84-/85- Parallel Port Item Optional parallel port I/O address (in BIOS Setup) Optional parallel port IRQ (in BIOS Setup) USB Port Item USB Compliancy Level OHCI Number of USB port Location Serial port function... control 378, 278, 3BC IRQ7, IRQ5 Specification Specification 2.0 USB 2.0 4 Rear side Enable/Disable by BIOS Setup PCMCIA Port Item PCMCIA controller Supports card type Number of slots Access location Supports ZV (Zoomed Video) port... Converter Item Vendor & Model Name 26 Specification MAX IM1645/MAXIM1715/MAX1 999/MAXI 545 TravelMate 240/ 250
... keyboard controller M38857 API 84-/85- Parallel Port Item Optional parallel port I/O address (in BIOS Setup) Optional parallel port IRQ (in BIOS Setup) USB Port Item USB Compliancy Level OHCI Number of USB port Location Serial port function... control 378, 278, 3BC IRQ7, IRQ5 Specification Specification 2.0 USB 2.0 4 Rear side Enable/Disable by BIOS Setup PCMCIA Port Item PCMCIA controller Supports card type Number of slots Access location Supports ZV (Zoomed Video) port... Converter Item Vendor & Model Name 26 Specification MAX IM1645/MAXIM1715/MAX1 999/MAXI 545 TravelMate 240/ 250
TravelMate 240/250 Service Guide
Page 43
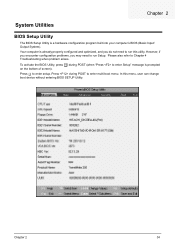
... problems, you do not need to enter Setup" message is a hardware configuration program built into your computer's BIOS (Basic Input/ Output System). To activate the BIOS Utility, press m during POST to run Setup. In this utility. Please also refer to enter setup. Press... during POST (when "Press to run this menu, user can change boot device without entering BIOS SETUP Utility. Chapter 2 34 Press m to Chapter 4 Troubleshooting when problem arises. Your computer is already properly configured and optimized,...
... problems, you do not need to enter Setup" message is a hardware configuration program built into your computer's BIOS (Basic Input/ Output System). To activate the BIOS Utility, press m during POST to run Setup. In this utility. Please also refer to enter setup. Press... during POST (when "Press to run this menu, user can change boot device without entering BIOS SETUP Utility. Chapter 2 34 Press m to Chapter 4 Troubleshooting when problem arises. Your computer is already properly configured and optimized,...
TravelMate 240/250 Service Guide
Page 44
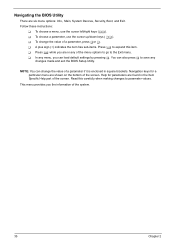
...settings by pressing t. You can change the value of a parameter, press por q. NOTE: You can also press u to save any changes made and exit the BIOS Setup Utility. Navigation keys for parameters are in any menu, you the information of the system. 35 Chapter 2 Follow these instructions: T To choose a menu,... use the cursor up/down keys ( wy). T In any of the menu options to go to parameter values. Navigating the BIOS Utility There are shown on the bottom of the screen. T To change the value of a parameter if it is enclosed in the Item Specific Help...
...settings by pressing t. You can change the value of a parameter, press por q. NOTE: You can also press u to save any changes made and exit the BIOS Setup Utility. Navigation keys for parameters are in any menu, you the information of the system. 35 Chapter 2 Follow these instructions: T To choose a menu,... use the cursor up/down keys ( wy). T In any of the menu options to go to parameter values. Navigating the BIOS Utility There are shown on the bottom of the screen. T To change the value of a parameter if it is enclosed in the Item Specific Help...
TravelMate 240/250 Service Guide
Page 50
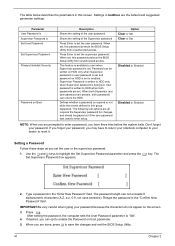
Press Enter to user when Supervisor password is available to set , this password protects the BIOS Setup Utility from unauthorized access. When set the supervisor password. This feature is set the user or the supervisor password: 1. Setting a Password Follow these ... you may have three tries before the system halts. When both Supervisor and user password are present, both passwords are set , this password protects the BIOS Setup Utility from unauthorized access. Use the w andy keys to "Set". 4. Settings in this group happened. Option Clear or Set Clear or Set Disabled ...
Press Enter to user when Supervisor password is available to set , this password protects the BIOS Setup Utility from unauthorized access. When set the supervisor password. This feature is set the user or the supervisor password: 1. Setting a Password Follow these ... you may have three tries before the system halts. When both Supervisor and user password are present, both passwords are set , this password protects the BIOS Setup Utility from unauthorized access. Use the w andy keys to "Set". 4. Settings in this group happened. Option Clear or Set Clear or Set Disabled ...

TravelMate 240/250 Service Guide
Page 51
...to highlight the Set Supervisor Password parameter and press the e key. If desired, you are done, press u to save the changes and exit the BIOS Setup Utility. The Set Password box appears: 2. Press e twice without typing anything in the Confirm New Password field. 4. Changing a Password 1. ... setting is OK, the screen will display as following. When you have changed the settings, press u to save the changes and exit the BIOS Setup Utility. Type the current password in the Enter Current Password field and press e. 3. The Set Password box appears: 2. Type a password...
...to highlight the Set Supervisor Password parameter and press the e key. If desired, you are done, press u to save the changes and exit the BIOS Setup Utility. The Set Password box appears: 2. Press e twice without typing anything in the Confirm New Password field. 4. Changing a Password 1. ... setting is OK, the screen will display as following. When you have changed the settings, press u to save the changes and exit the BIOS Setup Utility. Type the current password in the Enter Current Password field and press e. 3. The Set Password box appears: 2. Type a password...
TravelMate 240/250 Service Guide
Page 55
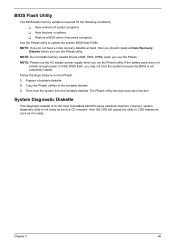
...2 46 Use the Phlash utility to the bootable diskette. 3. System Diagnostic Diskette This diagnostic diskette is required for the Acer TravelMate 240/250 series notebook machine. Acer HQ CSD will upload the utility to CSD website as soon as service CD released. However, system diagnostic utility is...corrupted. NOTE: Please use the Phlash utility. Fellow the steps below to finish BIOS flash, you use the Phlash. Copy the Phlash utilities to update the system BIOS flash ROM. BIOS Flash Utility The BIOS flash memory update is for the following conditions: T New versions of system ...
...2 46 Use the Phlash utility to the bootable diskette. 3. System Diagnostic Diskette This diagnostic diskette is required for the Acer TravelMate 240/250 series notebook machine. Acer HQ CSD will upload the utility to CSD website as soon as service CD released. However, system diagnostic utility is...corrupted. NOTE: Please use the Phlash utility. Fellow the steps below to finish BIOS flash, you use the Phlash. Copy the Phlash utilities to update the system BIOS flash ROM. BIOS Flash Utility The BIOS flash memory update is for the following conditions: T New versions of system ...
TravelMate 240/250 Service Guide
Page 108
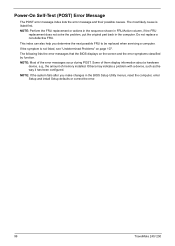
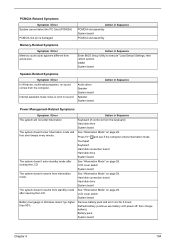
...of them display information about a hardware device, e.g., the amount of the error messages occur during POST. The following lists the error messages that the BIOS displays on page 107. Others may indicate a problem with a device, such as the way it has been configured. If the symptom is listed ... the FRU replacement does not solve the problem, put the original part back in the BIOS Setup Utility menus, reset the computer, enter Setup and install Setup defaults or correct the error. 99 TravelMate 240/ 250 Power-On Self-Test (POST) Error Message The POST error message index lists ...
...of them display information about a hardware device, e.g., the amount of the error messages occur during POST. The following lists the error messages that the BIOS displays on page 107. Others may indicate a problem with a device, such as the way it has been configured. If the symptom is listed ... the FRU replacement does not solve the problem, put the original part back in the BIOS Setup Utility menus, reset the computer, enter Setup and install Setup defaults or correct the error. 99 TravelMate 240/ 250 Power-On Self-Test (POST) Error Message The POST error message index lists ...
TravelMate 240/250 Service Guide
Page 109
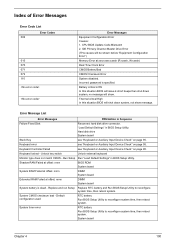
... Time Clock Error CMOS Battery Bad CMOS Checksum Error System disabled. Default configuration used RTC battery Run BIOS Setup Utility to reconfigure system time, then reboot system. CPU BIOS Update Code Mismatch 2. Hard disk drive System board Stuck Key see "Keyboard or Auxiliary Input Device ..." in Sequence Failure Fixed Disk Reconnect hard disk drive connector. Run Setup Run "Load Default Settings" in BIOS Setup Utility. Battery critical LOW In this situation BIOS will shut down system, no message will show message. IDE Primary Channel Master Drive Error (THe causes will...
... Time Clock Error CMOS Battery Bad CMOS Checksum Error System disabled. Default configuration used RTC battery Run BIOS Setup Utility to reconfigure system time, then reboot system. CPU BIOS Update Code Mismatch 2. Hard disk drive System board Stuck Key see "Keyboard or Auxiliary Input Device ..." in Sequence Failure Fixed Disk Reconnect hard disk drive connector. Run Setup Run "Load Default Settings" in BIOS Setup Utility. Battery critical LOW In this situation BIOS will shut down system, no message will show message. IDE Primary Channel Master Drive Error (THe causes will...
TravelMate 240/250 Service Guide
Page 110
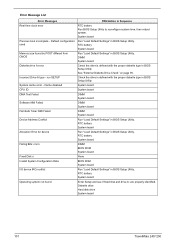
...see if fixed disk and drive A: are properly identified. Incorrect Drive A type - Error Message List Error Messages FRU/Action in BIOS Setup Utility. Cache disabled System board CPU ID: System board DMA Test Failed DIMM System board Software NMI Failed DIMM System board..." in Sequence Real time clock error RTC battery Run BIOS Setup Utility to reconfigure system time, then reboot system. Default configuration used Run "Load Default Settings" in BIOS Setup Utility. Diskette drive Hard disk drive System board 101 TravelMate 240/ 250 System board Previous boot incomplete -
...see if fixed disk and drive A: are properly identified. Incorrect Drive A type - Error Message List Error Messages FRU/Action in BIOS Setup Utility. Cache disabled System board CPU ID: System board DMA Test Failed DIMM System board Software NMI Failed DIMM System board..." in Sequence Real time clock error RTC battery Run BIOS Setup Utility to reconfigure system time, then reboot system. Default configuration used Run "Load Default Settings" in BIOS Setup Utility. Diskette drive Hard disk drive System board 101 TravelMate 240/ 250 System board Previous boot incomplete -
TravelMate 240/250 Service Guide
Page 112
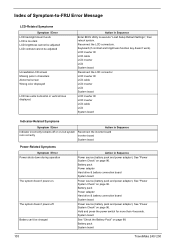
...brightness function key doesn't work LCD is too dark LCD brightness cannot be adjusted LCD contrast cannot be charged Action in Sequence Enter BIOS Utility to -FRU Error Message LCD-Related Symptoms Symptom / Error LCD backlight doesn't work ). Battery pack Power adapter Hard drive...Power shuts down during operation The system doesn't power-on. See "Power System Check" on page 98. Battery pack System board 103 TravelMate 240/ 250 Battery can't be adjusted Unreadable LCD screen Missing pels in Sequence Indicator incorrectly remains off . Reconnect the LCD connectors. See "...
...brightness function key doesn't work LCD is too dark LCD brightness cannot be adjusted LCD contrast cannot be charged Action in Sequence Enter BIOS Utility to -FRU Error Message LCD-Related Symptoms Symptom / Error LCD backlight doesn't work ). Battery pack Power adapter Hard drive...Power shuts down during operation The system doesn't power-on. See "Power System Check" on page 98. Battery pack System board 103 TravelMate 240/ 250 Battery can't be adjusted Unreadable LCD screen Missing pels in Sequence Indicator incorrectly remains off . Reconnect the LCD connectors. See "...
TravelMate 240/250 Service Guide
Page 113
... (continue use battery until power off, then charge battery). LCD cover switch System board The system doesn't resume from actual size. Action in Sequence Enter BIOS Setup Utility to execute "Load Default Settings, then reboot system. See "Hibernation Mode" on page 29. Action in Sequence PCMCIA slot assembly System board PCMCIA...
... (continue use battery until power off, then charge battery). LCD cover switch System board The system doesn't resume from actual size. Action in Sequence Enter BIOS Setup Utility to execute "Load Default Settings, then reboot system. See "Hibernation Mode" on page 29. Action in Sequence PCMCIA slot assembly System board PCMCIA...
TravelMate 240/250 Service Guide
Page 114
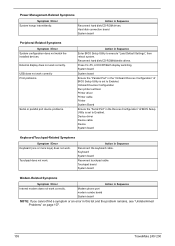
...Sequence Enter BIOS Setup Utility to Enabled. Device driver Device cable Device System board Keyboard/Touchpad-Related Symptoms Symptom / Error Keyboard (one or more keys) does not work . Action in this list and the problem remains, see "Undetermined Problems" on page 107. 105 TravelMate 240/ 250...correctly. External display does not work correctly Print problems. Serial or parallel port device problems. Action in the Devices Configuration" of BIOS Setup Utility is set to execute "Load Default Settings", then reboot system. USB does not work correctly. Touchpad board System ...
...Sequence Enter BIOS Setup Utility to Enabled. Device driver Device cable Device System board Keyboard/Touchpad-Related Symptoms Symptom / Error Keyboard (one or more keys) does not work . Action in this list and the problem remains, see "Undetermined Problems" on page 107. 105 TravelMate 240/ 250...correctly. External display does not work correctly Print problems. Serial or parallel port device problems. Action in the Devices Configuration" of BIOS Setup Utility is set to execute "Load Default Settings", then reboot system. USB does not work correctly. Touchpad board System ...
TravelMate 240/250 Service Guide
Page 151
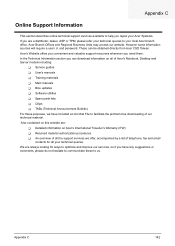
... a distributor, dealer, ASP or TPM, please refer your technical queries to your local Acer branch office. and password. These can download information on all of Acer's Notebook, Desktop and Server models including: T Service guides T User's manuals T Training materials T Main manuals T Bios updates T Software utilities T Spare parts lists T Chips T TABs (Technical Announcement Bulletin) For...
... a distributor, dealer, ASP or TPM, please refer your technical queries to your local Acer branch office. and password. These can download information on all of Acer's Notebook, Desktop and Server models including: T Service guides T User's manuals T Training materials T Main manuals T Bios updates T Software utilities T Spare parts lists T Chips T TABs (Technical Announcement Bulletin) For...
TravelMate 240/250 Service Guide
Page 153
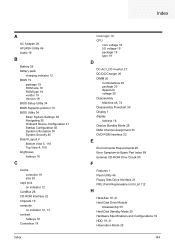
A AC Adapter 28 AFLASH Utility 46 Audio 19 B Battery 26 battery pack charging indicator 12 BIOS 19 package 19 ROM size 19 ROM type 19 vendor 19 Version 19 BIOS Setup Utility 34 BIOS Supports protocol 19 BIOS Utility 34 Basic System Settings 39 Navigating 35 Onboard Device Configuration 41 Startup Configuration 40 System Information...
A AC Adapter 28 AFLASH Utility 46 Audio 19 B Battery 26 battery pack charging indicator 12 BIOS 19 package 19 ROM size 19 ROM type 19 vendor 19 Version 19 BIOS Setup Utility 34 BIOS Supports protocol 19 BIOS Utility 34 Basic System Settings 39 Navigating 35 Onboard Device Configuration 41 Startup Configuration 40 System Information...
TravelMate 240/250 Service Guide
Page 154
... Utility Diskette 46 T Temperature 29 Test Compatible Components 128 Touchpad 19 touchpad hotkey 16 Touchpad Check 98 Troubleshooting 94 U Undetermined Problems 107 USB 26 utility BIOS 34 V Video 25 Resolutions 25 Video controller 19 W Windows XP Environment Test 129, Windows 2000 Environment Test 133, Index
... Utility Diskette 46 T Temperature 29 Test Compatible Components 128 Touchpad 19 touchpad hotkey 16 Touchpad Check 98 Troubleshooting 94 U Undetermined Problems 107 USB 26 utility BIOS 34 V Video 25 Resolutions 25 Video controller 19 W Windows XP Environment Test 129, Windows 2000 Environment Test 133, Index


