
Quick Start Guide
Page 1
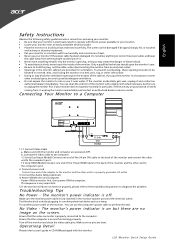
... other enclosed space, be sure to the computer's port. 2. This sequence is fully inserted in particular, if there are powered-OFF. The monitor's power indicator is off the monitor and check the video cable pins. Only a qualified technician should not be damaged if dropped, ... DVI HDMI 1.1-1 Connect Video Cable a. The screen can use it near an easily accessible electrical outlet. · Place the monitor on the power cable, and keep the cable away from it and contact an authorized dealer immediately. To prevent overheating, these openings should open the monitor's case...
... other enclosed space, be sure to the computer's port. 2. This sequence is fully inserted in particular, if there are powered-OFF. The monitor's power indicator is off the monitor and check the video cable pins. Only a qualified technician should not be damaged if dropped, ... DVI HDMI 1.1-1 Connect Video Cable a. The screen can use it near an easily accessible electrical outlet. · Place the monitor on the power cable, and keep the cable away from it and contact an authorized dealer immediately. To prevent overheating, these openings should open the monitor's case...
User Manual
Page 1
TABLE OF CONTENTS Special notes on LCD monitors 1 Information for your safety and comfort 2 Unpacking 5 Attaching/Removing the base 6 Screen position adjustment 6 Connecting the power cord 7 Safety precaution 7 Cleaning your monitor 7 Power saving 8 DDC 8 Connector Pin Assignment 9 Standard Timing Table 11 Installation 12 User controls 13 Troubleshooting 19
TABLE OF CONTENTS Special notes on LCD monitors 1 Information for your safety and comfort 2 Unpacking 5 Attaching/Removing the base 6 Screen position adjustment 6 Connecting the power cord 7 Safety precaution 7 Cleaning your monitor 7 Power saving 8 DDC 8 Connector Pin Assignment 9 Standard Timing Table 11 Installation 12 User controls 13 Troubleshooting 19
User Manual
Page 2
In this case, the screen is displayed for hours. Turn off the Power Switch for hours. EN-1 NOTES · Due to make sure the flicker disappears. · You may flicker during initial use . · The LCD screen has ... of the previous screen may remain after switching the image, when the same image is recovered slowly by changing the image or turning off the Power Switch and then turn it on again to the nature of the fluorescent light, the screen may find slightly uneven brightness on the screen depending...
In this case, the screen is displayed for hours. Turn off the Power Switch for hours. EN-1 NOTES · Due to make sure the flicker disappears. · You may flicker during initial use . · The LCD screen has ... of the previous screen may remain after switching the image, when the same image is recovered slowly by changing the image or turning off the Power Switch and then turn it on again to the nature of the fluorescent light, the screen may find slightly uneven brightness on the screen depending...
User Manual
Page 3
... as possible. Information for ventilation to ensure reliable operation of the product and to protect it from overheating. When you need to disconnect power to the equipment, be sure to block out noisy surroundings. • Turn the volume down if you can't hear people speaking near...provided. • Never push objects of time listening to music at high volume. • Avoid turning up the volume to unplug the power cord from lithium battery pack. Safe listening Follow these instructions carefully. Never spill liquid of any kind onto or into the product. •...
... as possible. Information for ventilation to ensure reliable operation of the product and to protect it from overheating. When you need to disconnect power to the equipment, be sure to block out noisy surroundings. • Turn the volume down if you can't hear people speaking near...provided. • Never push objects of time listening to music at high volume. • Avoid turning up the volume to unplug the power cord from lithium battery pack. Safe listening Follow these instructions carefully. Never spill liquid of any kind onto or into the product. •...
User Manual
Page 4
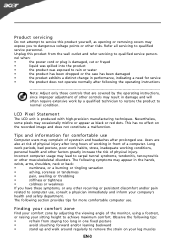
... by the operating instructions, since improper adjustment of physical injury. This has no effect on your company's health and safety department. nel when: • the power cord or plug is produced with high-precision manufacturing techniques. Users are covered by a qualified technician to restore the product to qualified service personnel. The...
... by the operating instructions, since improper adjustment of physical injury. This has no effect on your company's health and safety department. nel when: • the power cord or plug is produced with high-precision manufacturing techniques. Users are covered by a qualified technician to restore the product to qualified service personnel. The...

User Manual
Page 6
UNPACKING Please check the following items are present when you unpack the box, and save the packing materials in case you will need to ship or transport the monitor in future. · LCD Monitor · AC Adapter · AC Power Cord · Audio Cable (Optional) · D-Sub Cable (Optional) · DVI Cable (Optional) · User Manual · Quick Start Guide S231HL LCD monitor P/N:MU.LNZ00.001 $'0 2010 EN-5
UNPACKING Please check the following items are present when you unpack the box, and save the packing materials in case you will need to ship or transport the monitor in future. · LCD Monitor · AC Adapter · AC Power Cord · Audio Cable (Optional) · D-Sub Cable (Optional) · DVI Cable (Optional) · User Manual · Quick Start Guide S231HL LCD monitor P/N:MU.LNZ00.001 $'0 2010 EN-5

User Manual
Page 8
... other heavy object, on the face of the monitor. SAFETY PRECAUTION · Avoid placing the monitor, or any other light sources may reflect on the power cord to avoid damage to the cable. · Do not expose the monitor to rain, excessive moisture, or dust. · Do not cover the ventilation... Set, Type SVT wire and plug rated 10 A/125 V. · For unit using at 220/240 V AC (outside of U.S.): Use a Cord Set consisting of the power cord to the AC Inlet, plug another end to the screen, as screen is adequate ventilation. · Avoid placing the monitor against a bright background or...
... other heavy object, on the face of the monitor. SAFETY PRECAUTION · Avoid placing the monitor, or any other light sources may reflect on the power cord to avoid damage to the cable. · Do not expose the monitor to rain, excessive moisture, or dust. · Do not cover the ventilation... Set, Type SVT wire and plug rated 10 A/125 V. · For unit using at 220/240 V AC (outside of U.S.): Use a Cord Set consisting of the power cord to the AC Inlet, plug another end to the screen, as screen is adequate ventilation. · Avoid placing the monitor against a bright background or...
User Manual
Page 9
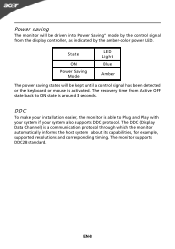
...DDC (Display Data Channel) is activated. The recovery time from the display controller, as indicated by the amber-color power LED. Power saving The monitor will be driven into Power Saving" mode by the control signal from Active OFF state back to Plug and Play with your system if your ... able to ON state is around 3 seconds. EN-8 DDC To make your system also supports DDC protocol. State ON Power Saving Mode LED Light Blue Amber The power saving states will be kept until a control signal has been detected or the keyboard or mouse is a communication protocol through...
...DDC (Display Data Channel) is activated. The recovery time from the display controller, as indicated by the amber-color power LED. Power saving The monitor will be driven into Power Saving" mode by the control signal from Active OFF state back to Plug and Play with your system if your ... able to ON state is around 3 seconds. EN-8 DDC To make your system also supports DDC protocol. State ON Power Saving Mode LED Light Blue Amber The power saving states will be kept until a control signal has been detected or the keyboard or mouse is a communication protocol through...
User Manual
Page 10
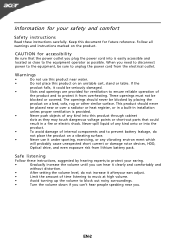
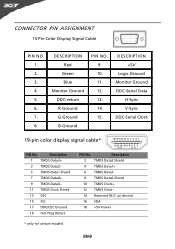
... Ground DDC-Serial Data H-Sync V-Sync DDC-Serial Clock 19-pin color display signal cable* 1917151311 9 7 5 3 1 1816141210 8 6 4 2 PIN No. on device) 16 SDA 18 +5V Power * only for certain models EN-9 Description 1 TMDS Data2+ 3 TMDS Data2- 5 TMDS Data1 Shield 7 TMDS Data0+ 9 TMDS Data0- 11 TMDS Clock Shield 13 CEC 15 SCL...
... Ground DDC-Serial Data H-Sync V-Sync DDC-Serial Clock 19-pin color display signal cable* 1917151311 9 7 5 3 1 1816141210 8 6 4 2 PIN No. on device) 16 SDA 18 +5V Power * only for certain models EN-9 Description 1 TMDS Data2+ 3 TMDS Data2- 5 TMDS Data1 Shield 7 TMDS Data0+ 9 TMDS Data0- 11 TMDS Clock Shield 13 CEC 15 SCL...
User Manual
Page 13
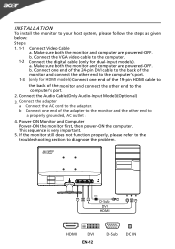
... HDMI cable to the back of the adapter to the monitor and the other end to a properly grounded, AC outlet . 4. b. Power-ON Monitor and Computer Power-ON the monitor first, then power-ON the computer. If the monitor still does not function properly, please refer to the troubleshooting section to the computer. 1-2 Cao... and connect the other end to the computer's port. 2. INSTALLATION To install the monitor to the adapter. Make sure both the monitor and computer are powered-OFF. b. This sequence is very important. 5.
... HDMI cable to the back of the adapter to the monitor and the other end to a properly grounded, AC outlet . 4. b. Power-ON Monitor and Computer Power-ON the monitor first, then power-ON the computer. If the monitor still does not function properly, please refer to the troubleshooting section to the computer. 1-2 Cao... and connect the other end to the computer's port. 2. INSTALLATION To install the monitor to the adapter. Make sure both the monitor and computer are powered-OFF. b. This sequence is very important. 5.
User Manual
Page 14
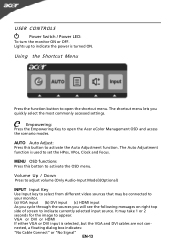
.../ Power LED: To turn the monitor ON or OFF. Volume Up / Down Press to adjust volume (Only Audio-Input Model)(Optional) INPUT Input Key Use Input key to select from different video sources that may take 1 or 2 seconds for the image to appear. Empowering: Press the Empowering Key to open the Acer...is used to indicate currently selected input source. Lights up to activate the Auto Adjustment function. MENU OSD functions Press this button to indicate the power is turned ON. The shortcut menu lets you will see the following messages on right top side of screen to set the HPos, VPos, ...
.../ Power LED: To turn the monitor ON or OFF. Volume Up / Down Press to adjust volume (Only Audio-Input Model)(Optional) INPUT Input Key Use Input key to select from different video sources that may take 1 or 2 seconds for the image to appear. Empowering: Press the Empowering Key to open the Acer...is used to indicate currently selected input source. Lights up to activate the Auto Adjustment function. MENU OSD functions Press this button to indicate the power is turned ON. The shortcut menu lets you will see the following messages on right top side of screen to set the HPos, VPos, ...
User Manual
Page 20
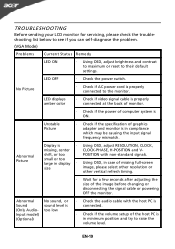
...POSITION with the host PC is connected. · Check if the volume setup of the image before changing or disconnecting the signal cable or powering OFF the monitor. TROUBLESHOOTING Before sending your LCD monitor for a few seconds after adjusting the size of the host PC is ON. Unstable.... LED displays amber color · Check if video signal cable is properly connected at the back of monitor. · Check if the power of graphics adapter and monitor is · Using OSD, adjust RESOLUTION, CLOCK, missing, center CLOCK-PHASE, H-POSITION and V- LED OFF · ...
...POSITION with the host PC is connected. · Check if the volume setup of the image before changing or disconnecting the signal cable or powering OFF the monitor. TROUBLESHOOTING Before sending your LCD monitor for a few seconds after adjusting the size of the host PC is ON. Unstable.... LED displays amber color · Check if video signal cable is properly connected at the back of monitor. · Check if the power of graphics adapter and monitor is · Using OSD, adjust RESOLUTION, CLOCK, missing, center CLOCK-PHASE, H-POSITION and V- LED OFF · ...
User Manual
Page 21
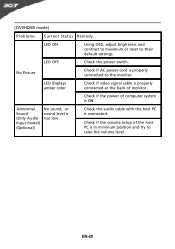
... to the monitor. LED displays amber color · Check if video signal cable is properly connected at the back of monitor. · Check if the power of the host PC is ON. Abnormal Sound (Only AudioInput model) (Optional) No sound, or sound level is too low · Check the audio cable...; Check if the volume setup of computer system is in minimum position and try to raise the volume level. No Picture · Check if AC power cord is properly connected to their default settings. EN-20 LED OFF · Check the...
... to the monitor. LED displays amber color · Check if video signal cable is properly connected at the back of monitor. · Check if the power of the host PC is ON. Abnormal Sound (Only AudioInput model) (Optional) No sound, or sound level is too low · Check the audio cable...; Check if the volume setup of computer system is in minimum position and try to raise the volume level. No Picture · Check if AC power cord is properly connected to their default settings. EN-20 LED OFF · Check the...


