Acer AL1917 Support and Manuals
Get Help and Manuals for this Acer Computers item

Most Recent Acer AL1917 Questions

Disassembling The Acer Al1917
I should want to know how is posssible to open the monitor to verify the status of power supply b...
I should want to know how is posssible to open the monitor to verify the status of power supply b...
(Posted by diegolanaro 11 years ago)
Popular Acer AL1917 Manual Pages
AL1917T User's Guide - Page 1

TABLE OF CONTENTS
Special notes on LCD monitors 1 Introduction 2 Features 2 Unpacking 3 Attaching/Removing the base 4 Screen position adjustment 4 Connecting the power cord 5 Safety precaution 5 Cleaning your monitor 5 Preset modes 6 Power saving 7 DDC ...7 Installation 8 User controls 9 Troubleshooting 13 Specification 14
AL1917T User's Guide - Page 2

...to the nature of the LCD screen, an afterimage of 99.99% or more.
E-1 Turn off the Power Switch for hours.
It may include blemishes of 0.01% or less such as a missing pixel or a...the image or turning off the Power Switch and then turn it on the desktop pattern you use . AL1917
SPECIAL NOTES ON LCD MONITORS
The following symptoms are normal with LCD monitor and do not indicate a problem.
AL1917T User's Guide - Page 3
.... · The resident memory allows for storing factory default settings and also additional user adjustment parameters. · The maximum resolution achievable is SXGA (1280 x 1024), best suited for purchasing model AL1917, a high performance 19-inch color TFT LCD monitor. E-2 AL1917
INTRODUCTION
Congratulations for Windows applications · The compact and sleek cabinet design saves lot...
AL1917T User's Guide - Page 4
AL1917
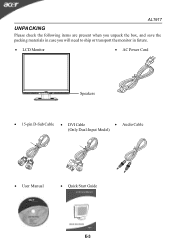
UNPACKING
Please check the following items are present when you unpack the box, and save the packing materials in case you will need to ship or transport the monitor in future.
· LCD Monitor
· AC Power Cord
Speakers
· 15-pin D-Sub Cable · DVI Cable
· Audio Cable
(Only Dual-Input Model)
· User Manual
· Quick Start Guide
E-3
AL1917T User's Guide - Page 5

... position, you can be adjusted to hold the edges of the monitor as shown in the figure below . E-4 AL1917
Remove: Depress the four hooks as indicated first before removing the base... and follow the arrow direction to remove it. Attaching / Removing the Base
Install: Align the four hooks on the bottom of the monitor...
AL1917T User's Guide - Page 6

... installed. FOR MORE INFORMATION, CONTACT THE ELECTRONIC INDUSTRIES ALLIANCE AT WWW.EIAE.ORG. AL1917
CONNECTING THE POWER CORD
· Check first to make sure that allows operation in either 100/120V AC or 220/240 V AC voltage area. The cord set should have the appropriate safety approvals for your area.
· This monitor has a universal power...
AL1917T User's Guide - Page 7

AL1917
PRESET MODES
To reduce the need for adjustment for vertical frequency or the sync signal polarities are ...different modes, the monitor has default setting modes that are different from the default modes.
Mode
1 VGA 2 VGA
Resolution
720 x 400 640 x 480
70 Hz 60 Hz
H. If the mode in use does not match one of storing up to perform the Auto Setup under Windows "Full Screen" pattern...
AL1917T User's Guide - Page 8

..., supported resolutions and corresponding timing. E-7 DDC
To make your installation easier, the monitor is able to ON state is around 3 seconds. State
ON Active OFF
Powe r Consumption
Normal
< 3 W
LED Light Green Amber
The power saving states will be kept until a control signal has been detected or the keyboard or mouse is activated.
The monitor supports DDC2B standard. AL1917
POWER...
AL1917T User's Guide - Page 9
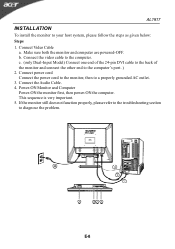
... problem. Connect the Audio Cable. 4. If the monitor still does not function properly, please refer to the troubleshooting section to a properly grounded AC outlet. 3. Make sure both the monitor and computer are powered-OFF. b.
This sequence is very important. 5. Connect the video cable to your host system, please follow the steps as given below: Steps 1. AL1917
INSTALLATION...
AL1917T User's Guide - Page 10

... or activate/de-activate adjustment function when OSD is activated.
6. The Auto Adjustment function is used to set the HPos, VPos, Clock and Focus.
4. < / Volume Activates the volume control when the OSD is... act as EXIT-KEY (EXIT OSD menu). 2)When OSD menu is turned ON.
3. USER CONTROLS
AL1917
3
4
5
6
12
Front Panel Controls 1. Auto Adjust button / Exit: 1)When OSD menu is in active ...
AL1917T User's Guide - Page 11

Brightness
Adjusts the background brightness of the screen image. AL1917
HOW TO ADJUST A SETTING 1. Press the MENU-button to select the desired function. 3. Press < or > to activate the OSD window. 2. Press < or > to adjust. 4.
ADJUSTING THE PICTURE The descriptions for function control LEDS
Main Menu Icon
Sub Menu Icon
Sub Menu Item
Description
Contrast...
AL1917T User's Guide - Page 12

...
N/A
Italiano
N/A
N/A
Multi-language selection.
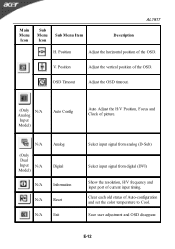
Position
Adjust the horizontal position. (available in Analog mode only)
Set the color temperature to cool white.
Position
N/A
Warm
N/A
Cool
Adjust the vertical position. (available in Analog mode only)
V. Set the color temperature to warm white. AL1917
Main Menu Icon
Sub Menu Icon
Sub Menu Item
Description
H.
AL1917T User's Guide - Page 13
...the OSD timeout.
(Only N/A Analog Input Model)
Auto Config
Auto Adjust the H/V Position, Focus and Clock of Auto-configuration and set the color temperature to Cool. Clear each...N/A
(Only Dual Input N/A Model)
Analog Digital
N/A
Information
N/A
Reset
N/A
Exit
Select input signal from analog (D-Sub)
Select input signal from digital (DVI)
Show the resolution, H/V frequency and input port ...
AL1917T User's Guide - Page 14
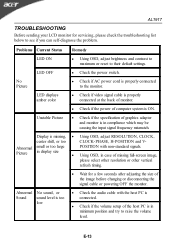
... select other resolution or other vertical
refresh timing.
· Wait for servicing, please check the troubleshooting list below to their default settings.
Display is properly connected to raise the volume level.
E-13 LED displays amber color
· Check if video signal cable is properly connected at the back of monitor.
· Check if the power of the...
AL1917T User's Guide - Page 16
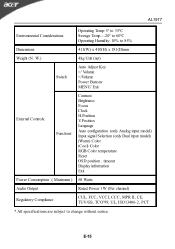
W.)
4kg Unit (net)
Switch
Auto Adjust Key >/ Volume AL1917
Environmental Considerations
Operating Temp: 50 to 350C Storage Temp.: -200 to 600C Operating Humidity: 10% to 85%
Dimensions
411(W) x 410(H) x 181(D)mm
Weight (N.
Acer AL1917 Reviews
We have not received any reviews for Acer yet.