
Quick Start Guide
Page 1
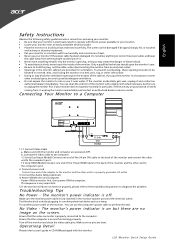
... the adapter to the monitor and the other enclosed space, be sure to provide adequate ventilation. · Do not expose the monitor to rain or use the computer's power cable to perform this monitor LCD Monitor Quick Setup Guide Connecting Your Monitor to diagnose the problem. Try another power cable on and functioning properly. No Video - Ensure that the video connector is very important. 5. Make sure no image on the power cable, and keep the cable...
... the adapter to the monitor and the other enclosed space, be sure to provide adequate ventilation. · Do not expose the monitor to rain or use the computer's power cable to perform this monitor LCD Monitor Quick Setup Guide Connecting Your Monitor to diagnose the problem. Try another power cable on and functioning properly. No Video - Ensure that the video connector is very important. 5. Make sure no image on the power cable, and keep the cable...
Quick Start Guide
Page 2
... instructions, may be made using shielded cables to maintain compliance with the limits for help. This device generates, uses, and can be determined by turning the device off and on a circuit different from that to which the receiver is granted by the manufacturer could void the user authority, which can radiate radio frequency energy and, if not installed and used...
... instructions, may be made using shielded cables to maintain compliance with the limits for help. This device generates, uses, and can be determined by turning the device off and on a circuit different from that to which the receiver is granted by the manufacturer could void the user authority, which can radiate radio frequency energy and, if not installed and used...
User Manual
Page 1
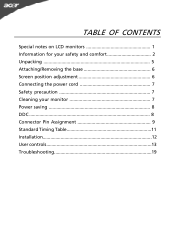
TABLE OF CONTENTS Special notes on LCD monitors 1 Information for your safety and comfort 2 Unpacking 5 Attaching/Removing the base 6 Screen position adjustment 6 Connecting the power cord 7 Safety precaution 7 Cleaning your monitor 7 Power saving 8 DDC 8 Connector Pin Assignment 9 Standard Timing Table 11 Installation 12 User controls 13 Troubleshooting 19
TABLE OF CONTENTS Special notes on LCD monitors 1 Information for your safety and comfort 2 Unpacking 5 Attaching/Removing the base 6 Screen position adjustment 6 Connecting the power cord 7 Safety precaution 7 Cleaning your monitor 7 Power saving 8 DDC 8 Connector Pin Assignment 9 Standard Timing Table 11 Installation 12 User controls 13 Troubleshooting 19
User Manual
Page 2
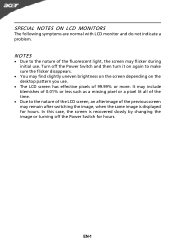
... LCD screen has effective pixels of the fluorescent light, the screen may remain after switching the image, when the same image is recovered slowly by changing the image or turning off the Power Switch and then turn it on again to the nature of 99.99% or more. SPECIAL NOTES ON LCD MONITORS The following symptoms are normal with LCD monitor and do not indicate a problem. Turn off the Power Switch for...
... LCD screen has effective pixels of the fluorescent light, the screen may remain after switching the image, when the same image is recovered slowly by changing the image or turning off the Power Switch and then turn it on again to the nature of 99.99% or more. SPECIAL NOTES ON LCD MONITORS The following symptoms are normal with LCD monitor and do not indicate a problem. Turn off the Power Switch for...

User Manual
Page 3
... These openings must not be placed near or over a radiator or heat register, or in a built-in a fire or electric shock. EN-2 Keep this product on an unstable cart, stand or ...parts that could result in installation unless proper ventilation is easily accessible and located as close to unplug the power cord from lithium battery pack. If the product falls, it from overheating. Safe listening Follow these instructions carefully. Follow all warnings and instructions marked on a vibrating surface. • Never use this product near you need to disconnect power...
... These openings must not be placed near or over a radiator or heat register, or in a built-in a fire or electric shock. EN-2 Keep this product on an unstable cart, stand or ...parts that could result in installation unless proper ventilation is easily accessible and located as close to unplug the power cord from lithium battery pack. If the product falls, it from overheating. Safe listening Follow these instructions carefully. Follow all warnings and instructions marked on a vibrating surface. • Never use this product near you need to disconnect power...
User Manual
Page 4
... your comfort zone by adjusting the viewing angle of a computer. Finding your comfort zone Find your company's health and safety department. Unplug this product yourself, as opening or removing covers may occasionally misfire or appear as black or red dots. Users are covered by a qualified technician to restore the product to normal condition. LCD Pixel Statement The LCD unit is damaged, cut...
... your comfort zone by adjusting the viewing angle of a computer. Finding your comfort zone Find your company's health and safety department. Unplug this product yourself, as opening or removing covers may occasionally misfire or appear as black or red dots. Users are covered by a qualified technician to restore the product to normal condition. LCD Pixel Statement The LCD unit is damaged, cut...
User Manual
Page 5
... lighting, poorly focused screens, very small typefaces and low-contrast displays could stress your documents, place the display at bright light sources, such as open windows, for enhanced text readability and graphics clarity. • Eliminate glare and reflections by: • placing your eyes regular breaks by using drapes, shades or blinds • using a task light • changing the display's viewing angle • using a glare-reduction filter • using...
... lighting, poorly focused screens, very small typefaces and low-contrast displays could stress your documents, place the display at bright light sources, such as open windows, for enhanced text readability and graphics clarity. • Eliminate glare and reflections by: • placing your eyes regular breaks by using drapes, shades or blinds • using a task light • changing the display's viewing angle • using a glare-reduction filter • using...

User Manual
Page 6
UNPACKING Please check the following items are present when you unpack the box, and save the packing materials in case you will need to ship or transport the monitor in future. · LCD Monitor · AC Adapter · AC Power Cord · Audio Cable (Optional) · D-Sub Cable (Optional) · DVI Cable (Optional) · User Manual · Quick Start Guide S231HL LCD monitor P/N:MU.LNZ00.001 $'0 2010 EN-5
UNPACKING Please check the following items are present when you unpack the box, and save the packing materials in case you will need to ship or transport the monitor in future. · LCD Monitor · AC Adapter · AC Power Cord · Audio Cable (Optional) · D-Sub Cable (Optional) · DVI Cable (Optional) · User Manual · Quick Start Guide S231HL LCD monitor P/N:MU.LNZ00.001 $'0 2010 EN-5
User Manual
Page 7
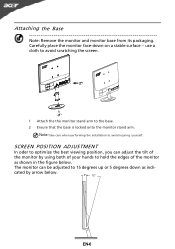
... optimize the best viewing position, you can be adjusted to hold the edges of the monitor as indi- The monitor can adjust the tilt of the monitor by arrow below . cated by using both of your hands to 15 degrees up or 5 degrees down on a stable surface -- Note:Take care when performing the installation to the base. 2 Ensure that the base is locked onto the monitor stand...
... optimize the best viewing position, you can be adjusted to hold the edges of the monitor as indi- The monitor can adjust the tilt of the monitor by arrow below . cated by using both of your hands to 15 degrees up or 5 degrees down on a stable surface -- Note:Take care when performing the installation to the base. 2 Ensure that the base is locked onto the monitor stand...

User Manual
Page 8
... to the screen, as screen is adequate ventilation. · Avoid placing the monitor against a bright background or where sun- CONNECTING THE POWER CORD · Check first to make sure that allows operation in either 100/120V AC or 220/240 V AC voltage area. No user-adjustment is the correct type required for the country in which the equipment will be installed. light or...
... to the screen, as screen is adequate ventilation. · Avoid placing the monitor against a bright background or where sun- CONNECTING THE POWER CORD · Check first to make sure that allows operation in either 100/120V AC or 220/240 V AC voltage area. No user-adjustment is the correct type required for the country in which the equipment will be installed. light or...
User Manual
Page 9
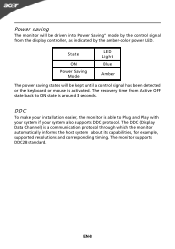
... is able to Plug and Play with your system if your installation easier, the monitor is around 3 seconds. The monitor supports DDC2B standard. Power saving The monitor will be driven into Power Saving" mode by the amber-color power LED. DDC To make your system also supports DDC protocol. The DDC (Display Data Channel) is activated. State ON Power Saving Mode LED Light Blue Amber The power saving states will be kept until a control signal has been...
... is able to Plug and Play with your system if your installation easier, the monitor is around 3 seconds. The monitor supports DDC2B standard. Power saving The monitor will be driven into Power Saving" mode by the amber-color power LED. DDC To make your system also supports DDC protocol. The DDC (Display Data Channel) is activated. State ON Power Saving Mode LED Light Blue Amber The power saving states will be kept until a control signal has been...
User Manual
Page 10
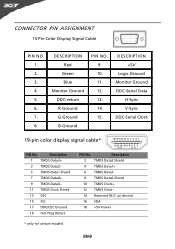
CONNECTOR PIN ASSIGNMENT 15-Pin Color Display Signal Cable PIN NO. 1. 2. 3. 4. 5. 6. 7. 8. Description 1 TMDS Data2+ 3 TMDS Data2- 5 TMDS Data1 Shield 7 TMDS Data0+ 9 TMDS Data0- 11 TMDS Clock Shield 13 CEC 15 SCL 17 DDC/CEC Ground 19 Hot Plug Detect PIN...10 TMDS Clock+ 12 TMDS Clock- 14 Reserved (N.C. DESCRIPTION +5V Logic Ground Monitor Ground DDC-Serial Data H-Sync V-Sync DDC-Serial Clock 19-pin color display signal cable* 1917151311 9 7 5 3 1 1816141210 8 6 4 2 PIN No. DESCRIPTION Red Green Blue Monitor Ground DDC-return R-Ground G-Ground B-Ground PIN NO. 9. 10. 11....
CONNECTOR PIN ASSIGNMENT 15-Pin Color Display Signal Cable PIN NO. 1. 2. 3. 4. 5. 6. 7. 8. Description 1 TMDS Data2+ 3 TMDS Data2- 5 TMDS Data1 Shield 7 TMDS Data0+ 9 TMDS Data0- 11 TMDS Clock Shield 13 CEC 15 SCL 17 DDC/CEC Ground 19 Hot Plug Detect PIN...10 TMDS Clock+ 12 TMDS Clock- 14 Reserved (N.C. DESCRIPTION +5V Logic Ground Monitor Ground DDC-Serial Data H-Sync V-Sync DDC-Serial Clock 19-pin color display signal cable* 1917151311 9 7 5 3 1 1816141210 8 6 4 2 PIN No. DESCRIPTION Red Green Blue Monitor Ground DDC-return R-Ground G-Ground B-Ground PIN NO. 9. 10. 11....
User Manual
Page 13
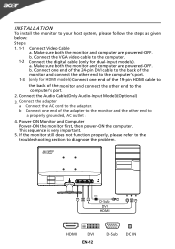
... the computer's port. 1-3 (only for HDMI models) Connect one end of the monitor and connect the other end to the computer's port. 2. DC D-Sub 2 DVI HDMI HDMI DVI EN-12 D-Sub DC IN b. INSTALLATION To install the monitor to the adapter. Mnnaekcet stuhreedbiogtithatlhceabmleo(noitnolyr afonrddcuoaml-pinupteurt amreodpeolws).ered-OFF. Connect the adapter a Connect the AC cord to your host system, please follow the steps as given below: Steps 1. 1-1 Connect Video Cable a. This...
... the computer's port. 1-3 (only for HDMI models) Connect one end of the monitor and connect the other end to the computer's port. 2. DC D-Sub 2 DVI HDMI HDMI DVI EN-12 D-Sub DC IN b. INSTALLATION To install the monitor to the adapter. Mnnaekcet stuhreedbiogtithatlhceabmleo(noitnolyr afonrddcuoaml-pinupteurt amreodpeolws).ered-OFF. Connect the adapter a Connect the AC cord to your host system, please follow the steps as given below: Steps 1. 1-1 Connect Video Cable a. This...
User Manual
Page 14
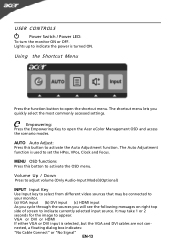
Lights up to indicate currently selected input source. It may be connected to your monitor. (a) VGA input (b) DVI input (c) HDMI input As you cycle through the sources you quickly select the most commonly accessed settings. Volume Up / Down Press to adjust volume (Only Audio-Input Model)(Optional) INPUT Input Key Use Input key to select from different video sources that may take 1 or 2 seconds for the image to open the Acer eColor Management OSD and access the scenario modes. Using the Shortcut Menu Press...
Lights up to indicate currently selected input source. It may be connected to your monitor. (a) VGA input (b) DVI input (c) HDMI input As you cycle through the sources you quickly select the most commonly accessed settings. Volume Up / Down Press to adjust volume (Only Audio-Input Model)(Optional) INPUT Input Key Use Input key to select from different video sources that may take 1 or 2 seconds for the image to open the Acer eColor Management OSD and access the scenario modes. Using the Shortcut Menu Press...

User Manual
Page 15
... Optimal balance of brightness and contrast N/A Text mode prevent eyestrain. Acer eColor Management Operation instructions Step 1: Press " " Key to open the Acer eColor Management OSD and access the scenario modes Step 2: Press " " or " " to select the mode Step 3: Press " AUTO " Key to confirm the mode and exit the eColor menu. N/A Movie mode Displays scenes in vibrant colors with sharp detail. R eflects n a tive d isp lay mode capability N/A Grahpic mode Enhances colors...
... Optimal balance of brightness and contrast N/A Text mode prevent eyestrain. Acer eColor Management Operation instructions Step 1: Press " " Key to open the Acer eColor Management OSD and access the scenario modes Step 2: Press " " or " " to select the mode Step 3: Press " AUTO " Key to confirm the mode and exit the eColor menu. N/A Movie mode Displays scenes in vibrant colors with sharp detail. R eflects n a tive d isp lay mode capability N/A Grahpic mode Enhances colors...
User Manual
Page 16
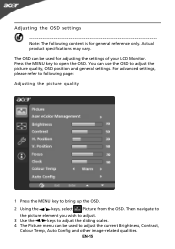
... be used to adjust the picture quality, OSD position and general settings. The OSD can use the OSD to adjust the current Brightness, Contrast, Colour Temp, Auto Config and other image-related qualities. You can be used for general reference only. Press the MENU key to bring up the OSD. 2 Using the / keys, select Picture from the OSD. For advanced settings, please refer to following content is for adjusting the settings of your LCD Monitor...
... be used to adjust the picture quality, OSD position and general settings. The OSD can use the OSD to adjust the current Brightness, Contrast, Colour Temp, Auto Config and other image-related qualities. You can be used for general reference only. Press the MENU key to bring up the OSD. 2 Using the / keys, select Picture from the OSD. For advanced settings, please refer to following content is for adjusting the settings of your LCD Monitor...
User Manual
Page 18
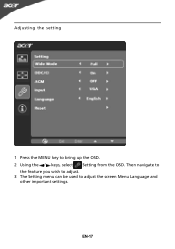
Then navigate to the feature you wish to adjust. 3 The Setting menu can be used to bring up the OSD. 2 Using the / keys, select Setting from the OSD. EN-17 Adjusting the setting 1 Press the MENU key to adjust the screen Menu Language and other important settings.
Then navigate to the feature you wish to adjust. 3 The Setting menu can be used to bring up the OSD. 2 Using the / keys, select Setting from the OSD. EN-17 Adjusting the setting 1 Press the MENU key to adjust the screen Menu Language and other important settings.
User Manual
Page 20
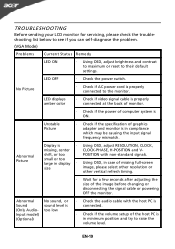
...-diagnose the problem. (VGA Mode) Problems Current Status Remedy LED ON · Using OSD, adjust brightness and contrast to maximum or reset to raise the volume level. TROUBLESHOOTING Before sending your LCD monitor for a few seconds after adjusting the size of the image before changing or disconnecting the signal cable or powering OFF the monitor. Abnormal Picture Display is in compliance which may be causing the input signal frequency mismatch. Abnormal Sound (Only AudioInput model) (Optional) No sound, or sound level is...
...-diagnose the problem. (VGA Mode) Problems Current Status Remedy LED ON · Using OSD, adjust brightness and contrast to maximum or reset to raise the volume level. TROUBLESHOOTING Before sending your LCD monitor for a few seconds after adjusting the size of the image before changing or disconnecting the signal cable or powering OFF the monitor. Abnormal Picture Display is in compliance which may be causing the input signal frequency mismatch. Abnormal Sound (Only AudioInput model) (Optional) No sound, or sound level is...
User Manual
Page 21
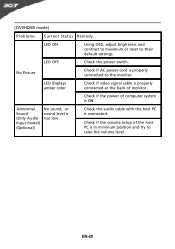
LED OFF · Check the power switch. (DVI/HDMI mode) Problems Current Status Remedy LED ON · Using OSD, adjust brightness and contrast to maximum or reset to the monitor. Abnormal Sound (Only AudioInput model) (Optional) No sound, or sound level is too low · Check the audio cable with the host PC is connected. · Check if the volume setup of computer system is ON. EN-20 No Picture · Check if AC power cord is in minimum position and try to...
LED OFF · Check the power switch. (DVI/HDMI mode) Problems Current Status Remedy LED ON · Using OSD, adjust brightness and contrast to maximum or reset to the monitor. Abnormal Sound (Only AudioInput model) (Optional) No sound, or sound level is too low · Check the audio cable with the host PC is connected. · Check if the volume setup of computer system is ON. EN-20 No Picture · Check if AC power cord is in minimum position and try to...
User Manual
Page 22
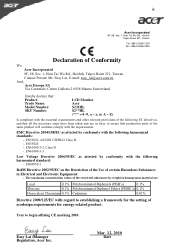
...Class B. -. EN61000-3-2, Class D -. Easy Lai /Manager Regulation, Acer Inc. Mar. 12, 2010 Date EN55024 -. Year to establishing a framework for the setting of ecodesign requirements for energy-related product. ix Acer Incorporated 8F, 88, Sec. 1, Hsin Tai Wu Rd., Hsichih Taipei... Taipei Hsien 221, Taiwan Contact Person: Mr. Easy Lai, E-mail: easy_lai@acer.com.tw And, Acer Europe SA Via Cantonale, Centro Galleria 2 6928 Manno Switzerland Hereby declare that: Product: Trade Name: Model Number: SKU Number: LCD Monitor Acer S231HL S2**HL ("*" = 0~9, a ~ z, or A ~ Z) Is compliant ...
...Class B. -. EN61000-3-2, Class D -. Easy Lai /Manager Regulation, Acer Inc. Mar. 12, 2010 Date EN55024 -. Year to establishing a framework for the setting of ecodesign requirements for energy-related product. ix Acer Incorporated 8F, 88, Sec. 1, Hsin Tai Wu Rd., Hsichih Taipei... Taipei Hsien 221, Taiwan Contact Person: Mr. Easy Lai, E-mail: easy_lai@acer.com.tw And, Acer Europe SA Via Cantonale, Centro Galleria 2 6928 Manno Switzerland Hereby declare that: Product: Trade Name: Model Number: SKU Number: LCD Monitor Acer S231HL S2**HL ("*" = 0~9, a ~ z, or A ~ Z) Is compliant ...


