
Quick Start Guide
Page 1
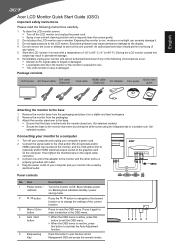
...inactive, press this range may cause permanent damage to the display. 4 Do not remove the cover or attempt to service this button to open the Acer eColor Management OSD and access the scenario modes. 543 2 1 Blue indicates power on. Press it . 3 Do not apply pressure to the LCD ... 2 Remove the monitor from the packaging. 3 Attach the monitor stand arm to the base. • Ensure that the base is damaged. English Acer LCD Monitor Quick Start Guide (QSG) Important safety instructions Please read the following circumstances occur: • Monitor-to-PC signal cable is frayed or damaged...
...inactive, press this range may cause permanent damage to the display. 4 Do not remove the cover or attempt to service this button to open the Acer eColor Management OSD and access the scenario modes. 543 2 1 Blue indicates power on. Press it . 3 Do not apply pressure to the LCD ... 2 Remove the monitor from the packaging. 3 Attach the monitor stand arm to the base. • Ensure that the base is damaged. English Acer LCD Monitor Quick Start Guide (QSG) Important safety instructions Please read the following circumstances occur: • Monitor-to-PC signal cable is frayed or damaged...
Quick Start Guide
Page 2
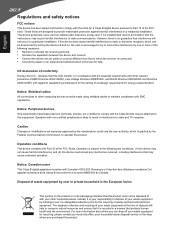
... environment. For more of the following two conditions: (1) this device may not cause harmful interference, and (2) this device must not be disposed of conformity Hereby, Acer Inc., declares that this product must accept any interference received, including interference that may cause undesired operation. English Regulations and safety notices FCC notices This...
... environment. For more of the following two conditions: (1) this device may not cause harmful interference, and (2) this device must not be disposed of conformity Hereby, Acer Inc., declares that this product must accept any interference received, including interference that may cause undesired operation. English Regulations and safety notices FCC notices This...
User Manual
Page 2
... or fitness for identification purposes only and belong to the contents hereof and specifically disclaims the implied warranties of Acer Incorporated. All correspondence concerning your computer. This company makes no representations or warranties, either expressed or implied, with respect ...to their respective companies. Acer LCD Monitor User Guide Original Issue: 1/2011 Changes may be incorporated in this publication may be reproduced, stored in a ...
... or fitness for identification purposes only and belong to the contents hereof and specifically disclaims the implied warranties of Acer Incorporated. All correspondence concerning your computer. This company makes no representations or warranties, either expressed or implied, with respect ...to their respective companies. Acer LCD Monitor User Guide Original Issue: 1/2011 Changes may be incorporated in this publication may be reproduced, stored in a ...
User Manual
Page 3
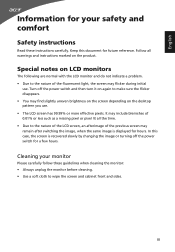
It may include blemishes of 0.01% or less such as a missing pixel or pixel lit all warnings and instructions marked on the product. Keep this case, the screen is displayed for future reference. English Information for a few hours. In this document for hours. Turn off the power switch for your monitor Please carefully follow these instructions carefully. iii Cleaning your safety and comfort Safety instructions Read these guidelines when cleaning the monitor: • Always unplug the monitor before cleaning. • Use a soft cloth to the nature of the previous screen...
It may include blemishes of 0.01% or less such as a missing pixel or pixel lit all warnings and instructions marked on the product. Keep this case, the screen is displayed for future reference. English Information for a few hours. In this document for hours. Turn off the power switch for your monitor Please carefully follow these instructions carefully. iii Cleaning your safety and comfort Safety instructions Read these guidelines when cleaning the monitor: • Always unplug the monitor before cleaning. • Use a soft cloth to the nature of the previous screen...
User Manual
Page 4
... operated from overheating. Model:HP-A0301R3 (S220HQL Model) Manufacture : Delta Electronics Inc., Model: ADP-30MH B (S220HQL Model) Manufacture : Delta Electronics Inc., Model: ADP-40PH BB (S230HL Model) Using electrical power • This product should never be blocked by placing the product on an unstable cart, stand or table. If you are...
... operated from overheating. Model:HP-A0301R3 (S220HQL Model) Manufacture : Delta Electronics Inc., Model: ADP-30MH B (S220HQL Model) Manufacture : Delta Electronics Inc., Model: ADP-40PH BB (S230HL Model) Using electrical power • This product should never be blocked by placing the product on an unstable cart, stand or table. If you are...
User Manual
Page 5
The plug only fits in a grounded power outlet. Warning! Using a power outlet that is not properly grounded may interfere with the performance of this product yourself, as opening or removing covers may expose you need for details. Note: The grounding pin also provides good protection from the wall outlet and refer servicing to qualified service personnel when: • the power cord or plug is damaged, cut or frayed • liquid was spilled into the product • the product was exposed to rain or water • the product has been dropped or the case has been damaged • the ...
The plug only fits in a grounded power outlet. Warning! Using a power outlet that is not properly grounded may interfere with the performance of this product yourself, as opening or removing covers may expose you need for details. Note: The grounding pin also provides good protection from the wall outlet and refer servicing to qualified service personnel when: • the power cord or plug is damaged, cut or frayed • liquid was spilled into the product • the product was exposed to rain or water • the product has been dropped or the case has been damaged • the ...

User Manual
Page 6
...of the reach of the global environment, please recycle. Disposal instructions Do not throw this website: http://www.acer-group.com/public/Sustainability/sustainability01.htm Visit www.acer-group.com for further information on the environment. To minimize pollution and ensure utmost protection of small children.... explosive environments Switch off your device in fuel depots, storage and distribution areas; Switch off the device near gas pumps at Acer are very conscious of the environmental effects of our business and strive to identify and provide the best working procedures to turn off...
...of the reach of the global environment, please recycle. Disposal instructions Do not throw this website: http://www.acer-group.com/public/Sustainability/sustainability01.htm Visit www.acer-group.com for further information on the environment. To minimize pollution and ensure utmost protection of small children.... explosive environments Switch off your device in fuel depots, storage and distribution areas; Switch off the device near gas pumps at Acer are very conscious of the environmental effects of our business and strive to identify and provide the best working procedures to turn off...

User Manual
Page 7
This product has been shipped enabled for comfortable use Computer users may appear in the hands, wrists, arms, shoulders, neck or back: • numbness, or a burning or tingling sensation • aching, soreness or tenderness • pain, swelling or throbbing • stiffness or tightness • coldness or weakness If you have these symptoms, or any other recurring or persistent discomfort and/or pain related to remove the strain on the recorded image and does not constitute a malfunction. Tips and information for power management: • Activate display's Sleep mode within 15...
This product has been shipped enabled for comfortable use Computer users may appear in the hands, wrists, arms, shoulders, neck or back: • numbness, or a burning or tingling sensation • aching, soreness or tenderness • pain, swelling or throbbing • stiffness or tightness • coldness or weakness If you have these symptoms, or any other recurring or persistent discomfort and/or pain related to remove the strain on the recorded image and does not constitute a malfunction. Tips and information for power management: • Activate display's Sleep mode within 15...
User Manual
Page 8
English Taking care of time. Eyes • Rest your eyes frequently. • Give your eyes regular breaks by using drapes, shades or blinds • using a task light • changing the display's viewing angle • using a glare-reduction filter • using a display visor, such as possible. • Exercise regularly and maintain a healthy body. viii The following work habits Develop the following sections provide suggestions on a distant point. • Blink frequently to reduce eyestrain. Developing good work habits to an awkward viewing angle. • Avoid looking...
English Taking care of time. Eyes • Rest your eyes frequently. • Give your eyes regular breaks by using drapes, shades or blinds • using a task light • changing the display's viewing angle • using a glare-reduction filter • using a display visor, such as possible. • Exercise regularly and maintain a healthy body. viii The following work habits Develop the following sections provide suggestions on a distant point. • Blink frequently to reduce eyestrain. Developing good work habits to an awkward viewing angle. • Avoid looking...
User Manual
Page 9
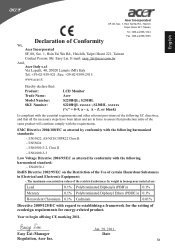
... EN61000-3-2, Class D -. ix English Acer Incorporated 8F, 88, Sec. 1, Hsin Tai Wu Rd., Hsichih Taipei Hsien 221, Taiwan Tel : 886-2-2696-1234 Fax : 886-2-2696-3535 Declaration of the same product will continue comply with the requirements. S230HL S220HQL xxxxxx ; EN61000-3-3 Low Voltage ...Directive 2006/95/EC as attested by weight in force to assure that production units of Conformity We, Acer Incorporated 8F, 88, Sec. 1, Hsin Tai Wu Rd., Hsichih...
... EN61000-3-2, Class D -. ix English Acer Incorporated 8F, 88, Sec. 1, Hsin Tai Wu Rd., Hsichih Taipei Hsien 221, Taiwan Tel : 886-2-2696-1234 Fax : 886-2-2696-3535 Declaration of the same product will continue comply with the requirements. S230HL S220HQL xxxxxx ; EN61000-3-3 Low Voltage ...Directive 2006/95/EC as attested by weight in force to assure that production units of Conformity We, Acer Incorporated 8F, 88, Sec. 1, Hsin Tai Wu Rd., Hsichih...
User Manual
Page 10
... Number: Name of Responsible Party: Address of the FCC Rules. San Jose, CA 95110 U. S230HL S220HQL xxxxxx ; S230HL xxxxxx ("x" = 0~9, a ~ z, A ~ Z or Blank) Acer America Corporation 333 West San Carlos St. A. Tel : 254-298-4000 Fax : 254-298-4147 www.acer.com Federal Communications Commission Declaration of Conformity This device complies with Part 15 of Responsible...
... Number: Name of Responsible Party: Address of the FCC Rules. San Jose, CA 95110 U. S230HL S220HQL xxxxxx ; S230HL xxxxxx ("x" = 0~9, a ~ z, A ~ Z or Blank) Acer America Corporation 333 West San Carlos St. A. Tel : 254-298-4000 Fax : 254-298-4147 www.acer.com Federal Communications Commission Declaration of Conformity This device complies with Part 15 of Responsible...
User Manual
Page 11
... cable 4 24-pin color display signal cable 5 19-pin color display signal cable 5 Standard timing table 6 Installation 7 Users controls 8 Panel controls 8 Using the Shortcut Menu 9 Acer eColor Management 9 Operation instructions 9 Features and benefits 10 Using the OSD Menus 10 Picture Menu 11 OSD Menu 12
... cable 4 24-pin color display signal cable 5 19-pin color display signal cable 5 Standard timing table 6 Installation 7 Users controls 8 Panel controls 8 Using the Shortcut Menu 9 Acer eColor Management 9 Operation instructions 9 Features and benefits 10 Using the OSD Menus 10 Picture Menu 11 OSD Menu 12
User Manual
Page 13
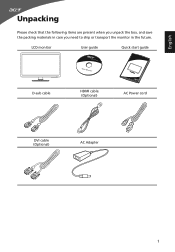
LCD monitor User guide Quick start guide D-sub cable HDMI cable (Optional) AC Power cord DVI cable (Optional) AC Adapter 1 English Unpacking Please check that the following items are present when you unpack the box, and save the packing materials in case you need to ship or transport the monitor in the future.
LCD monitor User guide Quick start guide D-sub cable HDMI cable (Optional) AC Power cord DVI cable (Optional) AC Adapter 1 English Unpacking Please check that the following items are present when you unpack the box, and save the packing materials in case you need to ship or transport the monitor in the future.
User Manual
Page 14
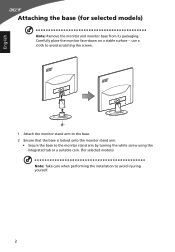
English Attaching the base (for selected models) Note: Take care when performing the installation to avoid injuring yourself. 2 Carefully place the monitor face-down on a stable surface -- use a cloth to avoid scratching the screen. 1 Attach the monitor stand arm to the base. 2 Ensure that the base is locked onto the monitor stand arm. • Secure the base to the monitor stand arm by turning the white screw using the integrated tab or a suitable coin. (for selected models) Note: Remove the monitor and monitor base from its packaging.
English Attaching the base (for selected models) Note: Take care when performing the installation to avoid injuring yourself. 2 Carefully place the monitor face-down on a stable surface -- use a cloth to avoid scratching the screen. 1 Attach the monitor stand arm to the base. 2 Ensure that the base is locked onto the monitor stand arm. • Secure the base to the monitor stand arm by turning the white screw using the integrated tab or a suitable coin. (for selected models) Note: Remove the monitor and monitor base from its packaging.
User Manual
Page 15
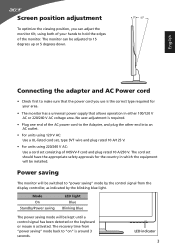
Screen position adjustment To optimize the viewing position, you can be adjusted to 15 degrees up or 5 degrees down. 5 15 English Connecting the adapter and AC Power cord • Check first to make sure that allows operation in which the equipment will be installed. Mode On Standby/Power saving LED light Blue Blinking Blue The power saving mode will be kept until a control signal has been detected or the keyboard or mouse is the correct type required for the country in either 100/120 V AC or 220/240 V AC voltage area. LED indicator 3 No user-adjustment is around 3 ...
Screen position adjustment To optimize the viewing position, you can be adjusted to 15 degrees up or 5 degrees down. 5 15 English Connecting the adapter and AC Power cord • Check first to make sure that allows operation in which the equipment will be installed. Mode On Standby/Power saving LED light Blue Blinking Blue The power saving mode will be kept until a control signal has been detected or the keyboard or mouse is the correct type required for the country in either 100/120 V AC or 220/240 V AC voltage area. LED indicator 3 No user-adjustment is around 3 ...
User Manual
Page 16
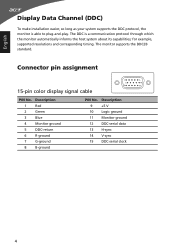
Description 1 Red 2 Green 3 Blue 4 Monitor ground 5 DDC-return 6 R-ground 7 G-ground 8 B-ground PIN No. English Display Data Channel (DDC) To make installation easier, so long as your system supports the DDC protocol, the monitor is a communication protocol through which the monitor automatically informs the host system about its capabilities; The monitor supports the DDC2B standard. Connector pin assignment 15-pin color display signal cable 1 5 6 10 11 15 PIN No. The DDC is able to plug-and-play. Description 9 +5 V 10 Logic ground 11 Monitor ground ...
Description 1 Red 2 Green 3 Blue 4 Monitor ground 5 DDC-return 6 R-ground 7 G-ground 8 B-ground PIN No. English Display Data Channel (DDC) To make installation easier, so long as your system supports the DDC protocol, the monitor is a communication protocol through which the monitor automatically informs the host system about its capabilities; The monitor supports the DDC2B standard. Connector pin assignment 15-pin color display signal cable 1 5 6 10 11 15 PIN No. The DDC is able to plug-and-play. Description 9 +5 V 10 Logic ground 11 Monitor ground ...
User Manual
Page 17
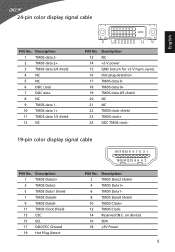
24-pin color display signal cable English PIN No. Description 2 TMDS Data2 Shield 4 TMDS Data1+ 6 TMDS Data1- 8 TMDS Data0 Shield 10 TMDS Clock+ 12 TMDS Clock- 14 Reserved (N.C. Description 1 TMDS data 2- 2 TMDS data 2+ 3 TMDS data 2/4 shield 4 NC 5 NC 6 DDC clock 7 DDC data 8 NC 9 TMDS data 1- 10 TMDS data 1+ 11 TMDS data 1/3 shield 12 NC PIN No. Description 1 TMDS Data2+ 3 TMDS Data2- 5 TMDS Data1 Shield 7 TMDS Data0+ 9 TMDS Data0- 11 TMDS Clock Shield 13 CEC 15 SCL 17 DDC/CEC Ground 19 Hot Plug Detect PIN No. on device) 16 SDA 18 +...
24-pin color display signal cable English PIN No. Description 2 TMDS Data2 Shield 4 TMDS Data1+ 6 TMDS Data1- 8 TMDS Data0 Shield 10 TMDS Clock+ 12 TMDS Clock- 14 Reserved (N.C. Description 1 TMDS data 2- 2 TMDS data 2+ 3 TMDS data 2/4 shield 4 NC 5 NC 6 DDC clock 7 DDC data 8 NC 9 TMDS data 1- 10 TMDS data 1+ 11 TMDS data 1/3 shield 12 NC PIN No. Description 1 TMDS Data2+ 3 TMDS Data2- 5 TMDS Data1 Shield 7 TMDS Data0+ 9 TMDS Data0- 11 TMDS Clock Shield 13 CEC 15 SCL 17 DDC/CEC Ground 19 Hot Plug Detect PIN No. on device) 16 SDA 18 +...

User Manual
Page 18
English Standard timing table No. Mode 1 VGA 2 3 MAC 4 VESA 5 6 SVGA 7 8 9 XGA 10 11 VESA 12 13 SXGA 14 VESA 15 WXGA 16 17 WXGA+ 18 WSXGA+ 19 UXGA 20 VESA Resolution 640x480 640x480 640x480 720x400 800x600 800x600 800x600 1024x600 1024x768 1024x768 1152x864 1280x960 1280x1024 1280x720 1280x800 1360x768 1440x900 1680x1050 1600x1200 1920x1080 Refresh Rate 60 Hz 72 Hz 66.7 Hz 70 Hz 56 Hz 60 Hz 72 Hz 60 Hz 60 Hz 70 Hz 75 Hz 60 Hz 60 Hz 60 Hz 60 Hz 60 Hz 60 Hz 60 Hz 60 Hz 60 Hz 6
English Standard timing table No. Mode 1 VGA 2 3 MAC 4 VESA 5 6 SVGA 7 8 9 XGA 10 11 VESA 12 13 SXGA 14 VESA 15 WXGA 16 17 WXGA+ 18 WSXGA+ 19 UXGA 20 VESA Resolution 640x480 640x480 640x480 720x400 800x600 800x600 800x600 1024x600 1024x768 1024x768 1152x864 1280x960 1280x1024 1280x720 1280x800 1360x768 1440x900 1680x1050 1600x1200 1920x1080 Refresh Rate 60 Hz 72 Hz 66.7 Hz 70 Hz 56 Hz 60 Hz 72 Hz 60 Hz 60 Hz 70 Hz 75 Hz 60 Hz 60 Hz 60 Hz 60 Hz 60 Hz 60 Hz 60 Hz 60 Hz 60 Hz 6
User Manual
Page 19
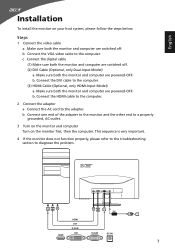
b. DVI HDMI D-SUB DC-IN 2 2 DC HDMI HDMI DVI D-SUB DVI D-SUB DC-IN 7 Make sure both the monitor and computer are switched off . English Installation To install the monitor on the monitor first, then the computer. Make sure both the monitor and computer are switched off . (2) DVI Cable (Optional, only Dual-Input Model) a. c Connect the digital cable (1) Make sure both the monitor and computer are powered-OFF. b Connect one end of the adapter to the monitor and the other end to a properly grounded, AC outlet. 3 Turn on the monitor and computer Turn on your host ...
b. DVI HDMI D-SUB DC-IN 2 2 DC HDMI HDMI DVI D-SUB DVI D-SUB DC-IN 7 Make sure both the monitor and computer are switched off . English Installation To install the monitor on the monitor first, then the computer. Make sure both the monitor and computer are switched off . (2) DVI Cable (Optional, only Dual-Input Model) a. c Connect the digital cable (1) Make sure both the monitor and computer are powered-OFF. b Connect one end of the adapter to the monitor and the other end to a properly grounded, AC outlet. 3 Turn on the monitor and computer Turn on your host ...
User Manual
Page 20
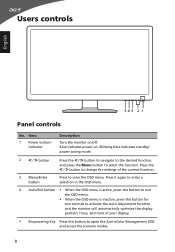
... OSD menu is active, press this button to exit the OSD menu. • When the OSD menu is inactive, press this button to open the Acer eColor Management OSD and access the scenario modes. 8 Item 1 Power button/ indicator Description Turn the monitor on . Press the < / > button to change the settings of...
... OSD menu is active, press this button to exit the OSD menu. • When the OSD menu is inactive, press this button to open the Acer eColor Management OSD and access the scenario modes. 8 Item 1 Power button/ indicator Description Turn the monitor on . Press the < / > button to change the settings of...
