
Quick Start Guide
Page 1
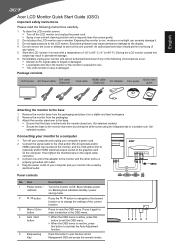
... OSD menu is inactive, press this button to open the Acer eColor Management OSD and access the scenario modes. 543 2 1 Package contents LCD monitor AC Power cable DVI cable (Optional) VGA cable HDMI cable (Optional) AC Adapter User guide Quick start guide Attaching the monitor to the base 1 Remove the monitor base from the packaging. 3 Attach the monitor stand arm to the base. • Ensure that the base is locked onto the monitor stand arm. (for selected models) • Secure the base to the monitor stand arm by turning the white screw using...
... OSD menu is inactive, press this button to open the Acer eColor Management OSD and access the scenario modes. 543 2 1 Package contents LCD monitor AC Power cable DVI cable (Optional) VGA cable HDMI cable (Optional) AC Adapter User guide Quick start guide Attaching the monitor to the base 1 Remove the monitor base from the packaging. 3 Attach the monitor stand arm to the base. • Ensure that the base is locked onto the monitor stand arm. (for selected models) • Secure the base to the monitor stand arm by turning the white screw using...
Quick Start Guide
Page 2
... a circuit different from that interference will help . Notice: Shielded cables All connections to other household waste. Notice: Canadian users This Class B digital apparatus complies with the limits for recycling, please contact your local city office, your waste equipment at the time of conformity Hereby, Acer Inc., declares that this equipment. English Regulations and safety notices FCC notices...
... a circuit different from that interference will help . Notice: Shielded cables All connections to other household waste. Notice: Canadian users This Class B digital apparatus complies with the limits for recycling, please contact your local city office, your waste equipment at the time of conformity Hereby, Acer Inc., declares that this equipment. English Regulations and safety notices FCC notices...

User Manual
Page 3
... slowly by changing the image or turning off the power switch and then turn it on again to make sure the flicker disappears. • You may flicker during initial use . • The LCD screen has 99.99% or more effective pixels. Keep this case, the screen is displayed for hours. Turn off the power switch for a few hours. Cleaning your safety and comfort Safety instructions Read these guidelines when cleaning the monitor: •...
... slowly by changing the image or turning off the power switch and then turn it on again to make sure the flicker disappears. • You may flicker during initial use . • The LCD screen has 99.99% or more effective pixels. Keep this case, the screen is displayed for hours. Turn off the power switch for a few hours. Cleaning your safety and comfort Safety instructions Read these guidelines when cleaning the monitor: •...

User Manual
Page 4
... surroundings. • Turn the volume down if you plug the power cord into the product. • To avoid damage of internal components and to the equipment operator as possible. Model:HP-A0301R3 (S220HQL Model) Manufacture : Delta Electronics Inc., Model: ADP-30MH B (S220HQL Model) Manufacture : Delta Electronics Inc., Model: ADP-40PH BB (S230HL Model) Using electrical power • This product should never be blocked or covered.
... surroundings. • Turn the volume down if you plug the power cord into the product. • To avoid damage of internal components and to the equipment operator as possible. Model:HP-A0301R3 (S220HQL Model) Manufacture : Delta Electronics Inc., Model: ADP-30MH B (S220HQL Model) Manufacture : Delta Electronics Inc., Model: ADP-40PH BB (S230HL Model) Using electrical power • This product should never be blocked or covered.
User Manual
Page 5
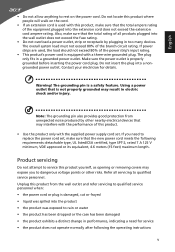
... locate this product. • Use the product only with the supplied power supply cord set , make sure that the new power cord meets the following the operating instructions v Warning! Product servicing Do not attempt to service this product yourself, as opening or removing covers may expose you need for details. Do not insert the plug into the wall outlet does not exceed the fuse rating. • Do not overload...
... locate this product. • Use the product only with the supplied power supply cord set , make sure that the new power cord meets the following the operating instructions v Warning! Product servicing Do not attempt to service this product yourself, as opening or removing covers may expose you need for details. Do not insert the plug into the wall outlet does not exceed the fuse rating. • Do not overload...

User Manual
Page 6
...the features and benefits of our other controls may contain small parts. Sparks in such areas could cause an explosion or fire resulting in fuel depots, storage and distribution areas; chemical plants; For more information and help when recycling, please go to this...Acer is strongly committed to environmental protection and views recycling, in the form of salvaging and disposal of used equipment, as grain, dust or metal powders. We at service stations. Switch off your device in damage and will often require extensive work by the operating instructions, since improper adjustment...
...the features and benefits of our other controls may contain small parts. Sparks in such areas could cause an explosion or fire resulting in fuel depots, storage and distribution areas; chemical plants; For more information and help when recycling, please go to this...Acer is strongly committed to environmental protection and views recycling, in the form of salvaging and disposal of used equipment, as grain, dust or metal powders. We at service stations. Switch off your device in damage and will often require extensive work by the operating instructions, since improper adjustment...

User Manual
Page 7
... been shipped enabled for more comfortable computer use . Nevertheless, some pixels may lead to computer use, consult a physician immediately and inform your sitting height to remove the strain on the recorded image and does not constitute a malfunction. The following tips: • refrain from Sleep mode by adjusting the viewing angle of a computer. English LCD pixel statement The LCD unit is produced with high-precision...
... been shipped enabled for more comfortable computer use . Nevertheless, some pixels may lead to computer use, consult a physician immediately and inform your sitting height to remove the strain on the recorded image and does not constitute a malfunction. The following tips: • refrain from Sleep mode by adjusting the viewing angle of a computer. English LCD pixel statement The LCD unit is produced with high-precision...
User Manual
Page 11
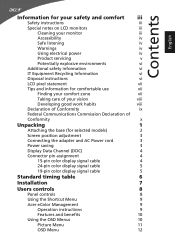
... of Conformity x Unpacking 1 Attaching the base (for selected models) 2 Screen position adjustment 3 Connecting the adapter and AC Power cord 3 Power saving 3 Display Data Channel (DDC) 4 Connector pin assignment 4 15-pin color display signal cable 4 24-pin color display signal cable 5 19-pin color display signal cable 5 Standard timing table 6 Installation 7 Users controls 8 Panel controls 8 Using the Shortcut Menu 9 Acer eColor Management 9 Operation instructions 9 Features and benefits 10 Using the OSD Menus 10 Picture Menu 11 OSD Menu 12
... of Conformity x Unpacking 1 Attaching the base (for selected models) 2 Screen position adjustment 3 Connecting the adapter and AC Power cord 3 Power saving 3 Display Data Channel (DDC) 4 Connector pin assignment 4 15-pin color display signal cable 4 24-pin color display signal cable 5 19-pin color display signal cable 5 Standard timing table 6 Installation 7 Users controls 8 Panel controls 8 Using the Shortcut Menu 9 Acer eColor Management 9 Operation instructions 9 Features and benefits 10 Using the OSD Menus 10 Picture Menu 11 OSD Menu 12
User Manual
Page 14
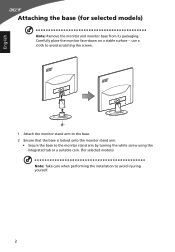
Carefully place the monitor face-down on a stable surface -- use a cloth to avoid scratching the screen. 1 Attach the monitor stand arm to the base. 2 Ensure that the base is locked onto the monitor stand arm. • Secure the base to the monitor stand arm by turning the white screw using the integrated tab or a suitable coin. (for selected models) Note: Remove the monitor and monitor base from its packaging. English Attaching the base (for selected models) Note: Take care when performing the installation to avoid injuring yourself. 2
Carefully place the monitor face-down on a stable surface -- use a cloth to avoid scratching the screen. 1 Attach the monitor stand arm to the base. 2 Ensure that the base is locked onto the monitor stand arm. • Secure the base to the monitor stand arm by turning the white screw using the integrated tab or a suitable coin. (for selected models) Note: Remove the monitor and monitor base from its packaging. English Attaching the base (for selected models) Note: Take care when performing the installation to avoid injuring yourself. 2
User Manual
Page 15
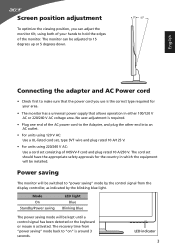
... make sure that the power cord you can be installed. Power saving The monitor will be adjusted to 15 degrees up or 5 degrees down. 5 15 English Connecting the adapter and AC Power cord • Check first to "on" is around 3 seconds. The monitor can adjust the monitor tilt, using 220/240 V AC: Use a cord set should have the appropriate safety approvals for your hands to "power saving" mode by the blinking blue light. The cord set consisting of the monitor. LED indicator 3 Screen position adjustment...
... make sure that the power cord you can be installed. Power saving The monitor will be adjusted to 15 degrees up or 5 degrees down. 5 15 English Connecting the adapter and AC Power cord • Check first to "on" is around 3 seconds. The monitor can adjust the monitor tilt, using 220/240 V AC: Use a cord set should have the appropriate safety approvals for your hands to "power saving" mode by the blinking blue light. The cord set consisting of the monitor. LED indicator 3 Screen position adjustment...
User Manual
Page 16
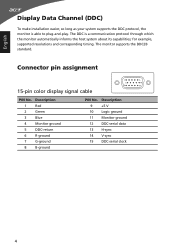
...-pin color display signal cable 1 5 6 10 11 15 PIN No. The monitor supports the DDC2B standard. Description 1 Red 2 Green 3 Blue 4 Monitor ground 5 DDC-return 6 R-ground 7 G-ground 8 B-ground PIN No. The DDC is able to plug-and-play. Description 9 +5 V 10 Logic ground 11 Monitor ground 12 DDC-serial data 13 H-sync 14 V-sync 15 DDC-serial clock 4 for example, supported resolutions and corresponding timing. English Display Data Channel (DDC) To make installation easier...
...-pin color display signal cable 1 5 6 10 11 15 PIN No. The monitor supports the DDC2B standard. Description 1 Red 2 Green 3 Blue 4 Monitor ground 5 DDC-return 6 R-ground 7 G-ground 8 B-ground PIN No. The DDC is able to plug-and-play. Description 9 +5 V 10 Logic ground 11 Monitor ground 12 DDC-serial data 13 H-sync 14 V-sync 15 DDC-serial clock 4 for example, supported resolutions and corresponding timing. English Display Data Channel (DDC) To make installation easier...
User Manual
Page 19
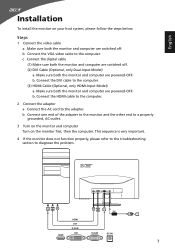
... are powered-OFF. b. Connect the HDMI cable to the computer. 2 Connect the adapter a Connect the AC cord to the computer. b Connect the VGA video cable to the adapter. c Connect the digital cable (1) Make sure both the monitor and computer are switched off . b. This sequence is very important. 4 If the monitor does not function properly, please refer to the troubleshooting section to the computer. (3) HDMI Cable (Optional, only HDMI-Input Model) a. Connect the DVI cable to diagnose the problem. English Installation To install the monitor...
... are powered-OFF. b. Connect the HDMI cable to the computer. 2 Connect the adapter a Connect the AC cord to the computer. b Connect the VGA video cable to the adapter. c Connect the digital cable (1) Make sure both the monitor and computer are switched off . b. This sequence is very important. 4 If the monitor does not function properly, please refer to the troubleshooting section to the computer. (3) HDMI Cable (Optional, only HDMI-Input Model) a. Connect the DVI cable to diagnose the problem. English Installation To install the monitor...
User Manual
Page 20
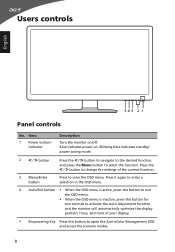
.... 3 Menu/Enter button Press to select the function. Press it again to enter a selection in the OSD menu. 4 Auto/Exit button • When the OSD menu is active, press this button to exit the OSD menu. • When the OSD menu is inactive, press this button to open the Acer eColor Management OSD and access the scenario modes. 8 Blue indicates power on /off. Item 1 Power button/ indicator Description Turn the monitor on . Users controls English 543 2 1 Panel controls No.
.... 3 Menu/Enter button Press to select the function. Press it again to enter a selection in the OSD menu. 4 Auto/Exit button • When the OSD menu is active, press this button to exit the OSD menu. • When the OSD menu is inactive, press this button to open the Acer eColor Management OSD and access the scenario modes. 8 Blue indicates power on /off. Item 1 Power button/ indicator Description Turn the monitor on . Users controls English 543 2 1 Panel controls No.
User Manual
Page 21
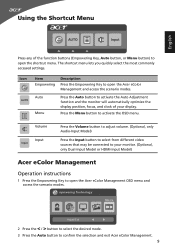
... to open the Acer eColor Management OSD menu and access the scenario modes. Volume Input Input Press the Volume button to adjust volume. (Optional, only Audio-Input Model) Press the Input button to select from different video sources that may be connected to open the Acer eColor Management and access the scenario modes. The shortcut menu lets you quickly select the most commonly accessed settings. Auto Menu Press the Auto button to activate the Auto Adjustment function and the monitor will automatically optimize the display position...
... to open the Acer eColor Management OSD menu and access the scenario modes. Volume Input Input Press the Volume button to adjust volume. (Optional, only Audio-Input Model) Press the Input button to select from different video sources that may be connected to open the Acer eColor Management and access the scenario modes. The shortcut menu lets you quickly select the most commonly accessed settings. Auto Menu Press the Auto button to activate the Auto Adjustment function and the monitor will automatically optimize the display position...

User Manual
Page 22
... power consumption. Presents great visuals, even in clearest detail. ECO mode Adjusts the settings to open the OSD menu. Pictures and photographs appear in vibrant colors with an on-screen display (OSD) menu for general reference only. Standard mode Default settings. Reflects native display capability. Actual product specifications may vary. English Features and benefits Icon Mode type User mode Description User-defined. Settings can use the OSD menu to suit any situation. Displays scenes in unsuitably-lit environments. Your LCD monitor...
... power consumption. Presents great visuals, even in clearest detail. ECO mode Adjusts the settings to open the OSD menu. Pictures and photographs appear in vibrant colors with an on-screen display (OSD) menu for general reference only. Standard mode Default settings. Reflects native display capability. Actual product specifications may vary. English Features and benefits Icon Mode type User mode Description User-defined. Settings can use the OSD menu to suit any situation. Displays scenes in unsuitably-lit environments. Your LCD monitor...
User Manual
Page 23
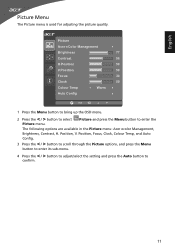
... OSD menu. 2 Press the < / > button to select Picture and press the Menu button to confirm. 11 Position, Focus, Clock, Colour Temp, and Auto Config. 3 Press the < / > button to scroll through the Picture options, and press the Menu button to enter its sub-menu. 4 Press the < / > button to adjust/select the setting and press the Auto button to enter the Picture menu. Position, V. The following options are available in the Picture menu: Acer ecolor Management, Brightness, Contrast, H. English Picture Menu...
... OSD menu. 2 Press the < / > button to select Picture and press the Menu button to confirm. 11 Position, Focus, Clock, Colour Temp, and Auto Config. 3 Press the < / > button to scroll through the Picture options, and press the Menu button to enter its sub-menu. 4 Press the < / > button to adjust/select the setting and press the Auto button to enter the Picture menu. Position, V. The following options are available in the Picture menu: Acer ecolor Management, Brightness, Contrast, H. English Picture Menu...
User Manual
Page 24
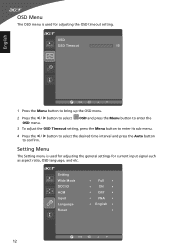
... input signal such as aspect ratio, OSD language, and etc. Setting Wide Mode DDC/CI ACM Input Language Reset Full ON OFF VGA English Exit 12 Setting Menu The Setting menu is used for adjusting the general settings for adjusting the OSD timeout setting. OSD and press the Menu button to enter the 3 To adjust the OSD Timeout setting, press the Menu button to enter its sub-menu. 4 Press the < / > button to select the desired time interval and press the Auto button to select OSD menu. OSD OSD...
... input signal such as aspect ratio, OSD language, and etc. Setting Wide Mode DDC/CI ACM Input Language Reset Full ON OFF VGA English Exit 12 Setting Menu The Setting menu is used for adjusting the general settings for adjusting the OSD timeout setting. OSD and press the Menu button to enter the 3 To adjust the OSD Timeout setting, press the Menu button to enter its sub-menu. 4 Press the < / > button to select the desired time interval and press the Auto button to select OSD menu. OSD OSD...
User Manual
Page 25
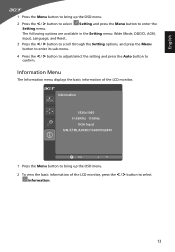
... the OSD menu. 2 To view the basic information of the LCD monitor. Information Menu The Information menu displays the basic information of the LCD monitor, press the < / > button to enter the Setting menu. English 1 Press the Menu button to bring up the OSD menu. 2 Press the < / > button to select Setting and press the Menu button to select Information. 13 The following options are available in the Setting menu: Wide Mode, DDC/CI, ACM, Input, Language, and Reset. 3 Press the < / > button...
... the OSD menu. 2 To view the basic information of the LCD monitor. Information Menu The Information menu displays the basic information of the LCD monitor, press the < / > button to enter the Setting menu. English 1 Press the Menu button to bring up the OSD menu. 2 Press the < / > button to select Setting and press the Menu button to select Information. 13 The following options are available in the Setting menu: Wide Mode, DDC/CI, ACM, Input, Language, and Reset. 3 Press the < / > button...
User Manual
Page 26
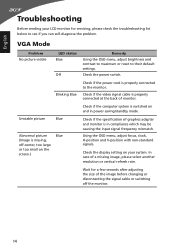
... computer system is switched on the screen.) Blue Remedy Using the OSD menu, adjust brightness and contrast to maximum or reset to the monitor. Check if the video signal cable is properly connected to their default settings. VGA Mode Problem No picture visible LED status Blue Off Blinking Blue Unstable picture Blue Abnormal picture (Image is in power saving/standby mode. Check if the power cord is properly connected at the back of graphics adapter and monitor is missing, off the monitor. 14 Using the OSD menu, adjust focus, clock, H-position and V-position with non...
... computer system is switched on the screen.) Blue Remedy Using the OSD menu, adjust brightness and contrast to maximum or reset to the monitor. Check if the video signal cable is properly connected to their default settings. VGA Mode Problem No picture visible LED status Blue Off Blinking Blue Unstable picture Blue Abnormal picture (Image is in power saving/standby mode. Check if the power cord is properly connected at the back of graphics adapter and monitor is missing, off the monitor. 14 Using the OSD menu, adjust focus, clock, H-position and V-position with non...
User Manual
Page 27
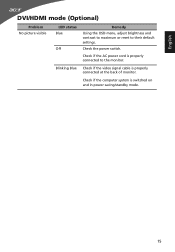
Blinking Blue Check if the video signal cable is switched on and in power saving/standby mode. 15 Check if the computer system is properly connected at the back of monitor. Check if the AC power cord is properly connected to their default settings. English DVI/HDMI mode (Optional) Problem No picture visible LED status Blue Off Remedy Using the OSD menu, adjust brightness and contrast to maximum or reset to the monitor. Check the power switch.
Blinking Blue Check if the video signal cable is switched on and in power saving/standby mode. 15 Check if the computer system is properly connected at the back of monitor. Check if the AC power cord is properly connected to their default settings. English DVI/HDMI mode (Optional) Problem No picture visible LED status Blue Off Remedy Using the OSD menu, adjust brightness and contrast to maximum or reset to the monitor. Check the power switch.


