
User Manual
Page 11
DDC Clock 18. NC 9. TMDS Clock+ 12. TMDS Data 2/4 Shield 15. NC 17. DDC Data 19. TMDS Data 0/5 Shield 8. NC 10. TMDS Data1+ 22. NC 16. NC 20. NC 2. Hot Plug Detect 5. TMDS Data0+ 7. TMDS Clock Shield 11. DDC TMDS Clock- * only for certain models EN-10 TMDS Data0- 6. TMDS Data1- 21. NC 24. TMDS Data2- 13. TMDS Data2+ 14. +5V Power 3. TMDS Data 1/3 Shield 23. Logic Ground 4. 24-Pin Color Display Signal Cable* PIN Meaning PIN Meaning 1.
DDC Clock 18. NC 9. TMDS Clock+ 12. TMDS Data 2/4 Shield 15. NC 17. DDC Data 19. TMDS Data 0/5 Shield 8. NC 10. TMDS Data1+ 22. NC 16. NC 20. NC 2. Hot Plug Detect 5. TMDS Data0+ 7. TMDS Clock Shield 11. DDC TMDS Clock- * only for certain models EN-10 TMDS Data0- 6. TMDS Data1- 21. NC 24. TMDS Data2- 13. TMDS Data2+ 14. +5V Power 3. TMDS Data 1/3 Shield 23. Logic Ground 4. 24-Pin Color Display Signal Cable* PIN Meaning PIN Meaning 1.

User Manual
Page 13
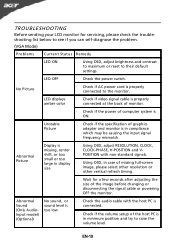
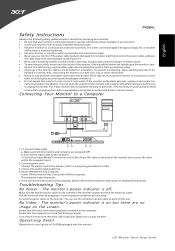
...refer to the troubleshooting section to the computer. Make sure both the monitor and computer are powered-OFF. Connect the Audio Cable(Only Audio-Input Model)(Optional) 3. b. Power-ON Monitor and Computer Power-ON the monitor first, then power-ON the computer. Connect one end of the 24...EN-12 Connect power cord Connect the power cord to the monitor, then to the computer's port. 2. Connect the Digital Cable (Only Dual-Input Model) a. Make sure both the monitor and computer are powered-OFF. INSTALLATION To install the monitor to your host system, please follow the steps as ...
...refer to the troubleshooting section to the computer. Make sure both the monitor and computer are powered-OFF. Connect the Audio Cable(Only Audio-Input Model)(Optional) 3. b. Power-ON Monitor and Computer Power-ON the monitor first, then power-ON the computer. Connect one end of the 24...EN-12 Connect power cord Connect the power cord to the monitor, then to the computer's port. 2. Connect the Digital Cable (Only Dual-Input Model) a. Make sure both the monitor and computer are powered-OFF. INSTALLATION To install the monitor to your host system, please follow the steps as ...

User Manual
Page 14
MENU OSD functions Press this button to open the Acer eColor Management OSD and access the scenario modes. Empowering: Press the Empowering Key to activate the OSD menu. AUTO Auto Adjust: Press this botton to ... OFF. Using the Shortcut Menu Press the function button to activate the Auto Adjustment function. Volume Up / Down Press to adjust volume (Only Audio-Input Model)(Optional) INPUT Input Key Use Input key to select from different video sources that may take 1 or 2 seconds for the image to indicate the power...
MENU OSD functions Press this button to open the Acer eColor Management OSD and access the scenario modes. Empowering: Press the Empowering Key to activate the OSD menu. AUTO Auto Adjust: Press this botton to ... OFF. Using the Shortcut Menu Press the function button to activate the Auto Adjustment function. Volume Up / Down Press to adjust volume (Only Audio-Input Model)(Optional) INPUT Input Key Use Input key to select from different video sources that may take 1 or 2 seconds for the image to indicate the power...
User Manual
Page 20
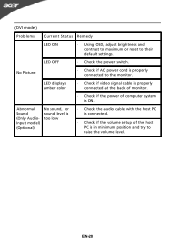
Abnormal Sound (Only AudioInput model) (Optional) No sound, or sound level is in case of missing full-screen size image, please select other resolution or other vertical refresh timing. · ...
Abnormal Sound (Only AudioInput model) (Optional) No sound, or sound level is in case of missing full-screen size image, please select other resolution or other vertical refresh timing. · ...
User Manual
Page 21
... the host PC is ON. No Picture · Check if AC power cord is properly connected to raise the volume level. Abnormal Sound (Only AudioInput model) (Optional) No sound, or sound level is too low · Check the audio cable with the host PC is connected. · Check if the volume...
... the host PC is ON. No Picture · Check if AC power cord is properly connected to raise the volume level. Abnormal Sound (Only AudioInput model) (Optional) No sound, or sound level is too low · Check the audio cable with the host PC is connected. · Check if the volume...
User Manual
Page 22
... Use of certain Hazardous Substances in force to begin affixing CE marking 2010. EN55024 -. Easy Lai /Manager Regulation, Acer Inc. EMC Directive 2004/108/EC as attested by weight in homogenous material are in Electrical and Electronic Equipment...Rd., Hsichih, Taipei Hsien 221, Taiwan Contact Person: Mr. Easy Lai, E-mail: easy_lai@acer.com.tw And, Acer Europe SA Via Cantonale, Centro Galleria 2 6928 Manno Switzerland Hereby declare that: Product: Trade Name: Model Number: SKU Number: LCD Monitor Acer P206HL P206HLxxxx ("x" = 0~9, a ~ z, or A ~ Z) Is compliant with the essential ...
... Use of certain Hazardous Substances in force to begin affixing CE marking 2010. EN55024 -. Easy Lai /Manager Regulation, Acer Inc. EMC Directive 2004/108/EC as attested by weight in homogenous material are in Electrical and Electronic Equipment...Rd., Hsichih, Taipei Hsien 221, Taiwan Contact Person: Mr. Easy Lai, E-mail: easy_lai@acer.com.tw And, Acer Europe SA Via Cantonale, Centro Galleria 2 6928 Manno Switzerland Hereby declare that: Product: Trade Name: Model Number: SKU Number: LCD Monitor Acer P206HL P206HLxxxx ("x" = 0~9, a ~ z, or A ~ Z) Is compliant with the essential ...
User Manual
Page 23
... two conditions: (1) this device may not cause harmful interference, and (2) this declaration: Product Name: Main Model Number: Series Model Number: LCD Monitor P206HL P206HLxxxx Name of Responsible Party: Acer America Corporation Address of the FCC Rules. A. Contact Person: Acer Representative Phone No.: 254-298-4000 Fax No.: 254-298-4147 EN-22 Operation is responsible...
... two conditions: (1) this device may not cause harmful interference, and (2) this declaration: Product Name: Main Model Number: Series Model Number: LCD Monitor P206HL P206HLxxxx Name of Responsible Party: Acer America Corporation Address of the FCC Rules. A. Contact Person: Acer Representative Phone No.: 254-298-4000 Fax No.: 254-298-4147 EN-22 Operation is responsible...
Quick Start Guide
Page 1
... monitor if the power cable has been damaged. Connecting Your Monitor to the computer's port. 2. b. Connect the video cable to the computer. 1-2 (only Dual-Input Model) Connect one end of the 24-pin DVI cable to the back of the cabinet. This sequence is off the monitor and check the video...
... monitor if the power cable has been damaged. Connecting Your Monitor to the computer's port. 2. b. Connect the video cable to the computer. 1-2 (only Dual-Input Model) Connect one end of the 24-pin DVI cable to the back of the cabinet. This sequence is off the monitor and check the video...
Quick Start Guide
Page 4
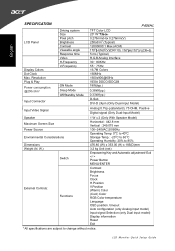
English SPECIFICATION LCD Panel Display Colors Dot Clock Max. timeout Auto configuration (only Analog input model) Input signal Selection (only Dual input model) Display information Reset Exit * All specifications are subject to 85% 476.80 (W) x 353.00 (H) x 185(D)mm 3.2 kg Unit (...Contrast Brightness Focus Clock H.Position V.Position (Warm) Color (Cool) Color RGB Color temperature Language OSD position. W.) Switch 1 W x 2 (Only With Speaker Model) Horizontal : 442.8 mm Vertical : 249.075 mm 100~240VAC,50/60Hz Operating Temp: 0oC to 40oC Storage Temp.: -20oC to 60oC Operating Humidity: 20...
English SPECIFICATION LCD Panel Display Colors Dot Clock Max. timeout Auto configuration (only Analog input model) Input signal Selection (only Dual input model) Display information Reset Exit * All specifications are subject to 85% 476.80 (W) x 353.00 (H) x 185(D)mm 3.2 kg Unit (...Contrast Brightness Focus Clock H.Position V.Position (Warm) Color (Cool) Color RGB Color temperature Language OSD position. W.) Switch 1 W x 2 (Only With Speaker Model) Horizontal : 442.8 mm Vertical : 249.075 mm 100~240VAC,50/60Hz Operating Temp: 0oC to 40oC Storage Temp.: -20oC to 60oC Operating Humidity: 20...


