
Installation Guide
Page 2
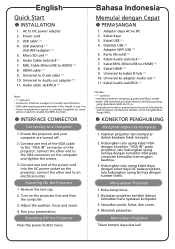
...Cable Jack/Jack (*) 7. HDMI cable (*) 9. phone maker) to enable the MHL function. INTERFACE CONNECTOR Connecting to DC power adapter 2. Run your computer are turned off. 2. Disk/stik USB (*) Adapter WiFi USB (*) 5. Kabel Audio Jack/Jack (*)... connect the other end to the "VGA IN" connector on the projector; Sesuaikan posisi, fokus, dan zoom. 4. Powering Off the Projector Press the power button twice. Kabel Audio Jack/RCA (*) Catatan: • (*) optional • Interface konektor tergantung pada ...
...Cable Jack/Jack (*) 7. HDMI cable (*) 9. phone maker) to enable the MHL function. INTERFACE CONNECTOR Connecting to DC power adapter 2. Run your computer are turned off. 2. Disk/stik USB (*) Adapter WiFi USB (*) 5. Kabel Audio Jack/Jack (*)... connect the other end to the "VGA IN" connector on the projector; Sesuaikan posisi, fokus, dan zoom. 4. Powering Off the Projector Press the power button twice. Kabel Audio Jack/RCA (*) Catatan: • (*) optional • Interface konektor tergantung pada ...
Quick Guide
Page 3
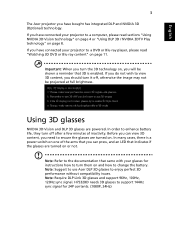
English 3 The Acer projector you have connected your projector to enhance battery life, they turn off , otherwise the image may not be shown a reminder that 3D is a power switch on or not. Using 3D glasses NVIDIA 3D Vision and DLP 3D glasses are turned on one of inactivity. Important: When... 96Hz, 100Hz, 120Hz sync signal. If you should turn them on page 8. Note: Refer to the documentation that indicates if the glasses are powered. If you have bought has integrated DLP and NVIDIA 3D (Optional) technology. If you do not wish to change the battery. In many cases...
English 3 The Acer projector you have connected your projector to enhance battery life, they turn off , otherwise the image may not be shown a reminder that 3D is a power switch on or not. Using 3D glasses NVIDIA 3D Vision and DLP 3D glasses are turned on one of inactivity. Important: When... 96Hz, 100Hz, 120Hz sync signal. If you should turn them on page 8. Note: Refer to the documentation that indicates if the glasses are powered. If you have bought has integrated DLP and NVIDIA 3D (Optional) technology. If you do not wish to change the battery. In many cases...

User Guide
Page 1
...work in Client mode when doing networking display. • Users can easily launch the Acer eDisplay Management to do Full screen, L/ R, 4-split screen projection and enable high quality video streaming. • Powerful wireless display features ready for devices with different OS (MS Windows, Mac OS, ...Android, iOS) • Supports wireless network security (WPA-PSK, WPA2-PSK). • Acer Projector Gateway Web Management enables a web-based control of Acer projector for Windows NB...
...work in Client mode when doing networking display. • Users can easily launch the Acer eDisplay Management to do Full screen, L/ R, 4-split screen projection and enable high quality video streaming. • Powerful wireless display features ready for devices with different OS (MS Windows, Mac OS, ...Android, iOS) • Supports wireless network security (WPA-PSK, WPA2-PSK). • Acer Projector Gateway Web Management enables a web-based control of Acer projector for Windows NB...

User Guide
Page 6
... different devices, such as RAM (internal memory), USB handy drive, USB hard drive and SD card (for selected models) when connected to lack of USB power. NOTE: Disks with partitions are , you can always press MEDIA HOME to go back to MEDIA. NOTE: Supported capacity for USB handy drive: up to...
... different devices, such as RAM (internal memory), USB handy drive, USB hard drive and SD card (for selected models) when connected to lack of USB power. NOTE: Disks with partitions are , you can always press MEDIA HOME to go back to MEDIA. NOTE: Supported capacity for USB handy drive: up to...
User Guide
Page 31
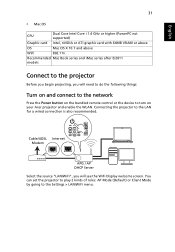
... begin projecting, you will need to do the following things: Turn on and connect to the network Press the Power button on the bundled remote control or the device to turn on your Acer projector and enable the WLAN. Connecting the projector to the Settings > LAN/WiFi menu. You can set the...
... begin projecting, you will need to do the following things: Turn on and connect to the network Press the Power button on the bundled remote control or the device to turn on your Acer projector and enable the WLAN. Connecting the projector to the Settings > LAN/WiFi menu. You can set the...

User Guide
Page 58
... : 0.0.0.0 • Before setting up for the WiFi Display or DLNA function, make sure to plug in acer USB WiFi adapter (optional) first. • When you use WiFi display function, check status icon (like ...different media functions. AP Mode is recommended because of multi-media contents and make sure enough USB power is fed to the USB hard drive. • Before using the eDisplay or DLNA function, make...USB cable to your devices has connected to plug in , LAN IP is complete. Then execute acer USB tool. • This projector allows firmware upgrade via the USB handy drive (select the ...
... : 0.0.0.0 • Before setting up for the WiFi Display or DLNA function, make sure to plug in acer USB WiFi adapter (optional) first. • When you use WiFi display function, check status icon (like ...different media functions. AP Mode is recommended because of multi-media contents and make sure enough USB power is fed to the USB hard drive. • Before using the eDisplay or DLNA function, make...USB cable to your devices has connected to plug in , LAN IP is complete. Then execute acer USB tool. • This projector allows firmware upgrade via the USB handy drive (select the ...

Instruction Manual
Page 3
... from overheating. These openings must not be placed near water. • Do not place this product from the wall outlet before removing the power supply unit from the projector. • If the system has multiple sources of any kind into is provided. • Never push objects of...sure to ensure reliable operation of any kind onto or into the product. Caution for ventilation to unplug the power cord from the power supplies. Never spill liquid of power, disconnect power from the system by placing the product on an unstable cart, stand or table. Keep this product through ...
... from overheating. These openings must not be placed near water. • Do not place this product from the wall outlet before removing the power supply unit from the projector. • If the system has multiple sources of any kind into is provided. • Never push objects of...sure to ensure reliable operation of any kind onto or into the product. Caution for ventilation to unplug the power cord from the power supplies. Never spill liquid of power, disconnect power from the system by placing the product on an unstable cart, stand or table. Keep this product through ...

Instruction Manual
Page 4
... an extension cord is used , the load should be operated from unexpected noise produced by plugging in too many devices. Make sure the power outlet is a safety feature. Do not insert the plug into the wall outlet does not exceed the fuse rating. • Do not overload... the extension cord does not exceed the extension cord ampere rating. Contact your dealer or local power company. • Do not allow anything to replace the power cord set, make sure that the new power cord meets the following requirements: detachable type, UL listed/CSA certified, VDE approved or its ...
... an extension cord is used , the load should be operated from unexpected noise produced by plugging in too many devices. Make sure the power outlet is a safety feature. Do not insert the plug into the wall outlet does not exceed the fuse rating. • Do not overload... the extension cord does not exceed the extension cord ampere rating. Contact your dealer or local power company. • Do not allow anything to replace the power cord set, make sure that the new power cord meets the following requirements: detachable type, UL listed/CSA certified, VDE approved or its ...

Instruction Manual
Page 5
... reach of your eyes. • Turn on . At least 50cm clearance from the wall outlet and refer servicing to qualified service personnel when: • the power cord or plug is damaged, cut or frayed • liquid was spilled into the projector's lens when the light is on the projector first and...
... reach of your eyes. • Turn on . At least 50cm clearance from the wall outlet and refer servicing to qualified service personnel when: • the power cord or plug is damaged, cut or frayed • liquid was spilled into the projector's lens when the light is on the projector first and...

Instruction Manual
Page 6
... deformed or even cause a fire. • Do not attempt to ensure the projector completes its cooling cycle before disconnecting power. • Do not frequently turn off before turning main power off the main power abruptly or unplug the projector during operation. There are dangerous high voltages inside may hurt your dealer for Listening...
... deformed or even cause a fire. • Do not attempt to ensure the projector completes its cooling cycle before disconnecting power. • Do not frequently turn off before turning main power off the main power abruptly or unplug the projector during operation. There are dangerous high voltages inside may hurt your dealer for Listening...
Instruction Manual
Page 8
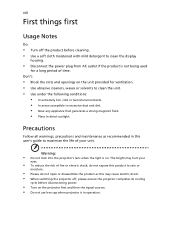
...projector completes its cooling cycle before cleaning. • Use a soft cloth moistened with mild detergent to clean the display housing. • Disconnect the power plug from AC outlet if the product is not being used for ventilation. • Use abrasive cleaners, waxes or solvents to clean the unit. ...8226; To reduce the risk of your unit. The bright may cause electric shock. • When switching the projector off the product before disconnecting power. • Turn on the projector first and then the signal sources. • Do not use lens cap when projector is on the unit ...
...projector completes its cooling cycle before cleaning. • Use a soft cloth moistened with mild detergent to clean the display housing. • Disconnect the power plug from AC outlet if the product is not being used for ventilation. • Use abrasive cleaners, waxes or solvents to clean the unit. ...8226; To reduce the risk of your unit. The bright may cause electric shock. • When switching the projector off the product before disconnecting power. • Turn on the projector first and then the signal sources. • Do not use lens cap when projector is on the unit ...
Instruction Manual
Page 11
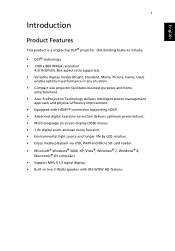
... (Bright, Standard, Movie, Picture, Game, User) enable optimum performance in any situation. • Compact size projector facilitates business purposes and home entertainment. • Acer EcoProjeciton Technology delivers Intelligent power management approach and physical efficiency improvement. • Equipped with HDMI™ connection supporting HDCP. • Advanced digital keystone correction delivers optimum presentations. •...
... (Bright, Standard, Movie, Picture, Game, User) enable optimum performance in any situation. • Compact size projector facilitates business purposes and home entertainment. • Acer EcoProjeciton Technology delivers Intelligent power management approach and physical efficiency improvement. • Equipped with HDMI™ connection supporting HDCP. • Advanced digital keystone correction delivers optimum presentations. •...

Instruction Manual
Page 12
... HIDE RATIO MODE SOURCE MEDIA HOME MEDIA SETUP BACK MENU ENTER Remote control Power cord AC to DC power adapter XXXXXX 3V Battery (option) User's guide Quick start guide Carrying case MHL cable (option) HDMI cable (option) User's guide (for multi-media and wireless ...
... HIDE RATIO MODE SOURCE MEDIA HOME MEDIA SETUP BACK MENU ENTER Remote control Power cord AC to DC power adapter XXXXXX 3V Battery (option) User's guide Quick start guide Carrying case MHL cable (option) HDMI cable (option) User's guide (for multi-media and wireless ...

Instruction Manual
Page 13
English 3 Projector Overview Projector Outlook Front / upper side 7 4 567 3 2 # Description 1 Projection lens 2 Tilt adjusting wheel 3 Focus ring 4 Power button Rear side 1 # Description 5 Control panel 6 Remote control receiver 7 Speakers 12 3 4 5 6 78 # Description # 1 Remote control receiver 5 2 Kensington lock 6 3 Universal connector for VGA in/ Audio out connector 7 4 MicroSD card slot 8 Description HDMI/ MHL connector Audio input connector connector DC Input USB connector
English 3 Projector Overview Projector Outlook Front / upper side 7 4 567 3 2 # Description 1 Projection lens 2 Tilt adjusting wheel 3 Focus ring 4 Power button Rear side 1 # Description 5 Control panel 6 Remote control receiver 7 Speakers 12 3 4 5 6 78 # Description # 1 Remote control receiver 5 2 Kensington lock 6 3 Universal connector for VGA in/ Audio out connector 7 4 MicroSD card slot 8 Description HDMI/ MHL connector Audio input connector connector DC Input USB connector

Instruction Manual
Page 14
... make keys adjustments to the previous step for the OSD menu operation or exit the OSD menu. English 4 Control Panel 2 5 8 4 3 7 6 9 1 # Icon Function 1 POWER 2 MENU 3 SOURCE Description Power button and Power Indicator LED. Press "MENU" to launch the Onscreen display (OSD) menu, back to your selection. 8 LAMP Lamp Indicator LED 9 TEMP Temp Indicator LED...
... make keys adjustments to the previous step for the OSD menu operation or exit the OSD menu. English 4 Control Panel 2 5 8 4 3 7 6 9 1 # Icon Function 1 POWER 2 MENU 3 SOURCE Description Power button and Power Indicator LED. Press "MENU" to launch the Onscreen display (OSD) menu, back to your selection. 8 LAMP Lamp Indicator LED 9 TEMP Temp Indicator LED...

Instruction Manual
Page 15
...the display mode from Bright, Standard, Movie, Picture, Game and User. Media home Press to return to the projector. English 5 Remote Control Layout 1 M1822 2 POWER 3 4 ZOOM HIDE 5 6 7 RATIO MODE SOURCE 8 9 MEDIA MEDIA HOME 11 SETUP 10 12 MENU 13 BACK 14 16 ENTER 15 17 18 MC....40911.001 # Icon Function 1 Infrared transmitter 2 ZOOM Zoom 3 POWER Power Description Sends signals to the Home page of Media mode. Refer to display the image and volume. Press "HIDE" to hide the image and ...
...the display mode from Bright, Standard, Movie, Picture, Game and User. Media home Press to return to the projector. English 5 Remote Control Layout 1 M1822 2 POWER 3 4 ZOOM HIDE 5 6 7 RATIO MODE SOURCE 8 9 MEDIA MEDIA HOME 11 SETUP 10 12 MENU 13 BACK 14 16 ENTER 15 17 18 MC....40911.001 # Icon Function 1 Infrared transmitter 2 ZOOM Zoom 3 POWER Power Description Sends signals to the Home page of Media mode. Refer to display the image and volume. Press "HIDE" to hide the image and ...

Instruction Manual
Page 17
English 7 MHL (Mobile High-Definition Link) Control POWER ZOOM HIDE 1 2 RATIO MODE SOURCE 3 MEDIA MEDIA HOME SETUP 4 5 MENU 6 BACK 7 ENTER 8 9 10 # Icon Component Description 1 MODE MODE • Press "MODE" button for one second ...
English 7 MHL (Mobile High-Definition Link) Control POWER ZOOM HIDE 1 2 RATIO MODE SOURCE 3 MEDIA MEDIA HOME SETUP 4 5 MENU 6 BACK 7 ENTER 8 9 10 # Icon Component Description 1 MODE MODE • Press "MODE" button for one second ...

Instruction Manual
Page 18
... iPod/iPhone/iPad battery charging 4 USB 3 5 3 USB 2 1 11 HDMI HDMI 10 9 7 8 6 MHL USB iPod/iPhone/iPad DVD player D-Sub HDMI # Description 1 AC to DC power adapter 2 Power cord 3 USB cable 4 USB disk/stick USB WiFi adapter 5 Micro SD card 6 Audio cable Jack/Jack # Description 7 MHL Cable (MicroUSB to HDMI) 8 HDMI cable 9 Universal...
... iPod/iPhone/iPad battery charging 4 USB 3 5 3 USB 2 1 11 HDMI HDMI 10 9 7 8 6 MHL USB iPod/iPhone/iPad DVD player D-Sub HDMI # Description 1 AC to DC power adapter 2 Power cord 3 USB cable 4 USB disk/stick USB WiFi adapter 5 Micro SD card 6 Audio cable Jack/Jack # Description 7 MHL Cable (MicroUSB to HDMI) 8 HDMI cable 9 Universal...
Instruction Manual
Page 19
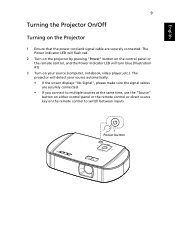
... use the "Source" button on either control panel or the remote control or direct source key on the remote control to switch between inputs. 1 Power button The projector will turn blue.(Illustration #1) 3 Turn on the control panel or the remote control, and the... Power indicator LED will detect your source (computer, notebook, video player ,etc.). The Power indicator LED will flash red. 2 Turn on the projector by pressing "Power" button on your source automatically. • If the screen displays "No Signal", ...
... use the "Source" button on either control panel or the remote control or direct source key on the remote control to switch between inputs. 1 Power button The projector will turn blue.(Illustration #1) 3 Turn on the control panel or the remote control, and the... Power indicator LED will detect your source (computer, notebook, video player ,etc.). The Power indicator LED will flash red. 2 Turn on the projector by pressing "Power" button on your source automatically. • If the screen displays "No Signal", ...
Instruction Manual
Page 20
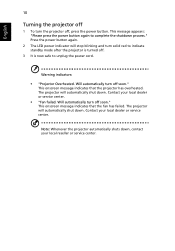
.... The projector will automatically shut down . Warning indicators: • "Projector Overheated. The projector will stop blinking and turn the projector off, press the power button. Contact your local dealer or service center. • "Fan failed. This onscreen message indicates that the fan has failed. Contact your local dealer or ... 1 To turn solid red to indicate standby mode after the projector is turned off. 3 It is now safe to complete the shutdown process." Press the power button again. 2 The LED power indicator will automatically shut down .
.... The projector will automatically shut down . Warning indicators: • "Projector Overheated. The projector will stop blinking and turn the projector off, press the power button. Contact your local dealer or service center. • "Fan failed. This onscreen message indicates that the fan has failed. Contact your local dealer or ... 1 To turn solid red to indicate standby mode after the projector is turned off. 3 It is now safe to complete the shutdown process." Press the power button again. 2 The LED power indicator will automatically shut down .


