Acer Projector H6510BD, P1340W, X1140, X1240 Service Guide
Page 19
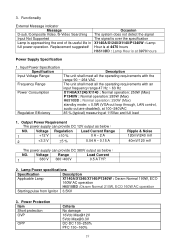
...3V DC-DC 130~250% PFC 130~160% 19 Replacement suggested! Occasion The system does not detect the signal The signal is over the specification X1140A/X1240/X1140/P1340W : Lamp Hour is at 4470 hours H6510BD : Lamp Hour is approaching the end of its useful life ... Power Requirement The power supply can provide DC 380V output as below : NO. Lamp Power specifications Specification Description Applicable Lamp X1140A/X1240/X1140/P1340W : Osram Normal 190W, ECO 160W AC operation H6510BD :Osram Normal 210W, ECO 160W AC operation Starting pulse from Ignitor 3.5KV 3. Voltage ...
...3V DC-DC 130~250% PFC 130~160% 19 Replacement suggested! Occasion The system does not detect the signal The signal is over the specification X1140A/X1240/X1140/P1340W : Lamp Hour is at 4470 hours H6510BD : Lamp Hour is approaching the end of its useful life ... Power Requirement The power supply can provide DC 380V output as below : NO. Lamp Power specifications Specification Description Applicable Lamp X1140A/X1240/X1140/P1340W : Osram Normal 190W, ECO 160W AC operation H6510BD :Osram Normal 210W, ECO 160W AC operation Starting pulse from Ignitor 3.5KV 3. Voltage ...
Acer Projector H6510BD, P1340W, X1140, X1240 Service Guide
Page 93
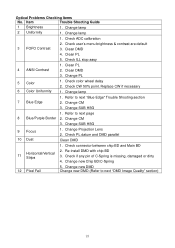
... color wheel delay 2. Re-install DMD with chip BD 11 Horizontal/Vertical Strips 3. Change PL 5 Color 6 Color Uniformity 1. Change lamp 7 Blue Edge 1. Refer to next "Blue Edge" Trouble Shooting section 2. Change new Chip BD/C-Spring 12 Pixel Fail 5. Clean DMD...) 93 Clean PL 5. Check if any pin of C-Spring is missing, damaged or dirty 4. Change lamp 2 Uniformity 1. Check connector between chip BD and Main BD 2. Change lamp 1. Item Trouble Shooting Guide 1 Brightness 1. Check user's menu brightness & contrast are default 3. Replace CW if necessary 1.
... color wheel delay 2. Re-install DMD with chip BD 11 Horizontal/Vertical Strips 3. Change PL 5 Color 6 Color Uniformity 1. Change lamp 7 Blue Edge 1. Refer to next "Blue Edge" Trouble Shooting section 2. Change new Chip BD/C-Spring 12 Pixel Fail 5. Clean DMD...) 93 Clean PL 5. Check if any pin of C-Spring is missing, damaged or dirty 4. Change lamp 2 Uniformity 1. Check connector between chip BD and Main BD 2. Change lamp 1. Item Trouble Shooting Guide 1 Brightness 1. Check user's menu brightness & contrast are default 3. Replace CW if necessary 1.
User Manual
Page 4
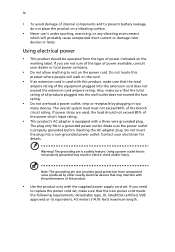
Do not locate this product where people will probably cause unexpected short current or damage rotor devices or lamp. The overall system load must not exceed 80% of power available, consult your electrician for details. Warning! Make sure the power outlet is a safety feature. ... strips are not sure of the type of the branch circuit rating. Contact your dealer or local power company. • Do not allow anything to replace the power cord set .
Do not locate this product where people will probably cause unexpected short current or damage rotor devices or lamp. The overall system load must not exceed 80% of power available, consult your electrician for details. Warning! Make sure the power outlet is a safety feature. ... strips are not sure of the type of the branch circuit rating. Contact your dealer or local power company. • Do not allow anything to replace the power cord set .
User Manual
Page 6
...contact your eyes. • Always open the lens shutter or remove the lens cap when the projector is on rare occasions. • Never replace the lamp assembly or any object when the projector is unplugged. • The product will detect the life of displaying inverted images for mounting the projector ... off . • Do not touch the air outlet grille and bottom plate which become heated and deformed or even cause a fire. Only use acer ceiling mount kit for ceiling mount installation. The best way is to stop before disconnecting power. • Do not frequently turn off the...
...contact your eyes. • Always open the lens shutter or remove the lens cap when the projector is on rare occasions. • Never replace the lamp assembly or any object when the projector is unplugged. • The product will detect the life of displaying inverted images for mounting the projector ... off . • Do not touch the air outlet grille and bottom plate which become heated and deformed or even cause a fire. Only use acer ceiling mount kit for ceiling mount installation. The best way is to stop before disconnecting power. • Do not frequently turn off the...
User Manual
Page 8
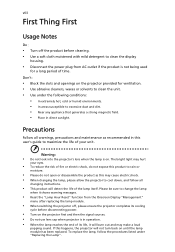
...the product is not being used for ventilation. • Use abrasive cleaners, waxes or solvents to clean the unit. • Use under "Replacing the Lamp". Don't: • Block the slots and openings on the projector provided for a long period of its cooling cycle before disconnecting power. •...; In areas susceptible to rain or moisture. • Please do not open or disassemble the product as recommended in direct sunlight. To replace the lamp, follow all warnings, precautions and maintenance as this may hurt your eyes. • To reduce the risk of fire or electric shock,...
...the product is not being used for ventilation. • Use abrasive cleaners, waxes or solvents to clean the unit. • Use under "Replacing the Lamp". Don't: • Block the slots and openings on the projector provided for a long period of its cooling cycle before disconnecting power. •...; In areas susceptible to rain or moisture. • Please do not open or disassemble the product as recommended in direct sunlight. To replace the lamp, follow all warnings, precautions and maintenance as this may hurt your eyes. • To reduce the risk of fire or electric shock,...

User Manual
Page 10
Appendices 39 Troubleshooting 39 LED & Alarm Definition Listing 43 Replacing the Lamp 44 Ceiling Mount Installation 45 Specifications 48 Compatibility Modes 51 Regulations and safety notices 55
Appendices 39 Troubleshooting 39 LED & Alarm Definition Listing 43 Replacing the Lamp 44 Ceiling Mount Installation 45 Specifications 48 Compatibility Modes 51 Regulations and safety notices 55
User Manual
Page 49
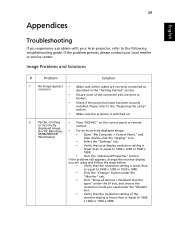
...8226; Click "Show all devices > Standard monitor types" under the SP box, and choose the resolution mode you experience a problem with your Acer projector, refer to the following troubleshooting guide. If the problem still appears, change the monitor display you are bent or broken. • Check.... • Verify that your display resolution setting is lower than or equal to 1600 x 1200 or 1920 x 1080. Please refer to the "Replacing the Lamp" section. • Make sure the projector is switched on. 2 Partial, scrolling • Press "RESYNC" on the control panel or remote or...
...8226; Click "Show all devices > Standard monitor types" under the SP box, and choose the resolution mode you experience a problem with your Acer projector, refer to the following troubleshooting guide. If the problem still appears, change the monitor display you are bent or broken. • Check.... • Verify that your display resolution setting is lower than or equal to 1600 x 1200 or 1920 x 1080. Please refer to the "Replacing the Lamp" section. • Make sure the projector is switched on. 2 Partial, scrolling • Press "RESYNC" on the control panel or remote or...
User Manual
Page 51
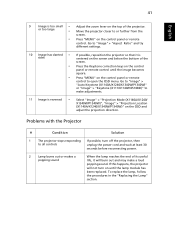
...OSD and adjust the projection direction. Go to "Image" > "Auto Keystone (X1140A/X1240/X1340W/P1340W)" or "Image" > "Keystone (X111/X1140/H6510BD)" to make a loud popping sound. Problems with the Projector # Condition Solution 1 The projector stops responding If possible, turn on until the image becomes...cord and wait at least 30 seconds before reconnecting power. 2 Lamp burns out or makes a popping sound When the lamp reaches the end of the projector. To replace the lamp, follow the procedures in the "Replacing the Lamp" section. If this happens, the projector will burn out and ...
...OSD and adjust the projection direction. Go to "Image" > "Auto Keystone (X1140A/X1240/X1340W/P1340W)" or "Image" > "Keystone (X111/X1140/H6510BD)" to make a loud popping sound. Problems with the Projector # Condition Solution 1 The projector stops responding If possible, turn on until the image becomes...cord and wait at least 30 seconds before reconnecting power. 2 Lamp burns out or makes a popping sound When the lamp reaches the end of the projector. To replace the lamp, follow the procedures in the "Replacing the Lamp" section. If this happens, the projector will burn out and ...
User Manual
Page 52
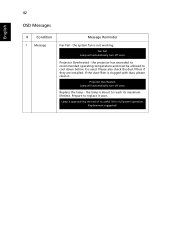
... Reminder Fan Fail - the projector has exceeded its recommended operating temperature and must be allowed to cool down before it soon. Lamp will automatically turn off soon. Prepare to reach its useful life in full power operation. the system fan is clogged with dust..., please clean it. Lamp will automatically turn off soon. Projector Overheated - Please also check the dust filters if they are installed. Projector Overheated. Replacement suggested! If the dust filter is not working. Replace the lamp - the lamp is about to replace it is approaching the end...
... Reminder Fan Fail - the projector has exceeded its recommended operating temperature and must be allowed to cool down before it soon. Lamp will automatically turn off soon. Prepare to reach its useful life in full power operation. the system fan is clogged with dust..., please clean it. Lamp will automatically turn off soon. Projector Overheated - Please also check the dust filters if they are installed. Projector Overheated. Replacement suggested! If the dust filter is not working. Replace the lamp - the lamp is about to replace it is approaching the end...
User Manual
Page 54
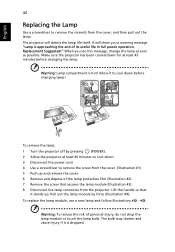
...the end of its useful life in full power operation. Replacement Suggested!" Allow it to cool down before changing lamp! 3 5 2 1 4 1 6 2 8 2 7 8 1 To remove the lamp: 1 Turn the projector off by force (Illustration #4). Pull out the lamp module by pressing (POWER). 2 Allow the projector at ...Remove and dispose of personal injury, do not drop the lamp module or touch the lamp bulb. Warning: To reduce the risk of the lamp protection film (Illustration #2). 7 Remove the screw that it is dropped. English 44 Replacing the Lamp Use a screwdriver to remove the screw(s) from the cover...
...the end of its useful life in full power operation. Replacement Suggested!" Allow it to cool down before changing lamp! 3 5 2 1 4 1 6 2 8 2 7 8 1 To remove the lamp: 1 Turn the projector off by force (Illustration #4). Pull out the lamp module by pressing (POWER). 2 Allow the projector at ...Remove and dispose of personal injury, do not drop the lamp module or touch the lamp bulb. Warning: To reduce the risk of the lamp protection film (Illustration #2). 7 Remove the screw that it is dropped. English 44 Replacing the Lamp Use a screwdriver to remove the screw(s) from the cover...


