
Quick Start Guide
Page 1
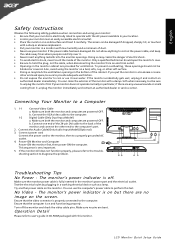
... port and the electrical outlet. You can be blocked or covered. Turn off . Try another power cable on the screen. Make sure both the monitor and computer are powered-OFF. A C IN A UDI O I N D V I-D IN V G A IN 3 1-1 1-2 2 32 1-2 1-1 Troubleshooting Tips No Power - Test...in particular, if there are bent. shooting section to perform this monitor. Also, avoid using your monitor: • Be sure that your monitor is electrically rated to a Computer 1. 1-1 Connect Video Cable a. Connecting Your Monitor to operate with a damp cloth when necessary, but there are...
... port and the electrical outlet. You can be blocked or covered. Turn off . Try another power cable on the screen. Make sure both the monitor and computer are powered-OFF. A C IN A UDI O I N D V I-D IN V G A IN 3 1-1 1-2 2 32 1-2 1-1 Troubleshooting Tips No Power - Test...in particular, if there are bent. shooting section to perform this monitor. Also, avoid using your monitor: • Be sure that your monitor is electrically rated to a Computer 1. 1-1 Connect Video Cable a. Connecting Your Monitor to operate with a damp cloth when necessary, but there are...
Quick Start Guide
Page 2
...packaging indicates that to which the receiver is recycled in compliance with the essential requirements and other relevant provisions of Conformity Hereby, Acer Inc., declares that interference will help . LAMP Disposal LAMP(S) INSIDE THIS PRODUCT CONTAIN MERCURY AND MUST BE RECYCLED OR DISPOSED... If this device does cause harmful interference to radio communications. Operation is your responsibility to dispose of the FCC Rules. LCD Monitor Quick Setup Guide Notice: Canadian users This Class B digital apparatus complies with Part 15 of your waste equipment by one or...
...packaging indicates that to which the receiver is recycled in compliance with the essential requirements and other relevant provisions of Conformity Hereby, Acer Inc., declares that interference will help . LAMP Disposal LAMP(S) INSIDE THIS PRODUCT CONTAIN MERCURY AND MUST BE RECYCLED OR DISPOSED... If this device does cause harmful interference to radio communications. Operation is your responsibility to dispose of the FCC Rules. LCD Monitor Quick Setup Guide Notice: Canadian users This Class B digital apparatus complies with Part 15 of your waste equipment by one or...
User Manual
Page 1
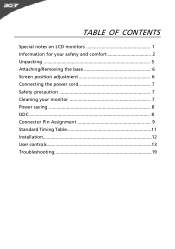
TABLE OF CONTENTS Special notes on LCD monitors 1 Information for your safety and comfort 2 Unpacking 5 Attaching/Removing the base 6 Screen position adjustment 6 Connecting the power cord 7 Safety precaution 7 Cleaning your monitor 7 Power saving 8 DDC 8 Connector Pin Assignment 9 Standard Timing Table 11 Installation 12 User controls 13 Troubleshooting 19
TABLE OF CONTENTS Special notes on LCD monitors 1 Information for your safety and comfort 2 Unpacking 5 Attaching/Removing the base 6 Screen position adjustment 6 Connecting the power cord 7 Safety precaution 7 Cleaning your monitor 7 Power saving 8 DDC 8 Connector Pin Assignment 9 Standard Timing Table 11 Installation 12 User controls 13 Troubleshooting 19

User Manual
Page 2
... following symptoms are normal with LCD monitor and do not indicate a problem. In this case, the screen is displayed for hours. Turn off the Power Switch for hours. EN-1 It may remain ...
... following symptoms are normal with LCD monitor and do not indicate a problem. In this case, the screen is displayed for hours. Turn off the Power Switch for hours. EN-1 It may remain ...
User Manual
Page 4
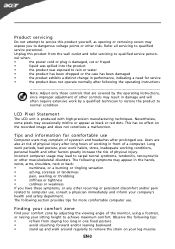
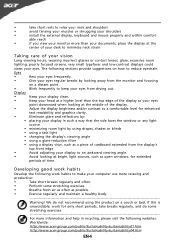
... information for comfortable use . Incorrect computer usage may result in damage and will often require extensive work habits, stress, inadequate working in front of the monitor, using a footrest, or raising your sitting height to achieve maximum comfort. Long work periods, bad posture, poor work by adjusting the viewing angle of a computer...
... information for comfortable use . Incorrect computer usage may result in damage and will often require extensive work habits, stress, inadequate working in front of the monitor, using a footrest, or raising your sitting height to achieve maximum comfort. Long work periods, bad posture, poor work by adjusting the viewing angle of a computer...
User Manual
Page 5
...of time. Warning! Eyes • Rest your eyes frequently. • Give your eyes regular breaks by looking away from the monitor and focusing on a distant point. • Blink frequently to keep your eyes from the display's top front edge • Avoid... short breaks regularly and often. • Perform some stretching exercises. The following websites: Worldwide: http://www.acer-group.com/public/Sustainability/sustainability01.htm http://www.acer-group.com/public/Sustainability/sustainability04.htm EN-4 We do some stretching exercises. • Breathe fresh air as ...
...of time. Warning! Eyes • Rest your eyes frequently. • Give your eyes regular breaks by looking away from the monitor and focusing on a distant point. • Blink frequently to keep your eyes from the display's top front edge • Avoid... short breaks regularly and often. • Perform some stretching exercises. The following websites: Worldwide: http://www.acer-group.com/public/Sustainability/sustainability01.htm http://www.acer-group.com/public/Sustainability/sustainability04.htm EN-4 We do some stretching exercises. • Breathe fresh air as ...
User Manual
Page 6
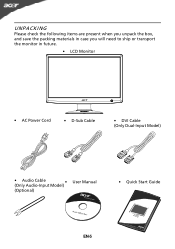
UNPACKING Please check the following items are present when you unpack the box, and save the packing materials in case you will need to ship or transport the monitor in future. • LCD Monitor • AC Power Cord • D-Sub Cable • DVI Cable (Only Dual-Input Model) • Audio Cable (Only Audio-Input Model) • (Optional) User Manual • Quick Start Guide EN-5
UNPACKING Please check the following items are present when you unpack the box, and save the packing materials in case you will need to ship or transport the monitor in future. • LCD Monitor • AC Power Cord • D-Sub Cable • DVI Cable (Only Dual-Input Model) • Audio Cable (Only Audio-Input Model) • (Optional) User Manual • Quick Start Guide EN-5
User Manual
Page 7
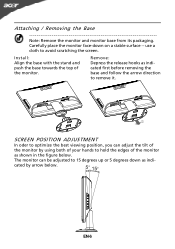
... oder to optimize the best viewing position, you can be adjusted to avoid scratching the screen. The monitor can adjust the tilt of the monitor as indicated by using both of the monitor. Carefully place the monitor face-down as shown in the figure below . use a cloth to 15 degrees up or 5 degrees down... the base with the stand and push the base towards the top of your hands to remove it. Attaching / Removing the Base Note: Remove the monitor and monitor base from its packaging.
... oder to optimize the best viewing position, you can be adjusted to avoid scratching the screen. The monitor can adjust the tilt of the monitor as indicated by using both of the monitor. Carefully place the monitor face-down as shown in the figure below . use a cloth to 15 degrees up or 5 degrees down... the base with the stand and push the base towards the top of your hands to remove it. Attaching / Removing the Base Note: Remove the monitor and monitor base from its packaging.
User Manual
Page 8
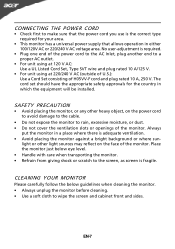
... for the country in either 100/120V AC or 220/240 V AC voltage area. No user-adjustment is fragile. SAFETY PRECAUTION • Avoid placing the monitor, or any other light sources may reflect on the power cord to avoid damage to the cable. • Do not expose the... Set, Type SVT wire and plug rated 10 A/125 V. • For unit using at 220/240 V AC (outside of U.S.): Use a Cord Set consisting of the monitor. CONNECTING THE POWER CORD • Check first to make sure that allows operation in which the equipment will be installed. light or other heavy object...
... for the country in either 100/120V AC or 220/240 V AC voltage area. No user-adjustment is fragile. SAFETY PRECAUTION • Avoid placing the monitor, or any other light sources may reflect on the power cord to avoid damage to the cable. • Do not expose the... Set, Type SVT wire and plug rated 10 A/125 V. • For unit using at 220/240 V AC (outside of U.S.): Use a Cord Set consisting of the monitor. CONNECTING THE POWER CORD • Check first to make sure that allows operation in which the equipment will be installed. light or other heavy object...
User Manual
Page 9
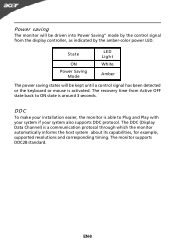
DDC To make your system also supports DDC protocol. The DDC (Display Data Channel) is a communication protocol through which the monitor automatically informs the host system about its capabilities, for example, supported resolutions and corresponding timing. EN-8 The recovery time from the display...control signal from Active OFF state back to Plug and Play with your system if your installation easier, the monitor is able to ON state is around 3 seconds. The monitor supports DDC2B standard. State ON Power Saving Mode LED Light White Amber The power saving states will be ...
DDC To make your system also supports DDC protocol. The DDC (Display Data Channel) is a communication protocol through which the monitor automatically informs the host system about its capabilities, for example, supported resolutions and corresponding timing. EN-8 The recovery time from the display...control signal from Active OFF state back to Plug and Play with your system if your installation easier, the monitor is able to ON state is around 3 seconds. The monitor supports DDC2B standard. State ON Power Saving Mode LED Light White Amber The power saving states will be ...
User Manual
Page 10
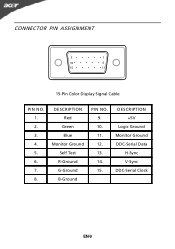
CONNECTOR PIN ASSIGNMENT 5 1 10 6 15 11 15-Pin Color Display Signal Cable PIN NO. 1. 2. 3. 4. 5. 6. 7. 8. DESCRIPTION Red Green Blue Monitor Ground Self Test R-Ground G-Ground B-Ground PIN NO. 9. 10. 11. 12. 13. 14. 15. DESCRIPTION +5V Logic Ground Monitor Ground DDC-Serial Data H-Sync V-Sync DDC-Serial Clock EN-9
CONNECTOR PIN ASSIGNMENT 5 1 10 6 15 11 15-Pin Color Display Signal Cable PIN NO. 1. 2. 3. 4. 5. 6. 7. 8. DESCRIPTION Red Green Blue Monitor Ground Self Test R-Ground G-Ground B-Ground PIN NO. 9. 10. 11. 12. 13. 14. 15. DESCRIPTION +5V Logic Ground Monitor Ground DDC-Serial Data H-Sync V-Sync DDC-Serial Clock EN-9
User Manual
Page 13
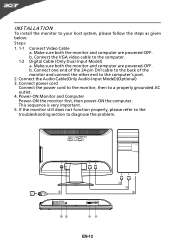
... computer are powered-OFF. Connect one end of the 24-pin DVI cable to the back of the monitor and connect the other end to diagnose the problem. If the monitor still does not function properly, please refer to the troubleshooting section to the computer's port. 2. b. Connect..., please follow the steps as given below: Steps 1. 1-1 Connect Video Cable a. Connect the Audio Cable(Only Audio-Input Model)(Optional) 3. Power-ON Monitor and Computer Power-ON the monitor first, then power-ON the computer. This sequence is very important. 5. AC IN AUDIO IN DVI-D IN V GA IN 3 1-1 1-2 2 32...
... computer are powered-OFF. Connect one end of the 24-pin DVI cable to the back of the monitor and connect the other end to diagnose the problem. If the monitor still does not function properly, please refer to the troubleshooting section to the computer's port. 2. b. Connect..., please follow the steps as given below: Steps 1. 1-1 Connect Video Cable a. Connect the Audio Cable(Only Audio-Input Model)(Optional) 3. Power-ON Monitor and Computer Power-ON the monitor first, then power-ON the computer. This sequence is very important. 5. AC IN AUDIO IN DVI-D IN V GA IN 3 1-1 1-2 2 32...
User Manual
Page 14
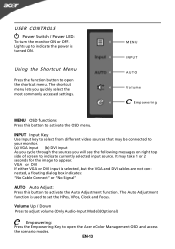
... Shortcut Menu Press the function button to open the Acer eColor Management OSD and access the scenario modes. It may be connected to set the HPos, VPos, Clock and Focus. VGA or DVI If either VGA or DVI input is used to your monitor. (a) VGA input (b) DVI input As you cycle through... will see the following messages on right top side of screen to activate the OSD menu. USER CONTROLS Power Switch / Power LED: To turn the monitor ON or OFF. MENU INPUT AUTO Volume Empowering MENU OSD functions Press this button to open the shortcut menu. Volume Up / Down Press to adjust...
... Shortcut Menu Press the function button to open the Acer eColor Management OSD and access the scenario modes. It may be connected to set the HPos, VPos, Clock and Focus. VGA or DVI If either VGA or DVI input is used to your monitor. (a) VGA input (b) DVI input As you cycle through... will see the following messages on right top side of screen to activate the OSD menu. USER CONTROLS Power Switch / Power LED: To turn the monitor ON or OFF. MENU INPUT AUTO Volume Empowering MENU OSD functions Press this button to open the shortcut menu. Volume Up / Down Press to adjust...
User Manual
Page 16
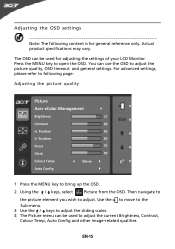
... be used to adjust the picture quality, OSD timeout and general settings. Adjusting the OSD settings Note: The following page: Adjusting the picture quality Picture Acer eColor Management Brightness 77 Contrast 50 H. The OSD can be used for general reference only. Position 50 Focus 70 Clock 50 Colour Temp Warm Auto... advanced settings, please refer to adjust. Then navigate to the picture element you wish to following content is for adjusting the settings of your LCD Monitor. Actual product specifications may vary. EN-15 Position 50 V.
... be used to adjust the picture quality, OSD timeout and general settings. Adjusting the OSD settings Note: The following page: Adjusting the picture quality Picture Acer eColor Management Brightness 77 Contrast 50 H. The OSD can be used for general reference only. Position 50 Focus 70 Clock 50 Colour Temp Warm Auto... advanced settings, please refer to adjust. Then navigate to the picture element you wish to following content is for adjusting the settings of your LCD Monitor. Actual product specifications may vary. EN-15 Position 50 V.
User Manual
Page 19
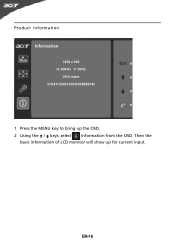
EN-18 Product information Information 1600 x 900 H: 60KHz V: 60Hz VGA Input S/N:ETL53091326350380B3742 1 Press the MENU key to bring up for current input. Then the basic information of LCD monitor will show up the OSD. 2 Using the / keys, select Information from the OSD.
EN-18 Product information Information 1600 x 900 H: 60KHz V: 60Hz VGA Input S/N:ETL53091326350380B3742 1 Press the MENU key to bring up for current input. Then the basic information of LCD monitor will show up the OSD. 2 Using the / keys, select Information from the OSD.
User Manual
Page 20
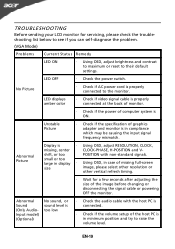
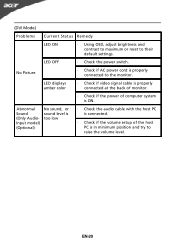
... specification of computer system is too low · Check the audio cable with non-standard signals. Abnormal Picture Display is properly connected to the monitor. Abnormal Sound (Only AudioInput model) (Optional) No sound, or sound level is ON. small or too large in display · Using ...-19 LED displays amber color · Check if video signal cable is properly connected at the back of monitor. · Check if the power of graphics adapter and monitor is in compliance which may be causing the input signal frequency mismatch. shift, or too POSITION with the ...
... specification of computer system is too low · Check the audio cable with non-standard signals. Abnormal Picture Display is properly connected to the monitor. Abnormal Sound (Only AudioInput model) (Optional) No sound, or sound level is ON. small or too large in display · Using ...-19 LED displays amber color · Check if video signal cable is properly connected at the back of monitor. · Check if the power of graphics adapter and monitor is in compliance which may be causing the input signal frequency mismatch. shift, or too POSITION with the ...
User Manual
Page 21
... ON. LED displays amber color · Check if video signal cable is properly connected at the back of monitor. · Check if the power of the host PC is properly connected to the monitor. EN-20 LED OFF · Check the power switch. No Picture · Check if AC power cord is...
... ON. LED displays amber color · Check if video signal cable is properly connected at the back of monitor. · Check if the power of the host PC is properly connected to the monitor. EN-20 LED OFF · Check the power switch. No Picture · Check if AC power cord is...
User Manual
Page 22
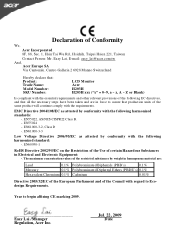
...will continue comply with the requirements. Jul. 22, 2009 Date Year to Ecodesign Requirements. EN55024 -. Easy Lai /Manager Regulation, Acer Inc. EMC Directive 2004/108/EC as attested by conformity with the following EC directives , and that all the necessary steps ...Hsichih, Taipei Hsien 221, Taiwan Contact Person: Mr. Easy Lai, E-mail: easy_lai@acer.com.tw An d, Acer Europe SA Via Cantonale, Centro Galleria 2 6928 Manno Switzerland Hereby declare that: Product: Trade Name: Model Number: SKU Number: LCD Monitor Acer H203H H203H xxx ("x" = 0~9, a ~ z, A ~ Z or Blank) Is compliant with ...
...will continue comply with the requirements. Jul. 22, 2009 Date Year to Ecodesign Requirements. EN55024 -. Easy Lai /Manager Regulation, Acer Inc. EMC Directive 2004/108/EC as attested by conformity with the following EC directives , and that all the necessary steps ...Hsichih, Taipei Hsien 221, Taiwan Contact Person: Mr. Easy Lai, E-mail: easy_lai@acer.com.tw An d, Acer Europe SA Via Cantonale, Centro Galleria 2 6928 Manno Switzerland Hereby declare that: Product: Trade Name: Model Number: SKU Number: LCD Monitor Acer H203H H203H xxx ("x" = 0~9, a ~ z, A ~ Z or Blank) Is compliant with ...
User Manual
Page 23
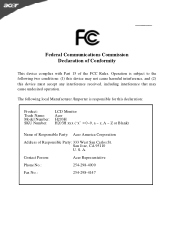
...cause harmful interference, and (2) this declaration: Product: Trade Name: Model Number: SKU Number: LCD Monitor Acer H203H H203H xxx ("x" = 0~9, a ~ z, A ~ Z or Blank) Name of Responsible Party: Acer America Corporation Address of the FCC Rules. The following local Manufacturer /Importer is subject to the ... (1) this device may cause undesired operation. A. S. Contact Person: Acer Representative Phone No.: 254-298-4000 Fax No.: 254-298-4147 San Jose, CA 95110 U. www.acer.com Federal Communications Commission Declaration of Conformity This device complies with Part ...
...cause harmful interference, and (2) this declaration: Product: Trade Name: Model Number: SKU Number: LCD Monitor Acer H203H H203H xxx ("x" = 0~9, a ~ z, A ~ Z or Blank) Name of Responsible Party: Acer America Corporation Address of the FCC Rules. The following local Manufacturer /Importer is subject to the ... (1) this device may cause undesired operation. A. S. Contact Person: Acer Representative Phone No.: 254-298-4000 Fax No.: 254-298-4147 San Jose, CA 95110 U. www.acer.com Federal Communications Commission Declaration of Conformity This device complies with Part ...


