
Quick Start Guide
Page 1
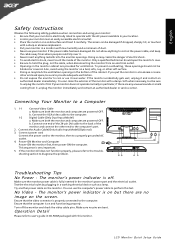
... or service center. LCD Monitor Quick Setup Guide Connect the Audio Cable(Only Audio-Input Model)(Optional) 3. The monitor's power indicator is properly connected to the computer. Doing so may block the ventilation openings in CD-ROM packaged with a damp cloth when necessary, but there are no pins are provided for ventilation. English Safety Instructions Observe the following safety guidelines when connection and using the monitor on the power cable, and keep the cable away...
... or service center. LCD Monitor Quick Setup Guide Connect the Audio Cable(Only Audio-Input Model)(Optional) 3. The monitor's power indicator is properly connected to the computer. Doing so may block the ventilation openings in CD-ROM packaged with a damp cloth when necessary, but there are no pins are provided for ventilation. English Safety Instructions Observe the following safety guidelines when connection and using the monitor on the power cable, and keep the cable away...
Quick Start Guide
Page 2
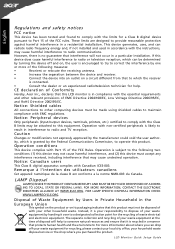
...a circuit different from that protects human health and the environment. Notice: Canadian users This Class B digital apparatus complies with the limits for the recycling of with the instructions, may cause undesired operation. Instead, it is likely to result in a manner... by turning the device off your other relevant provisions of disposal will not occur in a particular installation. LCD Monitor Quick Setup Guide English Regulations and safety notices FCC notice This device has been tested and found to comply with Canadian ICES-003. Caution Changes or ...
...a circuit different from that protects human health and the environment. Notice: Canadian users This Class B digital apparatus complies with the limits for the recycling of with the instructions, may cause undesired operation. Instead, it is likely to result in a manner... by turning the device off your other relevant provisions of disposal will not occur in a particular installation. LCD Monitor Quick Setup Guide English Regulations and safety notices FCC notice This device has been tested and found to comply with Canadian ICES-003. Caution Changes or ...
User Manual
Page 1
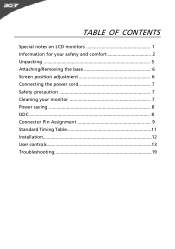
TABLE OF CONTENTS Special notes on LCD monitors 1 Information for your safety and comfort 2 Unpacking 5 Attaching/Removing the base 6 Screen position adjustment 6 Connecting the power cord 7 Safety precaution 7 Cleaning your monitor 7 Power saving 8 DDC 8 Connector Pin Assignment 9 Standard Timing Table 11 Installation 12 User controls 13 Troubleshooting 19
TABLE OF CONTENTS Special notes on LCD monitors 1 Information for your safety and comfort 2 Unpacking 5 Attaching/Removing the base 6 Screen position adjustment 6 Connecting the power cord 7 Safety precaution 7 Cleaning your monitor 7 Power saving 8 DDC 8 Connector Pin Assignment 9 Standard Timing Table 11 Installation 12 User controls 13 Troubleshooting 19

User Manual
Page 2
... slowly by changing the image or turning off the Power Switch and then turn it on again to make sure the flicker disappears. • You may flicker during initial use . • The LCD screen has effective pixels of 99.99% or more. NOTES • Due to the nature of the LCD screen, an afterimage of the fluorescent light, the screen may find slightly uneven brightness on the screen depending...
... slowly by changing the image or turning off the Power Switch and then turn it on again to make sure the flicker disappears. • You may flicker during initial use . • The LCD screen has effective pixels of 99.99% or more. NOTES • Due to the nature of the LCD screen, an afterimage of the fluorescent light, the screen may find slightly uneven brightness on the screen depending...

User Manual
Page 3
... sure to unplug the power cord from lithium battery pack. When you need to disconnect power to the equipment, be blocked by hearing experts,to protect your safety and comfort Safety instructions Read these instructions, suggested by placing the product on an unstable cart, stand or table. The openings should never be blocked or covered. Never spill liquid of...
... sure to unplug the power cord from lithium battery pack. When you need to disconnect power to the equipment, be blocked by hearing experts,to protect your safety and comfort Safety instructions Read these instructions, suggested by placing the product on an unstable cart, stand or table. The openings should never be blocked or covered. Never spill liquid of...
User Manual
Page 4
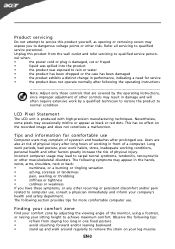
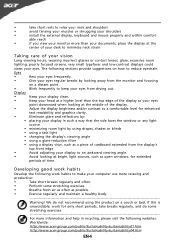
... prolonged use . Users are covered by adjusting the viewing angle of eyestrain and headaches after following tips: • refrain from the wall outlet and refer servicing to qualified service person- Long work periods, bad posture, poor work by a qualified technician to restore the product to normal condition. Finding your comfort zone Find your comfort zone by the operating instructions, since improper adjustment...
... prolonged use . Users are covered by adjusting the viewing angle of eyestrain and headaches after following tips: • refrain from the wall outlet and refer servicing to qualified service person- Long work periods, bad posture, poor work by a qualified technician to restore the product to normal condition. Finding your comfort zone Find your comfort zone by the operating instructions, since improper adjustment...
User Manual
Page 5
...; if you view your monitor more information and help in such a way that the side faces the window or any light source • minimizing room light by looking at the center of time. Display • Keep your display clean. • Keep your head at a higher level than your documents, place the display at the middle of the display. • Adjust the display brightness and/or contrast to a comfortable...
...; if you view your monitor more information and help in such a way that the side faces the window or any light source • minimizing room light by looking at the center of time. Display • Keep your display clean. • Keep your head at a higher level than your documents, place the display at the middle of the display. • Adjust the display brightness and/or contrast to a comfortable...

User Manual
Page 6
UNPACKING Please check the following items are present when you unpack the box, and save the packing materials in case you will need to ship or transport the monitor in future. • LCD Monitor • AC Power Cord • D-Sub Cable • DVI Cable (Only Dual-Input Model) • Audio Cable (Only Audio-Input Model) • (Optional) User Manual • Quick Start Guide EN-5
UNPACKING Please check the following items are present when you unpack the box, and save the packing materials in case you will need to ship or transport the monitor in future. • LCD Monitor • AC Power Cord • D-Sub Cable • DVI Cable (Only Dual-Input Model) • Audio Cable (Only Audio-Input Model) • (Optional) User Manual • Quick Start Guide EN-5
User Manual
Page 7
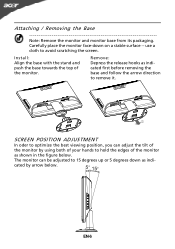
Install: Align the base with the stand and push the base towards the top of the monitor by arrow below . Remove: Depress the release hooks as shown in the figure below . EN-6 use a cloth to remove it. SCREEN POSITION ADJUSTMENT In oder to optimize the best viewing position, you can be adjusted to 15 degrees up or 5 degrees down on a stable surface -- Carefully place the monitor face-down as...
Install: Align the base with the stand and push the base towards the top of the monitor by arrow below . Remove: Depress the release hooks as shown in the figure below . EN-6 use a cloth to remove it. SCREEN POSITION ADJUSTMENT In oder to optimize the best viewing position, you can be adjusted to 15 degrees up or 5 degrees down on a stable surface -- Carefully place the monitor face-down as...

User Manual
Page 8
...-F cord and plug rated 10 A, 250 V. Place the monitor just below guidelines when cleaning the monitor. • Always unplug the monitor before cleaning. • Use a soft cloth to rain, excessive moisture, or dust. • Do not cover the ventilation slots or openings of the monitor. light or other heavy object, on the face of the monitor. CONNECTING THE POWER CORD • Check first to make sure that the power cord you use...
...-F cord and plug rated 10 A, 250 V. Place the monitor just below guidelines when cleaning the monitor. • Always unplug the monitor before cleaning. • Use a soft cloth to rain, excessive moisture, or dust. • Do not cover the ventilation slots or openings of the monitor. light or other heavy object, on the face of the monitor. CONNECTING THE POWER CORD • Check first to make sure that the power cord you use...
User Manual
Page 9
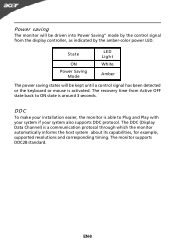
... monitor will be driven into Power Saving" mode by the control signal from Active OFF state back to Plug and Play with your system if your installation easier, the monitor is a communication protocol through which the monitor automatically informs the host system about its capabilities, for example, supported resolutions and corresponding timing. The recovery time from the display controller, as indicated by the amber-color power LED...
... monitor will be driven into Power Saving" mode by the control signal from Active OFF state back to Plug and Play with your system if your installation easier, the monitor is a communication protocol through which the monitor automatically informs the host system about its capabilities, for example, supported resolutions and corresponding timing. The recovery time from the display controller, as indicated by the amber-color power LED...
User Manual
Page 10
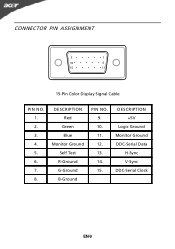
CONNECTOR PIN ASSIGNMENT 5 1 10 6 15 11 15-Pin Color Display Signal Cable PIN NO. 1. 2. 3. 4. 5. 6. 7. 8. DESCRIPTION Red Green Blue Monitor Ground Self Test R-Ground G-Ground B-Ground PIN NO. 9. 10. 11. 12. 13. 14. 15. DESCRIPTION +5V Logic Ground Monitor Ground DDC-Serial Data H-Sync V-Sync DDC-Serial Clock EN-9
CONNECTOR PIN ASSIGNMENT 5 1 10 6 15 11 15-Pin Color Display Signal Cable PIN NO. 1. 2. 3. 4. 5. 6. 7. 8. DESCRIPTION Red Green Blue Monitor Ground Self Test R-Ground G-Ground B-Ground PIN NO. 9. 10. 11. 12. 13. 14. 15. DESCRIPTION +5V Logic Ground Monitor Ground DDC-Serial Data H-Sync V-Sync DDC-Serial Clock EN-9
User Manual
Page 13
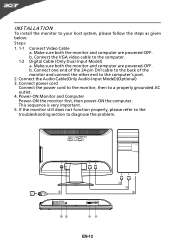
... computer. 1-2 Digital Cable (Only Dual-Input Model) a. AC IN AUDIO IN DVI-D IN V GA IN 3 1-1 1-2 2 32 1-2 1-1 EN-12 This sequence is very important. 5. Connect the VGA video cable to diagnose the problem. b. Make sure both the monitor and computer are powered-OFF. b. Make sure both the monitor and computer are powered-OFF. Connect power cord Connect the power cord to the monitor, then to the computer's port. 2. Power-ON Monitor and Computer Power-ON the monitor first, then power-ON...
... computer. 1-2 Digital Cable (Only Dual-Input Model) a. AC IN AUDIO IN DVI-D IN V GA IN 3 1-1 1-2 2 32 1-2 1-1 EN-12 This sequence is very important. 5. Connect the VGA video cable to diagnose the problem. b. Make sure both the monitor and computer are powered-OFF. b. Make sure both the monitor and computer are powered-OFF. Connect power cord Connect the power cord to the monitor, then to the computer's port. 2. Power-ON Monitor and Computer Power-ON the monitor first, then power-ON...
User Manual
Page 14
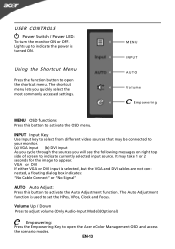
... the OSD menu. The Auto Adjustment function is turned ON. It may be connected to your monitor. (a) VGA input (b) DVI input As you cycle through the sources you quickly select the most commonly accessed settings. Volume Up / Down Press to adjust volume (Only Audio-Input Model)(Optional) Empowering: Press the Empowering Key to open the Acer eColor Management OSD and access the scenario modes. Using the Shortcut Menu Press the function button to open the shortcut menu. USER CONTROLS Power Switch / Power LED: To turn the monitor...
... the OSD menu. The Auto Adjustment function is turned ON. It may be connected to your monitor. (a) VGA input (b) DVI input As you cycle through the sources you quickly select the most commonly accessed settings. Volume Up / Down Press to adjust volume (Only Audio-Input Model)(Optional) Empowering: Press the Empowering Key to open the Acer eColor Management OSD and access the scenario modes. Using the Shortcut Menu Press the function button to open the shortcut menu. USER CONTROLS Power Switch / Power LED: To turn the monitor...

User Manual
Page 15
.... The most comfortable way to confirm the mode and run Auto Adjust. N/A Movie mode Displays scenes in clearest detail. Settings can be fine-tuned to suit any situation EN-14 Features and Benefits Main Menu icon Sub Menu icon Sub Menu item Description N/A Standard D efau lt Settin g . R eflects n a tive d isp lay mode capability N/A Text mode Optimal balance of brightness and contrast prevent eyestrain. N/A User mode User defined.
.... The most comfortable way to confirm the mode and run Auto Adjust. N/A Movie mode Displays scenes in clearest detail. Settings can be fine-tuned to suit any situation EN-14 Features and Benefits Main Menu icon Sub Menu icon Sub Menu item Description N/A Standard D efau lt Settin g . R eflects n a tive d isp lay mode capability N/A Text mode Optimal balance of brightness and contrast prevent eyestrain. N/A User mode User defined.
User Manual
Page 16
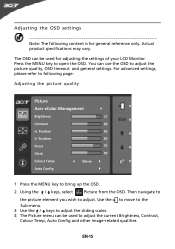
Position 50 Focus 70 Clock 50 Colour Temp Warm Auto Config 1 Press the MENU key to open the OSD. Adjusting the OSD settings Note: The following page: Adjusting the picture quality Picture Acer eColor Management Brightness 77 Contrast 50 H. Press the MENU key to bring up the OSD. 2 Using the / keys, select Picture from the OSD. You can be used to following content is for adjusting the settings of your LCD Monitor. For advanced settings, please...
Position 50 Focus 70 Clock 50 Colour Temp Warm Auto Config 1 Press the MENU key to open the OSD. Adjusting the OSD settings Note: The following page: Adjusting the picture quality Picture Acer eColor Management Brightness 77 Contrast 50 H. Press the MENU key to bring up the OSD. 2 Using the / keys, select Picture from the OSD. You can be used to following content is for adjusting the settings of your LCD Monitor. For advanced settings, please...
User Manual
Page 18
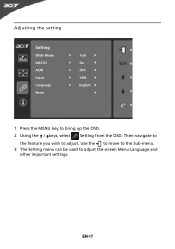
Adjusting the setting Setting Wide Mode DDC/CI ACM Input Language Reset Full On OFF VGA English 1 Press the MENU key to adjust the screen Menu Language and other important settings. Use the to move to the Sub-menu. 3 The Setting menu can be used to bring up the OSD. 2 Using the / keys, select Setting from the OSD. Then navigate to the feature you wish to adjust. EN-17
Adjusting the setting Setting Wide Mode DDC/CI ACM Input Language Reset Full On OFF VGA English 1 Press the MENU key to adjust the screen Menu Language and other important settings. Use the to move to the Sub-menu. 3 The Setting menu can be used to bring up the OSD. 2 Using the / keys, select Setting from the OSD. Then navigate to the feature you wish to adjust. EN-17
User Manual
Page 20
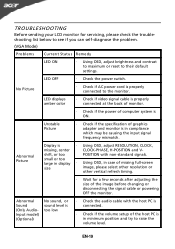
... resolution or other vertical refresh timing. · Wait for servicing, please check the troubleshooting list below to see if you can self-diagnose the problem. (VGA Mode) Problems Current Status Remedy LED ON · Using OSD, adjust brightness and contrast to maximum or reset to the monitor. LED OFF · Check the power switch. No Picture · Check if AC power cord is in compliance which may be causing the input signal frequency mismatch. EN-19 shift, or too POSITION...
... resolution or other vertical refresh timing. · Wait for servicing, please check the troubleshooting list below to see if you can self-diagnose the problem. (VGA Mode) Problems Current Status Remedy LED ON · Using OSD, adjust brightness and contrast to maximum or reset to the monitor. LED OFF · Check the power switch. No Picture · Check if AC power cord is in compliance which may be causing the input signal frequency mismatch. EN-19 shift, or too POSITION...
User Manual
Page 21
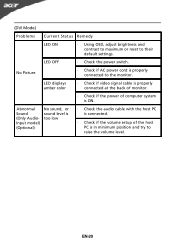
LED OFF · Check the power switch. No Picture · Check if AC power cord is properly connected to their default settings. EN-20 LED displays amber color · Check if video signal cable is properly connected at the back of monitor. · Check if the power of the host PC is ON. (DVI Mode) Problems Current Status Remedy LED ON · Using OSD, adjust brightness and contrast to maximum or reset to the monitor. Abnormal Sound (Only AudioInput model) (Optional) No sound, or sound level is too...
LED OFF · Check the power switch. No Picture · Check if AC power cord is properly connected to their default settings. EN-20 LED displays amber color · Check if video signal cable is properly connected at the back of monitor. · Check if the power of the host PC is ON. (DVI Mode) Problems Current Status Remedy LED ON · Using OSD, adjust brightness and contrast to maximum or reset to the monitor. Abnormal Sound (Only AudioInput model) (Optional) No sound, or sound level is too...
User Manual
Page 23
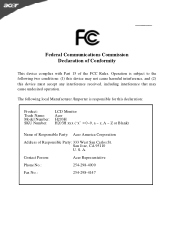
..., including interference that may not cause harmful interference, and (2) this declaration: Product: Trade Name: Model Number: SKU Number: LCD Monitor Acer H203H H203H xxx ("x" = 0~9, a ~ z, A ~ Z or Blank) Name of Responsible Party: Acer America Corporation Address of the FCC Rules. www.acer.com Federal Communications Commission Declaration of Conformity This device complies with Part 15 of Responsible Party: 333 West San Carlos St.
..., including interference that may not cause harmful interference, and (2) this declaration: Product: Trade Name: Model Number: SKU Number: LCD Monitor Acer H203H H203H xxx ("x" = 0~9, a ~ z, A ~ Z or Blank) Name of Responsible Party: Acer America Corporation Address of the FCC Rules. www.acer.com Federal Communications Commission Declaration of Conformity This device complies with Part 15 of Responsible Party: 333 West San Carlos St.


