Altos G540 User's Guide EN
Page 7
... 6 Environmental 6 Hardware options 7 External and internal structure 8 Front bezel 8 Front panel 9 Rear panel 11 Internal components 13 System boards 14 Mainboard 14 Backplane board 17 SAS controller board 18 BMC module 19 ARMC/3 module 20 System LED indicators 21 Front panel LED indicators 21 Hot-plug HDD LED indicator 22 LAN...
... 6 Environmental 6 Hardware options 7 External and internal structure 8 Front bezel 8 Front panel 9 Rear panel 11 Internal components 13 System boards 14 Mainboard 14 Backplane board 17 SAS controller board 18 BMC module 19 ARMC/3 module 20 System LED indicators 21 Front panel LED indicators 21 Hot-plug HDD LED indicator 22 LAN...
Altos G540 User's Guide EN
Page 8
... hard drive 45 Configuring a 5-25 inch storage device 48 Upgrading the processor 50 Upgrading the system memory 55 Installing an expansion card 60 Installing the SAS controller board 62 Installing the BMC module 63 Installing the ARMC/3 module 64 Installing a redundant power supply module 66 4 System BIOS 69 BIOS overview 71...
... hard drive 45 Configuring a 5-25 inch storage device 48 Upgrading the processor 50 Upgrading the system memory 55 Installing an expansion card 60 Installing the SAS controller board 62 Installing the BMC module 63 Installing the ARMC/3 module 64 Installing a redundant power supply module 66 4 System BIOS 69 BIOS overview 71...

Altos G540 User's Guide EN
Page 9
... Specific problems and corrective actions 106 Appendix A: Server management tools Server management overview RAID configuration utilities Onboard SATA RAID Configuration Utility LSI 1068 SAS Configuration Utility LSI MegaRAID SAS RAID Configuration Utility 111 113 114 114 116 117 Appendix B: Rack mount configuration Rack installation information Rack installation precautions Rack mount kit Vertical...
... Specific problems and corrective actions 106 Appendix A: Server management tools Server management overview RAID configuration utilities Onboard SATA RAID Configuration Utility LSI 1068 SAS Configuration Utility LSI MegaRAID SAS RAID Configuration Utility 111 113 114 114 116 117 Appendix B: Rack mount configuration Rack installation information Rack installation precautions Rack mount kit Vertical...
Altos G540 User's Guide EN
Page 14
...; 3.5" floppy disk drive (FDD) • Two hard disk drive (HDD) cage bays support: • Hot-swap or easy-swap HDD cages • Up to eight SAS/SATA2 drive support (four drives per HDD cage) • Embedded SATA2 controller with three separate bus segments • Three PCI Express x8 bus slots •... 64-bit, 66/100 MHz PCI-X bus slots • One 32-bit/33 MHz PCI bus slot • One dedicated PCI-X slot for the optional SAS controller board. 4 1 System tour PCI interface • Six PCI bus slots with six onboard connectors
...; 3.5" floppy disk drive (FDD) • Two hard disk drive (HDD) cage bays support: • Hot-swap or easy-swap HDD cages • Up to eight SAS/SATA2 drive support (four drives per HDD cage) • Embedded SATA2 controller with three separate bus segments • Three PCI Express x8 bus slots •... 64-bit, 66/100 MHz PCI-X bus slots • One 32-bit/33 MHz PCI bus slot • One dedicated PCI-X slot for the optional SAS controller board. 4 1 System tour PCI interface • Six PCI bus slots with six onboard connectors
Altos G540 User's Guide EN
Page 17
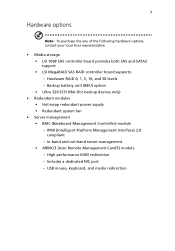
7 Hardware options Note: To purchase the any of the following hardware options, contact your local Acer representative. • Media storage • LSI 1068 SAS controller board provides both SAS and SATA2 support • LSI MegaRAID SAS RAID controller board supports: - High performance KVM redirection - USB mouse, keyboard, and media redirection Includes a dedicated NIC port - IPMI...
7 Hardware options Note: To purchase the any of the following hardware options, contact your local Acer representative. • Media storage • LSI 1068 SAS controller board provides both SAS and SATA2 support • LSI MegaRAID SAS RAID controller board supports: - High performance KVM redirection - USB mouse, keyboard, and media redirection Includes a dedicated NIC port - IPMI...

Altos G540 User's Guide EN
Page 20
... indicator 11 HDD cage 12 HDD cage bay 13 USB 2.0 ports Description Indicate the system network connection status. Supports four hot-plug or easy-swap SAS or SATA2 HDDs. Supports an optional four-bay HDD cage (hot-plug or easy-swap). Connects to USB devices. 14 Power button Press to turn...
... indicator 11 HDD cage 12 HDD cage bay 13 USB 2.0 ports Description Indicate the system network connection status. Supports four hot-plug or easy-swap SAS or SATA2 HDDs. Supports an optional four-bay HDD cage (hot-plug or easy-swap). Connects to USB devices. 14 Power button Press to turn...
Altos G540 User's Guide EN
Page 26
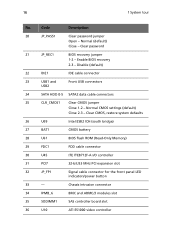
Enable BIOS recovery 2-3 - Chassis intrusion connector 34 IPMB_6 BMC and ARMC/3 modules slot 35 SODIMM1 SAS controller board slot 36 U10 ATI ES1000 video controller Code Description 20 JP_PASS1 Clear password jumper Open - Normal (default) Close - Disable (default) 22 IDE1 IDE ...
Enable BIOS recovery 2-3 - Chassis intrusion connector 34 IPMB_6 BMC and ARMC/3 modules slot 35 SODIMM1 SAS controller board slot 36 U10 ATI ES1000 video controller Code Description 20 JP_PASS1 Clear password jumper Open - Normal (default) Close - Disable (default) 22 IDE1 IDE ...

Altos G540 User's Guide EN
Page 27
.... HDD LED control via pin 11(default) Debug/diagnostic connector SAF-TE firmware flash connector Backplane board peering cable connector Power cable connectors for the SAS/SATA2 HDD 17 No. No. Code Description 37 PCI-E 4 PCI-E 5 PCI Express x8 expansion slots 38 U4 Video memory 39 PCI-X 2 PCI-X 31 64-bit... what differentiate it from the easy-swap HDD cage model. Backplane board The backplane board attached to J10 2 SGIO_JP 3 JP2 4 J4 5 CN1 and CN2 Description SAS/SATA2 HDD access LED control jumpers Close 2-3 -
.... HDD LED control via pin 11(default) Debug/diagnostic connector SAF-TE firmware flash connector Backplane board peering cable connector Power cable connectors for the SAS/SATA2 HDD 17 No. No. Code Description 37 PCI-E 4 PCI-E 5 PCI Express x8 expansion slots 38 U4 Video memory 39 PCI-X 2 PCI-X 31 64-bit... what differentiate it from the easy-swap HDD cage model. Backplane board The backplane board attached to J10 2 SGIO_JP 3 JP2 4 J4 5 CN1 and CN2 Description SAS/SATA2 HDD access LED control jumpers Close 2-3 -
Altos G540 User's Guide EN
Page 28
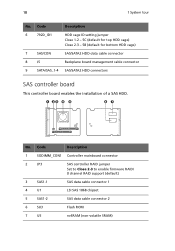
... RAID jumper Set to Close 2-3 to enable firmware RAID/ 0 channel RAID support (default) 3 SAS1-1 SAS data cable connector 1 4 U1 LSI SAS 1068 chipset 5 SAS1-2 SAS data cable connector 2 6 SU3 Flash ROM 7 U5 nvSRAM (non-volatile SRAM) Code 6 792D_ID1 7 SAS/CON 8 J5 9 SATA/SAS_1-4 Description HDD cage ID setting jumper Close 1-2 - 5C (default for top...
... RAID jumper Set to Close 2-3 to enable firmware RAID/ 0 channel RAID support (default) 3 SAS1-1 SAS data cable connector 1 4 U1 LSI SAS 1068 chipset 5 SAS1-2 SAS data cable connector 2 6 SU3 Flash ROM 7 U5 nvSRAM (non-volatile SRAM) Code 6 792D_ID1 7 SAS/CON 8 J5 9 SATA/SAS_1-4 Description HDD cage ID setting jumper Close 1-2 - 5C (default for top...

Altos G540 User's Guide EN
Page 51
... to purchase a blank HDD carrier to four SATA2 or SAS hard disk drives. Store this cover for more information. Contact your local Acer representative for future reinstallation. Installing a HDD cage 1 Perform the pre-installation instructions described on the rear side of the Altos G540 accommodates both hot-plug and easy-swap HDD cage models...
... to purchase a blank HDD carrier to four SATA2 or SAS hard disk drives. Store this cover for more information. Contact your local Acer representative for future reinstallation. Installing a HDD cage 1 Perform the pre-installation instructions described on the rear side of the Altos G540 accommodates both hot-plug and easy-swap HDD cage models...

Altos G540 User's Guide EN
Page 52
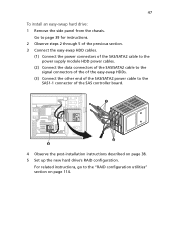
The cage locked to the SAS/CON connector of the backplane board. If you have installed a hot-plug HDD cage, proceed to next step for an easy-swap HDD can be ... the hot-plug HDD cage backplane board. (1) Connect the hard drive power cables to the CN1 and CN2 connectors of the backplane board. (2) Connect the SAS/SATA2 cable to the chassis with the HDD carriers facing front. Drive cable connections for related drive cable connections. 42 3 System upgrade 3 Install the HDD...
The cage locked to the SAS/CON connector of the backplane board. If you have installed a hot-plug HDD cage, proceed to next step for an easy-swap HDD can be ... the hot-plug HDD cage backplane board. (1) Connect the hard drive power cables to the CN1 and CN2 connectors of the backplane board. (2) Connect the SAS/SATA2 cable to the chassis with the HDD carriers facing front. Drive cable connections for related drive cable connections. 42 3 System upgrade 3 Install the HDD...
Altos G540 User's Guide EN
Page 53
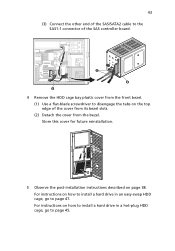
43 (3) Connect the other end of the SAS/SATA2 cable to the SAS1-1 connector of the SAS controller board. 4 Remove the HDD cage bay plastic cover from the bezel. For instructions on the top edge of the cover from its bezel slots. (2) ...
43 (3) Connect the other end of the SAS/SATA2 cable to the SAS1-1 connector of the SAS controller board. 4 Remove the HDD cage bay plastic cover from the bezel. For instructions on the top edge of the cover from its bezel slots. (2) ...
Altos G540 User's Guide EN
Page 55
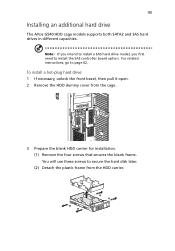
...cage. 3 Prepare the blank HDD carrier for installation. (1) Remove the four screws that secures the blank frame. For related instructions, go to install the SAS controller board option. To install a hot-plug hard drive: 1 If necessary, unlock the front bezel, then pull it open. 2 Remove the HDD dummy... cover from the HDD carrier. Note: If you intend to install a SAS hard drive model, you first need to page 62. 45 Installing an additional hard drive The Altos G540 HDD cage models supports both SATA2 and SAS hard drives in different capacities.
...cage. 3 Prepare the blank HDD carrier for installation. (1) Remove the four screws that secures the blank frame. For related instructions, go to install the SAS controller board option. To install a hot-plug hard drive: 1 If necessary, unlock the front bezel, then pull it open. 2 Remove the HDD dummy... cover from the HDD carrier. Note: If you intend to install a SAS hard drive model, you first need to page 62. 45 Installing an additional hard drive The Altos G540 HDD cage models supports both SATA2 and SAS hard drives in different capacities.
Altos G540 User's Guide EN
Page 57
... 2 through 5 of the previous section. 3 Connect the easy-swap HDD cables. (1) Connect the power connectors of the SAS/SATA2 cable to the power supply module HDD power cables. (2) Connect the data connectors of the SAS/SATA2 cable to the signal connectors of the of the easy-swap HDDs. (3) Connect the other end... of the SAS/SATA2 power cable to the "RAID configuration utilities" section on page 38. 5 Set up the new hard drive's RAID configuration. 47 To install an easy-...
... 2 through 5 of the previous section. 3 Connect the easy-swap HDD cables. (1) Connect the power connectors of the SAS/SATA2 cable to the power supply module HDD power cables. (2) Connect the data connectors of the SAS/SATA2 cable to the signal connectors of the of the easy-swap HDDs. (3) Connect the other end... of the SAS/SATA2 power cable to the "RAID configuration utilities" section on page 38. 5 Set up the new hard drive's RAID configuration. 47 To install an easy-...
Altos G540 User's Guide EN
Page 70
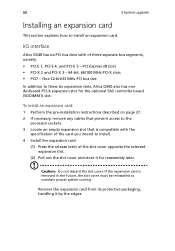
Caution: Do not discard the slot cover. I/O interface Altos G540 has six PCI bus slots with the specification of the card you intend to install. 4 ...the slot cover must be reinstalled to install an expansion card. Remove the expansion card from its protective packaging, handling it for the optional SAS controller board (SODIMM1) slot. PCI Express x8 slots • PCI-X 2 and PCI-X 3 - 64-bit, 66/100 MHz PCI... page 37. 2 If necessary, remove any cables that prevent access to these six expansion slots, Altos G540 also has one dedicated PCI-X expansion slot for reassembly later.
Caution: Do not discard the slot cover. I/O interface Altos G540 has six PCI bus slots with the specification of the card you intend to install. 4 ...the slot cover must be reinstalled to install an expansion card. Remove the expansion card from its protective packaging, handling it for the optional SAS controller board (SODIMM1) slot. PCI Express x8 slots • PCI-X 2 and PCI-X 3 - 64-bit, 66/100 MHz PCI... page 37. 2 If necessary, remove any cables that prevent access to these six expansion slots, Altos G540 also has one dedicated PCI-X expansion slot for reassembly later.
Altos G540 User's Guide EN
Page 72
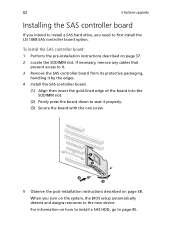
... instructions described on page 38. If necessary, remove any cables that prevent access to it. 3 Remove the SAS controller board from its protective packaging, handling it by the edges. 4 Install the SAS controller board. (1) Align then insert the gold-lined edge of the board into the SODIMM slot. (2) Firmly... press the board down to page 45. 62 3 System upgrade Installing the SAS controller board If you intend to install a SAS hard drive, you turn on page 37. 2 Locate the SODIMM slot. When you need to the new device. To install ...
... instructions described on page 38. If necessary, remove any cables that prevent access to it. 3 Remove the SAS controller board from its protective packaging, handling it by the edges. 4 Install the SAS controller board. (1) Align then insert the gold-lined edge of the board into the SODIMM slot. (2) Firmly... press the board down to page 45. 62 3 System upgrade Installing the SAS controller board If you intend to install a SAS hard drive, you turn on page 37. 2 Locate the SODIMM slot. When you need to the new device. To install ...
Altos G540 User's Guide EN
Page 90
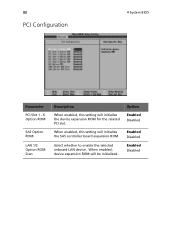
When enabled, this setting will initialize the device expansion ROM for the related PCI slot. Option Enabled Disabled Enabled Disabled Enabled Disabled 80 PCI Configuration 4 System BIOS Parameter PCI Slot 1 - 6 Option ROM SAS Option ROM LAN 1/2 Option ROM Scan Description When enabled, this setting will initialize the SAS controller board expansion ROM. Select whether to enable the selected onboard LAN device. When enabled, device expansion ROM will be initialized.
When enabled, this setting will initialize the device expansion ROM for the related PCI slot. Option Enabled Disabled Enabled Disabled Enabled Disabled 80 PCI Configuration 4 System BIOS Parameter PCI Slot 1 - 6 Option ROM SAS Option ROM LAN 1/2 Option ROM Scan Description When enabled, this setting will initialize the SAS controller board expansion ROM. Select whether to enable the selected onboard LAN device. When enabled, device expansion ROM will be initialized.
Altos G540 User's Guide EN
Page 123
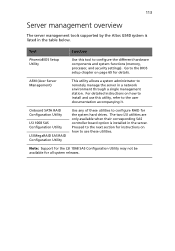
...to the user documentation accompanying it. Note: Support for the LSI 1068 SAS Configuration Utility may not be available for details. 113 Server management overview The server management tools supported by the Altos G540 system is installed in the server. Go to the next section for... drives. Onboard SATA RAID Configuration Utility LSI 1068 SAS Configuration Utility LSI MegaRAID SAS RAID Configuration Utility Use any of these utilities. Proceed to the BIOS setup chapter on page 69 for all system releases. ASM (Acer Server Management) This utility allows a system administrator ...
...to the user documentation accompanying it. Note: Support for the LSI 1068 SAS Configuration Utility may not be available for details. 113 Server management overview The server management tools supported by the Altos G540 system is installed in the server. Go to the next section for... drives. Onboard SATA RAID Configuration Utility LSI 1068 SAS Configuration Utility LSI MegaRAID SAS RAID Configuration Utility Use any of these utilities. Proceed to the BIOS setup chapter on page 69 for all system releases. ASM (Acer Server Management) This utility allows a system administrator ...
Altos G540 User's Guide EN
Page 124
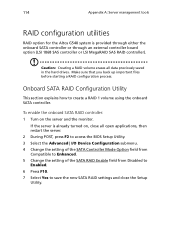
... Setup Utility. If the server is provided through either the onboard SATA controller or through an external controller board option (LSI 1068 SAS controller or LSI MegaRAID SAS RAID controller). 114 Appendix A: Server management tools RAID configuration utilities RAID option for the Altos G540 system is already turned on the server and the monitor.
... Setup Utility. If the server is provided through either the onboard SATA controller or through an external controller board option (LSI 1068 SAS controller or LSI MegaRAID SAS RAID controller). 114 Appendix A: Server management tools RAID configuration utilities RAID option for the Altos G540 system is already turned on the server and the monitor.
Altos G540 User's Guide EN
Page 126
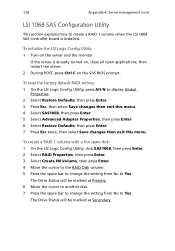
... disk. 7 Press the space bar to change the setting from No to Yes. To initialize the LSI Logic Config Utility: 1 Turn on the SAS BIOS prompt. To load the factory default RAID setting: 1 On the LSI Logic Config Utility, press Alt-N to display Global Properties. 2 Select Restore...Esc twice, then select Save changes then exit this menu. 116 Appendix A: Server management tools LSI 1068 SAS Configuration Utility This section explains how to create a RAID 1 volume when the LSI 1068 SAS controller board is already turned on, close all open applications, then restart the server. 2 During POST,...
... disk. 7 Press the space bar to change the setting from No to Yes. To initialize the LSI Logic Config Utility: 1 Turn on the SAS BIOS prompt. To load the factory default RAID setting: 1 On the LSI Logic Config Utility, press Alt-N to display Global Properties. 2 Select Restore...Esc twice, then select Save changes then exit this menu. 116 Appendix A: Server management tools LSI 1068 SAS Configuration Utility This section explains how to create a RAID 1 volume when the LSI 1068 SAS controller board is already turned on, close all open applications, then restart the server. 2 During POST,...

