
Altos G540 User's Guide EN
Page 4
... CAUTION: INVISIBLE LASER RADIATION WHEN OPEN. Use conditions This part complies with noncertified peripherals is likely to result in this server is subject to the following two conditions: (1) this device may not cause harmful interference, and (2) this device must be attached to ...this server. Operation is a laser product. Caution: Changes or modifications not expressly approved by the Federal Communications Commission, to operate this equipment....
... CAUTION: INVISIBLE LASER RADIATION WHEN OPEN. Use conditions This part complies with noncertified peripherals is likely to result in this server is subject to the following two conditions: (1) this device may not cause harmful interference, and (2) this device must be attached to ...this server. Operation is a laser product. Caution: Changes or modifications not expressly approved by the Federal Communications Commission, to operate this equipment....
Altos G540 User's Guide EN
Page 7
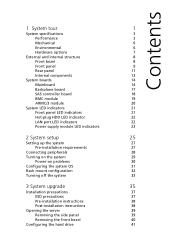
... 32 Turning off the system 33 3 System upgrade 35 Installation precautions 37 ESD precautions 37 Pre-installation instructions 38 Post-installation instructions 38 Opening the server 39 Removing the side panel 39 Removing the front bezel 40 Configuring the hard drive 41
... 32 Turning off the system 33 3 System upgrade 35 Installation precautions 37 ESD precautions 37 Pre-installation instructions 38 Post-installation instructions 38 Opening the server 39 Removing the side panel 39 Removing the front bezel 40 Configuring the hard drive 41
Altos G540 User's Guide EN
Page 8
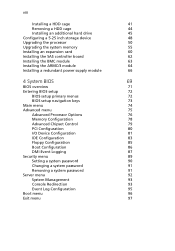
... Floppy Configuration 85 Boot Configuration 86 DMI Event Logging 87 Security menu 89 Setting a system password 90 Changing a system password 91 Removing a system password 91 Server menu 92 System Management 93 Console Redirection 93 Event Log Configuration 95 Boot menu 96 Exit menu 97
... Floppy Configuration 85 Boot Configuration 86 DMI Event Logging 87 Security menu 89 Setting a system password 90 Changing a system password 91 Removing a system password 91 Server menu 92 System Management 93 Console Redirection 93 Event Log Configuration 95 Boot menu 96 Exit menu 97

Altos G540 User's Guide EN
Page 9
... the storage devices 105 Confirming loading of the operating system 105 Specific problems and corrective actions 106 Appendix A: Server management tools Server management overview RAID configuration utilities Onboard SATA RAID Configuration Utility LSI 1068 SAS Configuration Utility LSI MegaRAID SAS RAID ...Rack installation precautions Rack mount kit Vertical mounting hole pattern Rack installation procedures Preparing the server for rack installation Preparing the rack for server installation Installing the server in the system rack Installing the cable arm option 119 121 121 122 124 125...
... the storage devices 105 Confirming loading of the operating system 105 Specific problems and corrective actions 106 Appendix A: Server management tools Server management overview RAID configuration utilities Onboard SATA RAID Configuration Utility LSI 1068 SAS Configuration Utility LSI MegaRAID SAS RAID ...Rack installation precautions Rack mount kit Vertical mounting hole pattern Rack installation procedures Preparing the server for rack installation Preparing the rack for server installation Installing the server in the system rack Installing the cable arm option 119 121 121 122 124 125...

Altos G540 User's Guide EN
Page 12
It host a range of various network environments. The Acer Altos G540 server is a fully modular dual-processor system featuring the latest in computing technology. From simple networking functions to meet the needs of powerful and flexible features designed to computing intensive applications, the Altos G540 delivers.
It host a range of various network environments. The Acer Altos G540 server is a fully modular dual-processor system featuring the latest in computing technology. From simple networking functions to meet the needs of powerful and flexible features designed to computing intensive applications, the Altos G540 delivers.
Altos G540 User's Guide EN
Page 15
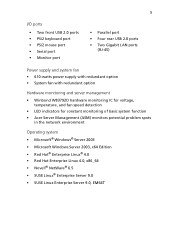
... system fan • 610-watts power supply with redundant option • System fan with redundant option Hardware monitoring and server management • Winbond W83792D hardware monitoring IC for voltage, temperature, and fan speed detection • LED indicators for constant... monitoring of basic system function • Acer Server Management (ASM) monitors potential problem spots in the network environment Operating system • Microsoft® Windows® Server 2003 • Microsoft Windows Server 2003, x64 Edition • Red Hat® Enterprise Linux&#...
... system fan • 610-watts power supply with redundant option • System fan with redundant option Hardware monitoring and server management • Winbond W83792D hardware monitoring IC for voltage, temperature, and fan speed detection • LED indicators for constant... monitoring of basic system function • Acer Server Management (ASM) monitors potential problem spots in the network environment Operating system • Microsoft® Windows® Server 2003 • Microsoft Windows Server 2003, x64 Edition • Red Hat® Enterprise Linux&#...
Altos G540 User's Guide EN
Page 17
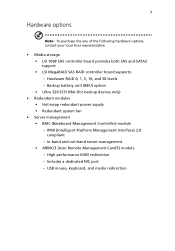
In-band and out-band server management • ARMC/3 (Acer Remote Management Card/3) module - IPMI (Intelligent Platform Management Interface) 2.0 compliant - Includes a dedicated NIC port - High performance KVM redirection - USB mouse, keyboard, and media... • Ultra 320 SCSI HBA (for backup devices only) • Redundant modules • Hot-swap redundant power supply • Redundant system fan • Server management • BMC (Baseboard Management Controller) module - 7 Hardware options Note: To purchase the any of the following hardware options, contact your local...
In-band and out-band server management • ARMC/3 (Acer Remote Management Card/3) module - IPMI (Intelligent Platform Management Interface) 2.0 compliant - Includes a dedicated NIC port - High performance KVM redirection - USB mouse, keyboard, and media... • Ultra 320 SCSI HBA (for backup devices only) • Redundant modules • Hot-swap redundant power supply • Redundant system fan • Server management • BMC (Baseboard Management Controller) module - 7 Hardware options Note: To purchase the any of the following hardware options, contact your local...
Altos G540 User's Guide EN
Page 18
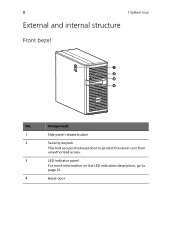
Component 1 Side panel release button 2 Security keylock This lock secures the bezel door to protect the server unit from unauthorized access. 3 LED indicator panel For more information on the LED indicators description, go to page 21. 4 Bezel door 8 1 System tour External and internal structure Front bezel No.
Component 1 Side panel release button 2 Security keylock This lock secures the bezel door to protect the server unit from unauthorized access. 3 LED indicator panel For more information on the LED indicators description, go to page 21. 4 Bezel door 8 1 System tour External and internal structure Front bezel No.

Altos G540 User's Guide EN
Page 20
... 1 System tour No. Supports four hot-plug or easy-swap SAS or SATA2 HDDs. Connects to USB devices. 14 Power button Press to turn the server on/off, or to eject the floppy disk from the FDD. 16 Floppy disk drive Disk drive for reading floppy disks. 17 FDD activity indicator...
... 1 System tour No. Supports four hot-plug or easy-swap SAS or SATA2 HDDs. Connects to USB devices. 14 Power button Press to turn the server on/off, or to eject the floppy disk from the FDD. 16 Floppy disk drive Disk drive for reading floppy disks. 17 FDD activity indicator...

Altos G540 User's Guide EN
Page 22
Icon 9 10 11 12 13 14 15 16 1 System tour Component Unit identification (UID) switch/ indicator USB 2.0 ports Description Press to mark a particular server unit within a server group (when rack-mounted) for purpose of the power supply module. (green) Redundant power supply module bay Accommodates an optional hot-swap redundant power supply ...
Icon 9 10 11 12 13 14 15 16 1 System tour Component Unit identification (UID) switch/ indicator USB 2.0 ports Description Press to mark a particular server unit within a server group (when rack-mounted) for purpose of the power supply module. (green) Redundant power supply module bay Accommodates an optional hot-swap redundant power supply ...

Altos G540 User's Guide EN
Page 29
No. 19 BMC module The optional BMC module is the meeting point between the server hardware and the system management software. In conjunction with the mainboard hardware monitor, it allows system administrators to manage the system remotely over a network. Code Description 1 SODIMM1 ARMC/3 module connector 2 DIMM1 BMC module mainboard connector 3 U3 SDRAM (Synchronous Dynamic Random Access Memory) 4 U1 H85/216x BMC chipset
No. 19 BMC module The optional BMC module is the meeting point between the server hardware and the system management software. In conjunction with the mainboard hardware monitor, it allows system administrators to manage the system remotely over a network. Code Description 1 SODIMM1 ARMC/3 module connector 2 DIMM1 BMC module mainboard connector 3 U3 SDRAM (Synchronous Dynamic Random Access Memory) 4 U1 H85/216x BMC chipset

Altos G540 User's Guide EN
Page 30
...and monitor system health events are readily access using a simple browser. 20 1 System tour ARMC/3 module The optional ARMC/3 module expands the server's remote management function through its condition. No. Code 1 LAN1 2 U6 3 U9 4 SODIMM1 5 U8 6 U5 7 U1 Description ... SDRAM ARMC/3 module mainboard connector Flash ROM SRAM Peppercon KIRA 100 chipset Options to the server regardless of key components; System administrators can now have full remote access to access server configuration, performance and storage; view a summary of its own dedicated NIC port.
...and monitor system health events are readily access using a simple browser. 20 1 System tour ARMC/3 module The optional ARMC/3 module expands the server's remote management function through its condition. No. Code 1 LAN1 2 U6 3 U9 4 SODIMM1 5 U8 6 U5 7 U1 Description ... SDRAM ARMC/3 module mainboard connector Flash ROM SRAM Peppercon KIRA 100 chipset Options to the server regardless of key components; System administrators can now have full remote access to access server configuration, performance and storage; view a summary of its own dedicated NIC port.

Altos G540 User's Guide EN
Page 38
The server is designed to configure the network setup. Note: Consult the operating system manual for each port. Caution: Do not route the power cord where it . Refer to the figure below for specific connection instructions for information on how to be electrically grounded (earthed). 28 2 System setup Connecting peripherals The color-coded I/O port panel on or pinched by items placed against it will walked on the system rear accepts a variety of compatible peripherals. To ensure proper operation, plug the power cord into a properly grounded AC outlet only.
The server is designed to configure the network setup. Note: Consult the operating system manual for each port. Caution: Do not route the power cord where it . Refer to the figure below for specific connection instructions for information on how to be electrically grounded (earthed). 28 2 System setup Connecting peripherals The color-coded I/O port panel on or pinched by items placed against it will walked on the system rear accepts a variety of compatible peripherals. To ensure proper operation, plug the power cord into a properly grounded AC outlet only.
Altos G540 User's Guide EN
Page 42
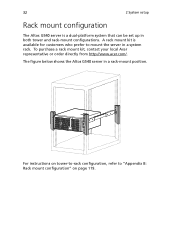
A rack mount kit is a dual-platform system that can be set up in both tower and rack-mount configurations. To purchase a rack mount kit, contact your local Acer representative or order directly from http://www.acer.com/. For instructions on page 119. The figure below shows the Altos G540 server in a rack-mount position. 32 2 System setup Rack mount configuration The Altos G540 server is available for customers who prefer to "Appendix B: Rack mount configuration" on tower-to-rack configuration, refer to mount the server in a system rack.
A rack mount kit is a dual-platform system that can be set up in both tower and rack-mount configurations. To purchase a rack mount kit, contact your local Acer representative or order directly from http://www.acer.com/. For instructions on page 119. The figure below shows the Altos G540 server in a rack-mount position. 32 2 System setup Rack mount configuration The Altos G540 server is available for customers who prefer to "Appendix B: Rack mount configuration" on tower-to-rack configuration, refer to mount the server in a system rack.

Altos G540 User's Guide EN
Page 43
... off the system via software, press the power button for at least four seconds. Quickly pressing the button may put the server in a Suspend mode only. To turn off the server-via software or via hardware. 33 Turning off the system There are two ways to turn off the system via hardware...: If you cannot shut down the server via software: 1 Press Ctrl+Alt+Delete on the attached keyboard or click the Start on a Windows OS. The software procedure below applies to the related...
... off the system via software, press the power button for at least four seconds. Quickly pressing the button may put the server in a Suspend mode only. To turn off the server-via software or via hardware. 33 Turning off the system There are two ways to turn off the system via hardware...: If you cannot shut down the server via software: 1 Press Ctrl+Alt+Delete on the attached keyboard or click the Start on a Windows OS. The software procedure below applies to the related...
Altos G540 User's Guide EN
Page 47
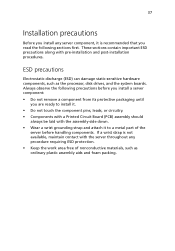
...with pre-installation and post-installation procedures. If a wrist strap is recommended that you read the following precautions before you install a server component: • Do not remove a component from its protective packaging until you install any procedure requiring ESD protection. • ...Keep the work area free of the server before handling components. Always observe the following sections first. 37 Installation precautions Before you are ready to install it. • Do...
...with pre-installation and post-installation procedures. If a wrist strap is recommended that you read the following precautions before you install a server component: • Do not remove a component from its protective packaging until you install any procedure requiring ESD protection. • ...Keep the work area free of the server before handling components. Always observe the following sections first. 37 Installation precautions Before you are ready to install it. • Do...

Altos G540 User's Guide EN
Page 48
...system. Do not attempt the procedures described in the previous section when handling a server component. 38 3 System upgrade Pre-installation instructions Perform the steps below after installing a server component. 1 See to it that all components are a qualified service technician. 1... 2 Unplug all power cables from their outlets. 3 Disconnect all telecommunication cables from their ports. 4 Place the server on a flat, stable surface. 5 Open the server according to the described step-by-step instructions. 2 Reinstall any expansion board(s), peripheral(s), bracket (s) and system cable...
...system. Do not attempt the procedures described in the previous section when handling a server component. 38 3 System upgrade Pre-installation instructions Perform the steps below after installing a server component. 1 See to it that all components are a qualified service technician. 1... 2 Unplug all power cables from their outlets. 3 Disconnect all telecommunication cables from their ports. 4 Place the server on a flat, stable surface. 5 Open the server according to the described step-by-step instructions. 2 Reinstall any expansion board(s), peripheral(s), bracket (s) and system cable...

Altos G540 User's Guide EN
Page 49
.... (2) Press the side panel release button. (3) Slide the side panel toward the rear of the chassis to open the server before you have turned off the system and all peripherals connected to the server's internal components. The front bezel and (left) side panel are removable to allow access to it . 39 Opening... the server Caution: Before you proceed, make sure that you can install upgrade components. Removing the side panel 1 Perform the pre-installation instructions described on page 37. 2 ...
.... (2) Press the side panel release button. (3) Slide the side panel toward the rear of the chassis to open the server before you have turned off the system and all peripherals connected to the server's internal components. The front bezel and (left) side panel are removable to allow access to it . 39 Opening... the server Caution: Before you proceed, make sure that you can install upgrade components. Removing the side panel 1 Perform the pre-installation instructions described on page 37. 2 ...
Altos G540 User's Guide EN
Page 60
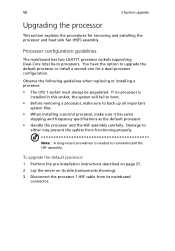
To upgrade the default processor: 1 Perform the pre-installation instructions described on page 37. 2 Lay the server on its side (components showing). 3 Disconnect the processor 1 HSF cable from functioning properly. Damage to upgrade the default processor or install a second one for removing ...
To upgrade the default processor: 1 Perform the pre-installation instructions described on page 37. 2 Lay the server on its side (components showing). 3 Disconnect the processor 1 HSF cable from functioning properly. Damage to upgrade the default processor or install a second one for removing ...

Altos G540 User's Guide EN
Page 67
... duct from the heat sink-fan. 57 • Install FBD pair upgrades in pairs. 1 Perform the pre-installation instructions described on page 37. 2 Lay the server on its side (components showing). 3 Remove the air duct to access to back up all important system files. First FBD pair: DIMMA1 and DIMMB1 slots...
... duct from the heat sink-fan. 57 • Install FBD pair upgrades in pairs. 1 Perform the pre-installation instructions described on page 37. 2 Lay the server on its side (components showing). 3 Remove the air duct to access to back up all important system files. First FBD pair: DIMMA1 and DIMMB1 slots...

