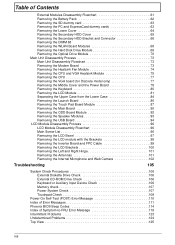
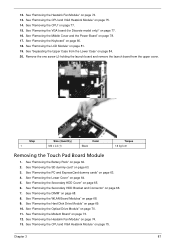
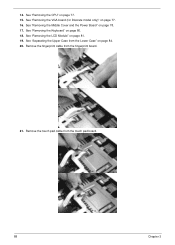
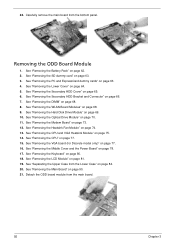
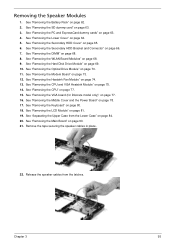
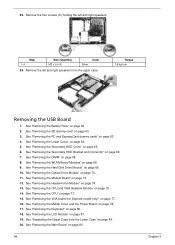
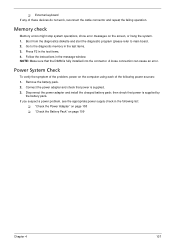
TravelMate 7720 / 7720G/7320 and Extensa 7620 / 7620Z User's Guide
Page 11
... from staying too long in one fixed posture • avoid slouching forward and/or leaning backward • stand up and walk around regularly to remove the strain on your leg muscles • take short rests to relax your neck and shoulders • avoid tensing your muscles or shrugging your ...shoulders • install the external display, keyboard and mouse properly and within comfortable reach • if you view your monitor more than the top edge of the display so your eyes point...
TravelMate 7720 / 7720G/7320 and Extensa 7620 / 7620Z User's Guide
Page 69
... the computer to a client's office or a different building, you go within short distances, for example, from the AC adapter. 6 Disconnect the keyboard, pointing device, printer, external monitor and other external devices. 7 Disconnect the Kensington lock if you are ready to use the computer again, unlatch and...to disconnect your computer from external accessories: 1 Save any open the display; To bring the computer out of Sleep mode, open files. 2 Remove any media, floppy disks or compact disks from the drive(s). 3 Shut down the computer: Click on Start, Turn Off Computer, then click on...
TravelMate 7720 / 7720G/7320 and Extensa 7620 / 7620Z User's Guide
Page 99
...-low warning 48 caring for xv characteristics 45 charging 47 checking charge level 47 installing 46 low conditions 48 maximizing life 45 optimizing 47 removing 47 using the first time 45 BIOS utility 60 brightness hotkeys 33 C caps lock 30 on indicator 25 care AC adapter xiv battery...manually 42 troubleshooting 42 charging checking level 47 cleaning computer xv computer caring for xiv cleaning xv disconnecting 49 features 14, 38 indicators 25 keyboards 30 79 moving around 49 on indicator 25 security 53 setting up a home office 51 taking home 50 traveling internationally 52 traveling on ...
TravelMate 7720 / 7320 and Extensa 7620 Service Guide
Page 7
... Basics 11 Using the Keyboard 13 Lock Keys and embedded numeric keypad 13 Windows Keys 14 Hot Keys 15 Special Key 16 Acer Empowering Technology 17 Empowering Technology password 17 Acer eNet Management 17 Acer ePower Management 19 Acer ePresentation Management 20 Acer eDataSecurity Management 21 Acer eLock Management 22 Acer eRecovery Management 23 Acer eSettings Management 24 Windows...
TravelMate 7720 / 7320 and Extensa 7620 Service Guide
Page 8
... Process 73 Main Unit Disassembly Flowchart 73 Removing the Modem Board 73 Removing the Heatsink Fan Module 74 Removing the CPU and VGA Heatsink Module 75 Removing the CPU 77 Removing the VGA board (for Discrete model only 77 Removing the Middle Cover and the Power Board 78 Removing the Keyboard 80 Removing the LCD Module 81 Separating the...
TravelMate 7720 / 7320 and Extensa 7620 Service Guide
Page 70
... pack. For example, if you want to remove the main board, you do the following stages: • External module disassembly • Main unit disassembly • LCD module disassembly The flowcharts provided in that ... peripherals. 2. Observe the order of the hardware components. General Information Pre-disassembly Instructions Before proceeding with the disassembly procedure, make sure that you must first remove the keyboard, then disassemble the inside assembly frame in the succeeding disassembly sections illustrate the entire disassembly sequence.
TravelMate 7720 / 7320 and Extensa 7620 Service Guide
Page 71
... Flowchart The flowchart below gives you a graphic representation on the components that need to remove the main board, you on the entire disassembly sequence and instructs you must first remove the keyboard, then disassemble the inside assembly frame in that order. For example, if you want... to be removed during servicing. EXTERNAL MODULE DISASSEMBLY TURN OFF POWER AND PERIPHERALS UNPLUG POWER CABLES...
TravelMate 7720 / 7320 and Extensa 7620 Service Guide
Page 83
See "Removing the Battery Pack" on page 64. Chapter 3 73 Main Unit Disassembly Process Main Unit Disassembly Flowchart MAIN UNIT DISASSEMBLY MAIN UNIT Cx2 HEAT SINK FAN C x9 (Cx5 for UMA module) MIDDLE COVER Cx2 MODEM BOARD CPU/VGA THERMAL MODULE CPU Dx2 VGA BOARD KEYBOARD Ax2 Hx2 LCD MODULE Cx 1 POWER BOARD... M2 x L4 M2.5 x L5 M2.5 x L8 M2 x L4 Part No. 86.00E33.736 86.9A552.4R0 86.00E74.335 86.00E34.738 86.00F24.724 Removing the Modem Board 1. See "Removing the Lower Cover" on page 62. 2.
TravelMate 7720 / 7320 and Extensa 7620 Service Guide
Page 90
See "Removing the Middle Cover and the Power Board" on page 62.. 2. Step 1 Size (Quantity) M2 x L4 (1) Color Silver Torque 1.6 kgf-cm Removing the Keyboard 1. 6. Release the top latches securing the keyboard in place. 80 Chapter 3 See "Removing the Battery Pack" on page 78. 3. Remove the one screw (C) securing the Power board to the middle cover, and remove the Power board from the middle cover.
TravelMate 7720 / 7320 and Extensa 7620 Service Guide
Page 91
See "Removing the Battery Pack" on page 78. 5. See "Removing the Middle Cover and the Power Board" on page 62. 2. 4. Removing the LCD Module 1. See "Removing the WLAN Board Modules" on page 80. Disconnect the keyboard cable from the main board to remove the keyboard. See "Removing the Keyboard" on page 68. 4. See "Removing the Lower Cover" on the touchpad area. 5. Chapter 3 81 then turn it out; Carefully pry the keyboard out of the side latches and slide it over on page 64. 3.
TravelMate 7720 / 7320 and Extensa 7620 Service Guide
Page 94
Separating the Upper Case from the base unit. See "Removing the Keyboard" on page 62. 2. 11. See "Removing the Battery Pack" on page 80. 18. See "Removing the Secondary HDD Bracket and Connector" on page 68. 8. See "Removing the DIMM" on page 66. 7. See "Removing the VGA board (for Discrete model only)" on page 69. 10. See...
TravelMate 7720 / 7320 and Extensa 7620 Service Guide
Page 97
... on page 64. 5. See "Removing the Optical Drive Module" on page 77. 16. See "Removing the VGA board (for Discrete model only)" on page 70. 11. See "Removing the Middle Cover and the Power Board" on page 80. 18. See "Removing the Keyboard" on page 78. 17. Remove the one screw (J) holding the ...launch board and remove the launch board from the Lower Case" on page 81. 19. See "Removing the SD dummy card" on page 65. 6. See "Removing the Secondary HDD Cover" on page 63. 3. ...
TravelMate 7720 / 7320 and Extensa 7620 Service Guide
Page 98
See "Removing the CPU" on page 77. 16. See "Removing the VGA board (for Discrete model only)" on page 77. 15. Remove the touch pad cable from the fingerprint board. 21. See "Removing the LCD Module" on page 84. 20. 14. See "Separating the Upper Case from the Lower Case" on page 81. 19. See "Removing the Keyboard" on page 78. 17. See "Removing the Middle Cover and the Power Board" on page 80. 18. Remove the fingerprint cable from the touch pad board. 88 Chapter 3
TravelMate 7720 / 7320 and Extensa 7620 Service Guide
Page 100
...Modules" on page 81. 19. See "Removing the Middle Cover and the Power Board" on page 77. 15. See "Removing the CPU" on page 78. 17. See "Removing the DIMM" on page 80. 18. See "Removing the Keyboard" on page 68. 8. See "Removing the Secondary HDD Bracket and Connector" on ...page 65. 6. Carefully pry loose and remove the touch pad board. See "Removing the Secondary HDD Cover...
TravelMate 7720 / 7320 and Extensa 7620 Service Guide
Page 102
...Detach the ODD board module from the bottom panel. See "Removing the WLAN Board Modules" on page 81. 19. See "Removing the Optical Drive Module" on page 75. 14. See "Removing the CPU and VGA Heatsink Module" on page 70. 11. See "Removing the Middle Cover and the Power Board" on page 63...See "Removing the Heatsink Fan Module" on page 64. 5. See "Separating the Upper Case from the Lower Case" on page 77. 16. See "Removing the VGA board (for Discrete model only)" on page 84. 20. See "Removing the CPU" on page 80. 18. See "Removing the Keyboard" on page 77. 15. Removing the...
TravelMate 7720 / 7320 and Extensa 7620 Service Guide
Page 103
...Power Board" on page 84. 20. See "Removing the Main Board" on page 81. 19. Chapter 3 93 See "Removing the LCD Module" on page 90. 21. See "Removing the SD dummy card" on page 80. 18. See "Removing the Keyboard" on page 63. 3. See "Removing the PC and ExpressCard dummy cards" on page... 75. 14. See "Removing the CPU and VGA Heatsink Module" on page...
TravelMate 7720 / 7320 and Extensa 7620 Service Guide
Page 104
... Color Silver 24. See "Removing the SD dummy card" on page 80. 18. See "Removing the Keyboard" on page 63. 3. Remove the four screws (C) holding the left and right speakers from the Lower Case" on page 69. 10. Remove the left and right speakers. See "Removing the PC and ExpressCard dummy ...cards" on page 75. 14. See "Removing the CPU and...
TravelMate 7720 / 7320 and Extensa 7620 Service Guide
Page 116
... CD-ROM. Boot from the diagnostics diskette and start the diagnostics program. 2. A write-enabled, diagnostic diskette is correct, run the Keyboard Test. System Check Procedures External Diskette Drive Check Do the following one label attached to it . Multiple labels can cause the drive to... to a controller, driver, or diskette. Replace the main board. Keyboard or Auxiliary Input Device Check Remove the external keyboard if the internal keyboard is passed when the program runs to fail. If the tests detect a keyboard problem, do the following to isolate the problem to be tested. ...
TravelMate 7720 / 7320 and Extensa 7620 Service Guide
Page 117
... power supply check in the message window. A loose connection can cause an error. then check that power is fully installed into the connector. K External keyboard If any of the problem, power on the screen, or hang the system. 1. Remove the battery pack. 2. Disconnect the power adapter and install the charged battery pack;
TravelMate 7720 / 7320 and Extensa 7620 Service Guide
Page 131
... connection board Hard disk drive System board See "Save to execute "Load Default Settings", then reboot system. LCD cover switch System board Remove battery pack and let it cool for 2 hours. Refresh battery (continue use battery until power off, then charge battery). Press Fn... does not match the installed devices. Reconnect hard disk/CD-ROM/diskette drives. Device driver Device cable Device System board Keyboard/Touchpad-Related Symptoms Symptom / Error Keyboard (one or more keys) does not work correctly. USB does not work correctly Print problems. Serial or parallel port ...