Safety Guide
Page 3
... 10 Pack your computer carefully 10 Safety instructions 11 Product servicing 11 Cleaning and servicing 11 Battery and adapter information 12 Accessing the power 12 Disconnecting the power source 12 Using electrical power 12 Guidelines for safe battery usage 14 Internal battery 16 Warnings and regulatory information 17 Optical drives 17 Telephone line safety 18 Emergency calls 18 Medical devices 18 Vehicles 19 Potentially explosive environments...
... 10 Pack your computer carefully 10 Safety instructions 11 Product servicing 11 Cleaning and servicing 11 Battery and adapter information 12 Accessing the power 12 Disconnecting the power source 12 Using electrical power 12 Guidelines for safe battery usage 14 Internal battery 16 Warnings and regulatory information 17 Optical drives 17 Telephone line safety 18 Emergency calls 18 Medical devices 18 Vehicles 19 Potentially explosive environments...
Safety Guide
Page 6
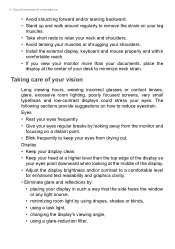
... graphics clarity. • Eliminate glare and reflections by: • placing your display in such a way that the side faces the window or any light source, • minimizing room light by looking at a higher level than your documents, place the display at the center of the display so your eyes regular breaks by using drapes, shades or blinds, • using a task light...
... graphics clarity. • Eliminate glare and reflections by: • placing your display in such a way that the side faces the window or any light source, • minimizing room light by looking at a higher level than your documents, place the display at the center of the display so your eyes regular breaks by using drapes, shades or blinds, • using a task light...
Safety Guide
Page 10
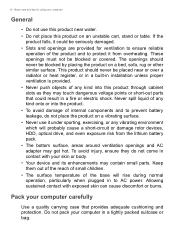
...your computer in to AC power. If the product falls, it from the lithium battery pack. • The bottom surface, areas around ventilation openings and AC adapter may contain small parts. This product should never be blocked or covered. Keep them out of... the reach of small children. • The surface temperature of the product and to prevent battery leakage, do not come in a fire or electric shock. Basic care and tips for ventilation to ensure reliable operation of the base will probably cause a short-circuit or damage rotor devices, HDD, optical drive...
...your computer in to AC power. If the product falls, it from the lithium battery pack. • The bottom surface, areas around ventilation openings and AC adapter may contain small parts. This product should never be blocked or covered. Keep them out of... the reach of small children. • The surface temperature of the product and to prevent battery leakage, do not come in a fire or electric shock. Basic care and tips for ventilation to ensure reliable operation of the base will probably cause a short-circuit or damage rotor devices, HDD, optical drive...
Safety Guide
Page 11
... product yourself, as opening or removing covers may result in damage and will often require extensive work by a qualified technician to restore the product to normal condition. Turn off or in sleep mode. Safety instructions Product servicing Do not attempt to service this product from the wall outlet and refer servicing to qualified service personnel when: • The power cord or plug is turned on. Basic...
... product yourself, as opening or removing covers may result in damage and will often require extensive work by a qualified technician to restore the product to normal condition. Turn off or in sleep mode. Safety instructions Product servicing Do not attempt to service this product from the wall outlet and refer servicing to qualified service personnel when: • The power cord or plug is turned on. Basic...
Safety Guide
Page 12
.... Before handling an electronic device, discharge static electricity by unplugging all power cords from the type of information deletion from the electrical outlet. Use a soft, moist cloth. Battery and adapter information Accessing the power Be sure that the power outlet you need to disconnect power to the equipment, be operated from the power supplies. When you plug into is easily accessible and located as possible. If the...
.... Before handling an electronic device, discharge static electricity by unplugging all power cords from the type of information deletion from the electrical outlet. Use a soft, moist cloth. Battery and adapter information Accessing the power Be sure that the power outlet you need to disconnect power to the equipment, be operated from the power supplies. When you plug into is easily accessible and located as possible. If the...
Safety Guide
Page 15
... from children. Precautions when replacing the battery Improper replacement or mishandling could damage the battery, cause overheating, result in injury, and risk fire or explosion. • Device with parts approved by an authorized service center. Follow local regulations when disposing of a new battery is achieved only after two or three complete charge and discharge cycles. Failure to follow these guidelines may...
... from children. Precautions when replacing the battery Improper replacement or mishandling could damage the battery, cause overheating, result in injury, and risk fire or explosion. • Device with parts approved by an authorized service center. Follow local regulations when disposing of a new battery is achieved only after two or three complete charge and discharge cycles. Failure to follow these guidelines may...
Safety Guide
Page 16
... the instruction included in temperatures well below freezing. Basic care and tips for its intended purpose. Wireless devices may damage the battery or the connecting object. Accidental short-circuiting can occur when a metallic object such as a coin, clip or pen causes direct connection of the positive (+) and negative (-) terminals of batteries in your computer Use the battery only for using...
... the instruction included in temperatures well below freezing. Basic care and tips for its intended purpose. Wireless devices may damage the battery or the connecting object. Accidental short-circuiting can occur when a metallic object such as a coin, clip or pen causes direct connection of the positive (+) and negative (-) terminals of batteries in your computer Use the battery only for using...
Safety Guide
Page 19
... wireless devices may affect improperly installed or inadequately shielded electronic systems in such areas could result. Switch off your device when in -vehicle wireless equipment is prohibited. Vehicles RF signals may interfere with great force. Faulty installation or service may be dangerous to turn off your vehicle is mounted and operating properly. The use . Do not place objects, including installed or portable wireless...
... wireless devices may affect improperly installed or inadequately shielded electronic systems in such areas could result. Switch off your device when in -vehicle wireless equipment is prohibited. Vehicles RF signals may interfere with great force. Faulty installation or service may be dangerous to turn off your vehicle is mounted and operating properly. The use . Do not place objects, including installed or portable wireless...
Safety Guide
Page 22
... media near the device, because information stored on board. The wireless adapter and your device's wireless adapter whilst on them may prohibit airborne operation of energy emitted by the wireless adapter, however, is available. In some cases, transmission of the device are not limited to follow any special regulations in force in any area, and always switch off all wireless or radio transmitting devices when using your device...
... media near the device, because information stored on board. The wireless adapter and your device's wireless adapter whilst on them may prohibit airborne operation of energy emitted by the wireless adapter, however, is available. In some cases, transmission of the device are not limited to follow any special regulations in force in any area, and always switch off all wireless or radio transmitting devices when using your device...
Safety Guide
Page 23
...devices or services is connected; Proper operation of such situations may cause damage to transmit data unless the antenna is perceived or identified as being harmful. Examples of this radio according to the instructions...Using the wireless adapter on board airplanes, or • Using the wireless adapter in any other environment where the risk of interference with its action in hazardous locations is very close or touching any component containing the radio such that applies to the use of wireless adapters in a specific organization or environment (an airport, for example), you turn...
...devices or services is connected; Proper operation of such situations may cause damage to transmit data unless the antenna is perceived or identified as being harmful. Examples of this radio according to the instructions...Using the wireless adapter on board airplanes, or • Using the wireless adapter in any other environment where the risk of interference with its action in hazardous locations is very close or touching any component containing the radio such that applies to the use of wireless adapters in a specific organization or environment (an airport, for example), you turn...
Safety Guide
Page 24
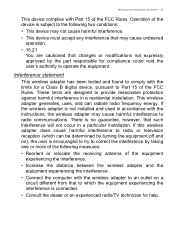
... the limits set forth by entering the FCC ID number on airplanes is built into the computer. No configuration controls are allocated as specified by the Federal Aviation Administration (FAA). • The use of wireless adapters on the device. Federal Communications Commission (FCC) Note The radiated output power of wireless adapters in the 5.15 to 5.25 GHz and 5.470 to Part 15.407...
... the limits set forth by entering the FCC ID number on airplanes is built into the computer. No configuration controls are allocated as specified by the Federal Aviation Administration (FAA). • The use of wireless adapters on the device. Federal Communications Commission (FCC) Note The radiated output power of wireless adapters in the 5.15 to 5.25 GHz and 5.470 to Part 15.407...
Safety Guide
Page 25
... by turning the equipment off and on), the user is encouraged to try to the following measures: • Reorient or relocate the receiving antenna of the equipment experiencing the interference. • Increase the distance between the wireless adapter and the equipment experiencing the interference. • Connect the computer with Part 15 of the device is not installed and used...
... by turning the equipment off and on), the user is encouraged to try to the following measures: • Reorient or relocate the receiving antenna of the equipment experiencing the interference. • Increase the distance between the wireless adapter and the equipment experiencing the interference. • Connect the computer with Part 15 of the device is not installed and used...
ErP Energy-related Product directive technical document
Page 1
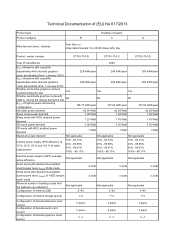
... mode Noise levels (the declared A-weighted sound power level, LWAd) of "HDD random seek" mode Minimum number of loading cycles that the batteries can withstand Configuration of memory (GB) Not applicable 2~64 Not applicable 3.30 B 3.30 B Not applicable 2~64 Not applicable 3.30 B 3.30 B Not applicable 4~64 3.30 B 3.30 B Configuration of internal storage (piece) 1~2 1~2 1~2 Configuration of discrete television tuner (piece) Configuration of discrete audio card (piece) Configuration...
... mode Noise levels (the declared A-weighted sound power level, LWAd) of "HDD random seek" mode Minimum number of loading cycles that the batteries can withstand Configuration of memory (GB) Not applicable 2~64 Not applicable 3.30 B 3.30 B Not applicable 2~64 Not applicable 3.30 B 3.30 B Not applicable 4~64 3.30 B 3.30 B Configuration of internal storage (piece) 1~2 1~2 1~2 Configuration of discrete television tuner (piece) Configuration of discrete audio card (piece) Configuration...
ErP Energy-related Product directive technical document
Page 3
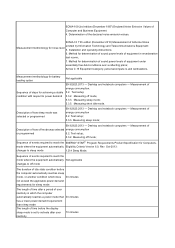
Determination of equipment under essentially free-field conditions over a reflecting plane; Method for sleep mode The length of time after user 10 minutes inactivity Description of how sleep mode was selected energy consumption or programmed 5.2. Measuring off mode; 5.3.3. Oct-2013: changes to power demand 5.3.2. Installation and operating instructions; 6. Measuring sleep mode; 5.3.5. Measurement of Computer and Business Equipment: 4. Desktop and notebook computers - Test setup; Measuring sleep mode; Sequence of events required...
Determination of equipment under essentially free-field conditions over a reflecting plane; Method for sleep mode The length of time after user 10 minutes inactivity Description of how sleep mode was selected energy consumption or programmed 5.2. Measuring off mode; 5.3.3. Oct-2013: changes to power demand 5.3.2. Installation and operating instructions; 6. Measuring sleep mode; 5.3.5. Measurement of Computer and Business Equipment: 4. Desktop and notebook computers - Test setup; Measuring sleep mode; Sequence of events required...
User Manual
Page 6
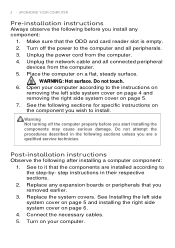
... sections for specific instructions on page 6. 4. See Installing the left side system cover on page 4 and removing the right side system cover on page 5. 7. Make sure that you install any component: 1. Unplug the power cord from the computer. 5. WARNING: Hot surface. Warning Not turning off the power to it that the components are a qualified service technician. Replace the system covers. Connect the necessary cables. 5. Open your computer...
... sections for specific instructions on page 6. 4. See Installing the left side system cover on page 4 and removing the right side system cover on page 5. 7. Make sure that you install any component: 1. Unplug the power cord from the computer. 5. WARNING: Hot surface. Warning Not turning off the power to it that the components are a qualified service technician. Replace the system covers. Connect the necessary cables. 5. Open your computer...

User Manual
Page 15
Release the cables from the hard drives. 3. Remove the three screws that secure the HDD bracket to the HDD bracket. 4. Removing the 3.5-inch hard drives 1. Disconnect the power and data cables from the cable clip securing them to the chassis. UPGRADING YOUR COMPUTER - 11 Hard drives The computer supports installation of one 3.5-inch SATA hard drives in the internal HDD cage. Perform Pre-installation instructions on page 2. 2.
Release the cables from the hard drives. 3. Remove the three screws that secure the HDD bracket to the HDD bracket. 4. Removing the 3.5-inch hard drives 1. Disconnect the power and data cables from the cable clip securing them to the chassis. UPGRADING YOUR COMPUTER - 11 Hard drives The computer supports installation of one 3.5-inch SATA hard drives in the internal HDD cage. Perform Pre-installation instructions on page 2. 2.

User Manual
Page 17
Secure the new hard drives with four screws. 4. Insert the HDD bracket into the HDD bracket. 3. Remove the new hard drive from their packaging. 2. UPGRADING YOUR COMPUTER - 13 Installing the 3.5-inch hard drives 1. Insert the new hard drive into the chassis.
Secure the new hard drives with four screws. 4. Insert the HDD bracket into the HDD bracket. 3. Remove the new hard drive from their packaging. 2. UPGRADING YOUR COMPUTER - 13 Installing the 3.5-inch hard drives 1. Insert the new hard drive into the chassis.

User Manual
Page 18
Connect the power and data cables to secure the cables. 8. Use the cable clip to the hard drives. 7. UPGRADING YOUR COMPUTER 5. Observe the Post-installation instructions on page 2 Secure the HDD bracket with three screws 6. 14 -
Connect the power and data cables to secure the cables. 8. Use the cable clip to the hard drives. 7. UPGRADING YOUR COMPUTER 5. Observe the Post-installation instructions on page 2 Secure the HDD bracket with three screws 6. 14 -

User Manual
Page 20
Press outward the holding clips on page 6. 2. Repeat steps 5~6 to release the memory module (1). 4. Disconnect the thermal fan cable from the DIMM slot (2). 5. Gently pull the memory module upward to remove the other memory modules. Perform Pre-installation instructions on both sides of the DIMM slot outward to remove the other memory modules. 2 1 6. UPGRADING YOUR COMPUTER Removing a memory module 1. Repeat steps 3~4 to remove it from the mainboard. 3. 16 -
Press outward the holding clips on page 6. 2. Repeat steps 5~6 to release the memory module (1). 4. Disconnect the thermal fan cable from the DIMM slot (2). 5. Gently pull the memory module upward to remove the other memory modules. Perform Pre-installation instructions on both sides of the DIMM slot outward to remove the other memory modules. 2 1 6. UPGRADING YOUR COMPUTER Removing a memory module 1. Repeat steps 3~4 to remove it from the mainboard. 3. 16 -

User Manual
Page 22
18 - Disconnect the power cables from the Graphic board. 3. Perform Pre-installation instructions on page 2. 2. Remove the screw that secure the graphics board to the chassis. 4. Unlatch the metal clip that secure the Graphic boards to the chassis. UPGRADING YOUR COMPUTER Graphic board The computer contains one or two Graphic boards installed in the PCIE x16 slots. Removing the Graphic board 1. The detail configuration will be differed by different models.
18 - Disconnect the power cables from the Graphic board. 3. Perform Pre-installation instructions on page 2. 2. Remove the screw that secure the graphics board to the chassis. 4. Unlatch the metal clip that secure the Graphic boards to the chassis. UPGRADING YOUR COMPUTER Graphic board The computer contains one or two Graphic boards installed in the PCIE x16 slots. Removing the Graphic board 1. The detail configuration will be differed by different models.


