CE DoC
Page 1
...acer.com Product: Notebook Computer Trade Name: acer Model Number: N20Q11** SKU Number: C852********** C852T********** (* is "0-9", "a-z", "A-Z", "-", or blank) We, Acer...is in conformity with setting up a network connection, using the touchpad, and other relevant ...Model: AX201D2W, Operation frequency and radio-frequency power are listed as below: [Bluetooth] 2402-2480MHz < 10 dBm [WLAN] 2412MHz-2462MHz < 20dBm, 5180-5320MHz < 23dBm, 5500-5700MHz < 23dBm Year to begin affixing CE marking:2022 RU Jan, Sr.Manager@Taipei 2022-01-05 Note: Open the Start Menu and search for 'Acer...
...acer.com Product: Notebook Computer Trade Name: acer Model Number: N20Q11** SKU Number: C852********** C852T********** (* is "0-9", "a-z", "A-Z", "-", or blank) We, Acer...is in conformity with setting up a network connection, using the touchpad, and other relevant ...Model: AX201D2W, Operation frequency and radio-frequency power are listed as below: [Bluetooth] 2402-2480MHz < 10 dBm [WLAN] 2412MHz-2462MHz < 20dBm, 5180-5320MHz < 23dBm, 5500-5700MHz < 23dBm Year to begin affixing CE marking:2022 RU Jan, Sr.Manager@Taipei 2022-01-05 Note: Open the Start Menu and search for 'Acer...
Lifecycle Extension Guide
Page 3
... the recovery media through Acer Customer Service (http://www.acer.com/support) This is not a free of a careless or unsuccessful self-repair attempt, is available in order to replace other components than those listed above. Prior performing self-repair, familiarize yourself with the Safety Guidelines and Recommended Equipment sections first as a result of charge service. NOTE: NOTE: For replacement parts, always use only Acer certified components in the User Manual...
... the recovery media through Acer Customer Service (http://www.acer.com/support) This is not a free of a careless or unsuccessful self-repair attempt, is available in order to replace other components than those listed above. Prior performing self-repair, familiarize yourself with the Safety Guidelines and Recommended Equipment sections first as a result of charge service. NOTE: NOTE: For replacement parts, always use only Acer certified components in the User Manual...

Lifecycle Extension Guide
Page 4
... or other parts are in on the locking tabs before opening the computer cover or panels. To avoid electrostatic discharge, ground yourself by using a wrist grounding strap or by step procedures on how to remove and de-install components from the computer. Some cables have connectors with locking tabs; if you are removing it . CAUTION! Turn off any...
... or other parts are in on the locking tabs before opening the computer cover or panels. To avoid electrostatic discharge, ground yourself by using a wrist grounding strap or by step procedures on how to remove and de-install components from the computer. Some cables have connectors with locking tabs; if you are removing it . CAUTION! Turn off any...
Lifecycle Extension Guide
Page 6
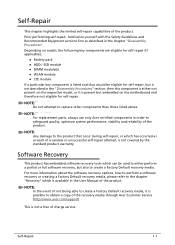
B C Figure 1-2. A Figure 1-1. AC Adapter Outlet and MicroSD Card Removal 1-4 Disassembly Procedures Place the system on a stable work surface. 2. Remove the microSD card from system. Remove all cables from the microSD card slot (C) (Figure 1-2). Remove the power adapter from the USB Type-C port (A or B) as shown in Figure 1-1 or Figure 1-2. 3. AC Adapter Outlet 4. Pre-disassembly Instructions 0 Do the following prior to starting any maintenance procedures: 1.
B C Figure 1-2. A Figure 1-1. AC Adapter Outlet and MicroSD Card Removal 1-4 Disassembly Procedures Place the system on a stable work surface. 2. Remove the microSD card from system. Remove all cables from the microSD card slot (C) (Figure 1-2). Remove the power adapter from the USB Type-C port (A or B) as shown in Figure 1-1 or Figure 1-2. 3. AC Adapter Outlet 4. Pre-disassembly Instructions 0 Do the following prior to starting any maintenance procedures: 1.
Lifecycle Extension Guide
Page 14
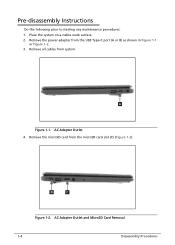
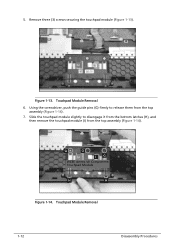
Touchpad Module Removal 6. G G I ) from the top assembly (Figure 1-14). Using the screwdriver, push the guide pins (G) firmly to disengage it from the top assembly (Figure 1-14). 7. 5. Slide the touchpad module slightly to release them from the bottom latches (H), and then remove the touchpad module (I G WEEE Annex VII Component: Touchpad Module H H Figure 1-14. Remove three (3) screws securing the touchpad module (Figure 1-13). Figure 1-13. Touchpad Module Removal 1-12 Disassembly Procedures
Touchpad Module Removal 6. G G I ) from the top assembly (Figure 1-14). Using the screwdriver, push the guide pins (G) firmly to disengage it from the top assembly (Figure 1-14). 7. 5. Slide the touchpad module slightly to release them from the bottom latches (H), and then remove the touchpad module (I G WEEE Annex VII Component: Touchpad Module H H Figure 1-14. Remove three (3) screws securing the touchpad module (Figure 1-13). Figure 1-13. Touchpad Module Removal 1-12 Disassembly Procedures
Lifecycle Extension Guide
Page 22
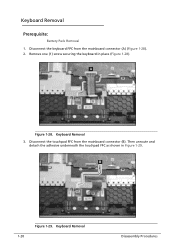
Disconnect the keyboard FPC from the mainboard connector (B). Keyboard Removal 3. Keyboard Removal 0 Prerequisite: Battery Pack Removal 1. B 1-20 Figure 1-29. Remove one (1) screw securing the keyboard in Figure 1-29. Keyboard Removal Disassembly Procedures A Figure 1-28. Disconnect the touchpad FFC from the mainboard connector (A) (Figure 1-28). 2. Then unroute and detach the adhesive underneath the touchpad FFC as shown in place (Figure 1-28).
Disconnect the keyboard FPC from the mainboard connector (B). Keyboard Removal 3. Keyboard Removal 0 Prerequisite: Battery Pack Removal 1. B 1-20 Figure 1-29. Remove one (1) screw securing the keyboard in Figure 1-29. Keyboard Removal Disassembly Procedures A Figure 1-28. Disconnect the touchpad FFC from the mainboard connector (A) (Figure 1-28). 2. Then unroute and detach the adhesive underneath the touchpad FFC as shown in place (Figure 1-28).
Lifecycle Extension Guide
Page 23
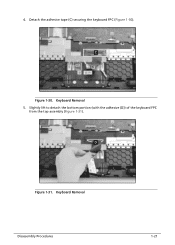
Slightly lift to detach the bottom portion (with the adhesive (D)) of the keyboard FPC from the top assembly (Figure 1-31). 4. Detach the adhesive tape (C) securing the keyboard FPC (Figure 1-30). D Figure 1-31. C Figure 1-30. Keyboard Removal 5. Keyboard Removal Disassembly Procedures 1-21
Slightly lift to detach the bottom portion (with the adhesive (D)) of the keyboard FPC from the top assembly (Figure 1-31). 4. Detach the adhesive tape (C) securing the keyboard FPC (Figure 1-30). D Figure 1-31. C Figure 1-30. Keyboard Removal 5. Keyboard Removal Disassembly Procedures 1-21
Lifecycle Extension Guide
Page 24
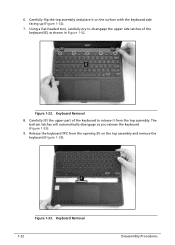
... upper part of the keyboard (E) as you release the keyboard (Figure 1-33). 9. Using a flat-headed tool, carefully pry to disengage the upper side latches of the keyboard to release it on the top assembly and remove the keyboard (Figure 1-33). Release the keyboard FPC from the top assembly. Carefully flip the top assembly and place it from the opening...
... upper part of the keyboard (E) as you release the keyboard (Figure 1-33). 9. Using a flat-headed tool, carefully pry to disengage the upper side latches of the keyboard to release it on the top assembly and remove the keyboard (Figure 1-33). Release the keyboard FPC from the top assembly. Carefully flip the top assembly and place it from the opening...
Lifecycle Extension Guide
Page 27
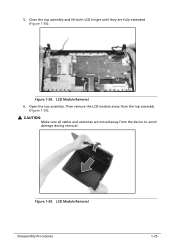
5. Figure 1-38. Open the top assembly. CAUTION: Make sure all cables and antennas are fully extended (Figure 1-38). Then remove the LCD module away from the device to avoid damage during removal. LCD Module Removal 6. Figure 1-39. Close the top assembly and lift both LCD hinges until they are moved away from the top assembly (Figure 1-39). ! LCD Module Removal Disassembly Procedures 1-25
5. Figure 1-38. Open the top assembly. CAUTION: Make sure all cables and antennas are fully extended (Figure 1-38). Then remove the LCD module away from the device to avoid damage during removal. LCD Module Removal 6. Figure 1-39. Close the top assembly and lift both LCD hinges until they are moved away from the top assembly (Figure 1-39). ! LCD Module Removal Disassembly Procedures 1-25
Lifecycle Extension Guide
Page 34
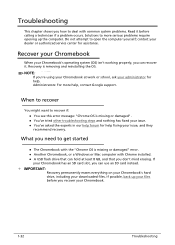
... fixing your Chromebook. 1-32 Troubleshooting When to recover 0 You might want to get started 0 The Chromebook with the "Chrome OS is removing and reinstalling the OS. Solutions to open the computer yourself; Administrators: For more serious problems require opening up your downloaded files. If your Chromebook has an SD card slot, you recover your issue, and they recommend recovery. contact your dealer or authorized service...
... fixing your Chromebook. 1-32 Troubleshooting When to recover 0 You might want to get started 0 The Chromebook with the "Chrome OS is removing and reinstalling the OS. Solutions to open the computer yourself; Administrators: For more serious problems require opening up your downloaded files. If your Chromebook has an SD card slot, you recover your issue, and they recommend recovery. contact your dealer or authorized service...
Lifecycle Extension Guide
Page 35
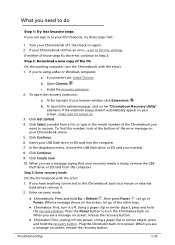
... factory settings. If you inserted. 8. Install the recovery extension. 2. To launch the extension popup, click on . In the dropdown menu, choose the USB flash drive or SD card you haven't yet, install Chrome. Press the Power button to turn it 's turned on screen, release the recovery button. Chromebit: First, unplug it . 2. If neither of the OS On the working computer (not the Chromebook with the error: 1. b. Click Get started...
... factory settings. If you inserted. 8. Install the recovery extension. 2. To launch the extension popup, click on . In the dropdown menu, choose the USB flash drive or SD card you haven't yet, install Chrome. Press the Power button to turn it 's turned on screen, release the recovery button. Chromebit: First, unplug it . 2. If neither of the OS On the working computer (not the Chromebook with the error: 1. b. Click Get started...
Lifecycle Extension Guide
Page 36
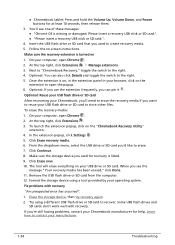
... it . Optional: Reuse your USB flash drive or SD card After recovering your Chromebook, you'll need to erase the recovery media if you want to store other files. Click Erase recovery media. 6. The tool will erase everything on your USB flash drive or SD card to reuse your USB drive or SD card. Format the storage device using a different USB flash drive or SD card to contact your operating system. Fix problems with recovery. Next to "Chromebook Recovery," toggle the switch to...
... it . Optional: Reuse your USB flash drive or SD card After recovering your Chromebook, you'll need to erase the recovery media if you want to store other files. Click Erase recovery media. 6. The tool will erase everything on your USB flash drive or SD card to reuse your USB drive or SD card. Format the storage device using a different USB flash drive or SD card to contact your operating system. Fix problems with recovery. Next to "Chromebook Recovery," toggle the switch to...
Lifecycle Extension Guide
Page 37
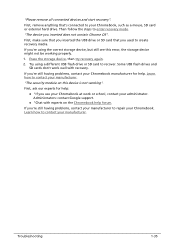
... used to your Chromebook, such as a mouse, SD card or external hard drive. First, make sure that you inserted the USB drive or SD card that 's connected to create recovery media. Try using the correct storage device, but still see this device is not working properly. 1. Some USB flash drives and SD cards don't work or school, contact your Chromebook at work well with experts on this error, the storage device might not be working ". Troubleshooting 1-35 "Please remove all connected devices and start recovery...
... used to your Chromebook, such as a mouse, SD card or external hard drive. First, make sure that you inserted the USB drive or SD card that 's connected to create recovery media. Try using the correct storage device, but still see this device is not working properly. 1. Some USB flash drives and SD cards don't work or school, contact your Chromebook at work well with experts on this error, the storage device might not be working ". Troubleshooting 1-35 "Please remove all connected devices and start recovery...
User Manual
Page 3
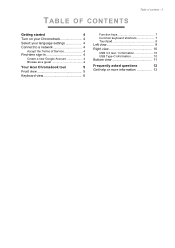
TABLE OF CONTENTS Table of contents - 3 Getting started 4 Turn on your Chromebook 4 Select your language settings 4 Connect to a network 4 Accept the Terms of Service 4 First-time sign-in 4 Create a new Google Account 4 Browse as a guest 4 Your Acer Chromebook tour 5 Front view 5 Keyboard view 6 Function keys 7 Common keyboard shortcuts 7 Touchpad 8 Left view 9 Right view 10 USB 3.2 Gen 1 information 10 USB Type-C information 10 Bottom view 11 Frequently asked questions 12 Get help or more information 13
TABLE OF CONTENTS Table of contents - 3 Getting started 4 Turn on your Chromebook 4 Select your language settings 4 Connect to a network 4 Accept the Terms of Service 4 First-time sign-in 4 Create a new Google Account 4 Browse as a guest 4 Your Acer Chromebook tour 5 Front view 5 Keyboard view 6 Function keys 7 Common keyboard shortcuts 7 Touchpad 8 Left view 9 Right view 10 USB 3.2 Gen 1 information 10 USB Type-C information 10 Bottom view 11 Frequently asked questions 12 Get help or more information 13
User Manual
Page 4
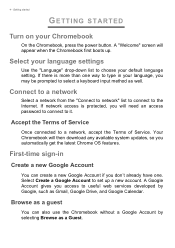
... need an access password to connect to select a keyboard input method as Gmail, Google Drive, and Google Calendar. A "Welcome" screen will then download any available system updates, so you may be prompted to it. Your Chromebook will appear when the Chromebook first boots up a new account. First-time sign-in your default language setting. Select your Chromebook On the Chromebook, press the power button. Getting started GETTING STARTED Turn on your language settings Use...
... need an access password to connect to select a keyboard input method as Gmail, Google Drive, and Google Calendar. A "Welcome" screen will then download any available system updates, so you may be prompted to it. Your Chromebook will appear when the Chromebook first boots up a new account. First-time sign-in your default language setting. Select your Chromebook On the Chromebook, press the power button. Getting started GETTING STARTED Turn on your language settings Use...
User Manual
Page 7
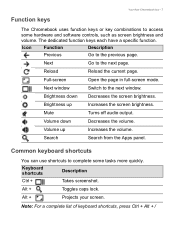
... window. Next window Switch to the previous page. Volume down Decreases the screen brightness. Reload Reload the current page. Mute Turns off audio output. Keyboard shortcuts Description Ctrl + Takes screenshot. Search Search from the Apps panel. Your Acer Chromebook tour - 7 Function keys The Chromebook uses function keys or key combinations to access some tasks more quickly. Alt + Toggles caps lock. The dedicated function keys each have a specific function. Full-screen Open the page in full-screen mode. Brightness up Increases the volume...
... window. Next window Switch to the previous page. Volume down Decreases the screen brightness. Reload Reload the current page. Mute Turns off audio output. Keyboard shortcuts Description Ctrl + Takes screenshot. Search Search from the Apps panel. Your Acer Chromebook tour - 7 Function keys The Chromebook uses function keys or key combinations to access some tasks more quickly. Alt + Toggles caps lock. The dedicated function keys each have a specific function. Full-screen Open the page in full-screen mode. Brightness up Increases the volume...
User Manual
Page 9
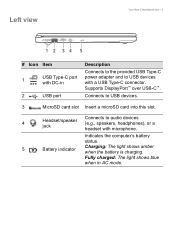
...: The light shows blue when in 2 USB port Description Connects to the provided USB Type-C power adapter and to audio devices (e.g., speakers, headphones), or a headset with microphone. Indicates the computer's battery status. 5 Battery indicator Charging: The light shows amber when the battery is charging. Connects to USB devices. 3 MicroSD card slot Insert a microSD card into this slot. 4 Headset/speaker jack Connects to USB devices with a USB Type-C connector. Left view Your Acer Chromebook tour - 9 1 2 34 5 # Icon Item 1 USB Type-C port with DC-in AC mode.
...: The light shows blue when in 2 USB port Description Connects to the provided USB Type-C power adapter and to audio devices (e.g., speakers, headphones), or a headset with microphone. Indicates the computer's battery status. 5 Battery indicator Charging: The light shows amber when the battery is charging. Connects to USB devices. 3 MicroSD card slot Insert a microSD card into this slot. 4 Headset/speaker jack Connects to USB devices with a USB Type-C connector. Left view Your Acer Chromebook tour - 9 1 2 34 5 # Icon Item 1 USB Type-C port with DC-in AC mode.
User Manual
Page 10
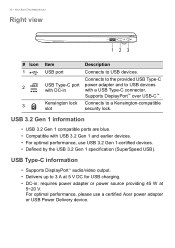
Your Acer Chromebook tour Right view 12 3 # Icon 1 2 3 Item USB port USB Type-C port with DC-in : requires power adapter or power source providing 45 W at 5 V DC for USB charging. • DC-in Kensington lock slot Description Connects to 3 A at 5~20 V. USB Type-C information • Supports DisplayPort™ audio/video output. • Delivers up to USB devices. USB 3.2 Gen 1 information • USB 3.2 Gen 1 compatible ports are blue. • Compatible with a USB Type-C connector. For optimal performance, please use USB 3.2 Gen...
Your Acer Chromebook tour Right view 12 3 # Icon 1 2 3 Item USB port USB Type-C port with DC-in : requires power adapter or power source providing 45 W at 5 V DC for USB charging. • DC-in Kensington lock slot Description Connects to 3 A at 5~20 V. USB Type-C information • Supports DisplayPort™ audio/video output. • Delivers up to USB devices. USB 3.2 Gen 1 information • USB 3.2 Gen 1 compatible ports are blue. • Compatible with a USB Type-C connector. For optimal performance, please use USB 3.2 Gen...
User Manual
Page 12
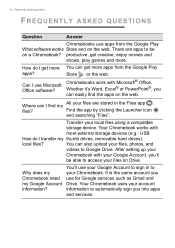
... app . Can I transfer my thumb drives, removable hard drives). You can I get more You can easily find my All your files are apps to be able to access your Google Account to automatically sign you use your files on a Chromebook? Where can also upload your local files using a compatible storage device. Chromebooks work with most external storage devices (e.g.: USB How do I find the apps...
... app . Can I transfer my thumb drives, removable hard drives). You can I get more You can easily find my All your files are apps to be able to access your Google Account to automatically sign you use your files on a Chromebook? Where can also upload your local files using a compatible storage device. Chromebooks work with most external storage devices (e.g.: USB How do I find the apps...
Safety Guide
Page 15
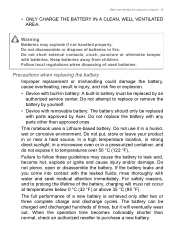
... from children. Do not attempt to replace or remove the battery by yourself. • Device with removable battery: The battery should only be replaced with parts approved by an authorized service center. This notebook uses a Lithium-based battery. The full performance of used batteries. When the operation time becomes noticeably shorter than approved ones. Do not disassemble or dispose of batteries in a humid, wet or corrosive environment. For...
... from children. Do not attempt to replace or remove the battery by yourself. • Device with removable battery: The battery should only be replaced with parts approved by an authorized service center. This notebook uses a Lithium-based battery. The full performance of used batteries. When the operation time becomes noticeably shorter than approved ones. Do not disassemble or dispose of batteries in a humid, wet or corrosive environment. For...


