
User Manual
Page 3
Information for a few hours. It may remain after switching the image, when the same image is displayed for future reference. In this document for hours. Follow all the time. • Due to the nature of the LCD screen, an afterimage of the ...
Information for a few hours. It may remain after switching the image, when the same image is displayed for future reference. In this document for hours. Follow all the time. • Due to the nature of the LCD screen, an afterimage of the ...

User Manual
Page 8
viii This product has been shipped enabled for power management: • Activate display's Sleep mode within 15 minutes of user inactivity. • Activate computer's Sleep mode within 30 minutes of a computer. Users are also at risk of physical ...
viii This product has been shipped enabled for power management: • Activate display's Sleep mode within 15 minutes of user inactivity. • Activate computer's Sleep mode within 30 minutes of a computer. Users are also at risk of physical ...

User Manual
Page 9
...the following sections provide suggestions on a distant point. • Blink frequently to keep your eyes. ix Taking care of the display. • Adjust the display brightness and/or contrast to a comfortable level for extended periods of time. Developing good work habits to reduce eyestrain. Eyes &#...viewing hours, wearing incorrect glasses or contact lenses, glare, excessive room lighting, poorly focused screens, very small typefaces and low-contrast displays could stress your eyes from the monitor and focusing on how to make your computer use more relaxing and productive: • ...
...the following sections provide suggestions on a distant point. • Blink frequently to keep your eyes. ix Taking care of the display. • Adjust the display brightness and/or contrast to a comfortable level for extended periods of time. Developing good work habits to reduce eyestrain. Eyes &#...viewing hours, wearing incorrect glasses or contact lenses, glare, excessive room lighting, poorly focused screens, very small typefaces and low-contrast displays could stress your eyes from the monitor and focusing on how to make your computer use more relaxing and productive: • ...
User Manual
Page 12
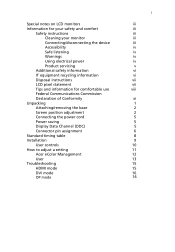
... Declaration of Conformity Unpacking Attaching/removing the base Screen position adjustment Connecting the power cord Power saving Display Data Channel (DDC) Connector pin assignment Standard timing table Installation User controls How to adjust a setting Acer eColor Management User Troubleshooting HDMI mode DVI mode DP mode 1 iii iii iii iii iii iv iv...
... Declaration of Conformity Unpacking Attaching/removing the base Screen position adjustment Connecting the power cord Power saving Display Data Channel (DDC) Connector pin assignment Standard timing table Installation User controls How to adjust a setting Acer eColor Management User Troubleshooting HDMI mode DVI mode DP mode 1 iii iii iii iii iii iv iv...

User Manual
Page 16
English 60o 60 • Monitor Pivot Before rotating the display,lift it to the top position and then push it back to the utmost degree. 4 • Swivel With the built-in pedestal, you can swivel the monitor for the most comfortable viewing angle. Rotate clockwise until the monitor stops at 90°. 90o 150
English 60o 60 • Monitor Pivot Before rotating the display,lift it to the top position and then push it back to the utmost degree. 4 • Swivel With the built-in pedestal, you can swivel the monitor for the most comfortable viewing angle. Rotate clockwise until the monitor stops at 90°. 90o 150

User Manual
Page 17
The recovery time from the display controller, as your area. • The monitor has a universal power supply that the power cord you use is the correct type required for your system ... V AC or 220/240 V AC voltage area. The cord set consisting of the power cord to "power saving" mode by the amber-colored power LED. Display Data Channel (DDC) To make sure that allows operation in which the monitor automatically informs the host system about its capabilities; The monitor supports the...
The recovery time from the display controller, as your area. • The monitor has a universal power supply that the power cord you use is the correct type required for your system ... V AC or 220/240 V AC voltage area. The cord set consisting of the power cord to "power saving" mode by the amber-colored power LED. Display Data Channel (DDC) To make sure that allows operation in which the monitor automatically informs the host system about its capabilities; The monitor supports the...

User Manual
Page 18
on device) 16 SDA 18 +5V Power English 6 Connector pin assignment 19-pin Color Display Signal cable* 1917151311 9 7 5 3 1 1816141210 8 6 4 2 PIN No. Description 1 TMDS Data2+ 3 TMDS Data2- 5 TMDS Data1 Shield 7 TMDS Data0+ 9 TMDS Data0- 11 TMDS Clock Shield 13 CEC 15 SCL 17 DDC/CEC Ground 19 Hot Plug Detect * only for certain models PIN No. Description 2 TMDS Data2 Shield 4 TMDS Data1+ 6 TMDS Data1- 8 TMDS Data0 Shield 10 TMDS Clock+ 12 TMDS Clock- 14 Reserved (N.C.
on device) 16 SDA 18 +5V Power English 6 Connector pin assignment 19-pin Color Display Signal cable* 1917151311 9 7 5 3 1 1816141210 8 6 4 2 PIN No. Description 1 TMDS Data2+ 3 TMDS Data2- 5 TMDS Data1 Shield 7 TMDS Data0+ 9 TMDS Data0- 11 TMDS Clock Shield 13 CEC 15 SCL 17 DDC/CEC Ground 19 Hot Plug Detect * only for certain models PIN No. Description 2 TMDS Data2 Shield 4 TMDS Data1+ 6 TMDS Data1- 8 TMDS Data0 Shield 10 TMDS Clock+ 12 TMDS Clock- 14 Reserved (N.C.

User Manual
Page 24
N/A Movie mode Displays scenes in unsuitably-lit environments. R eflects n a tive d isp lay mode capability N/A Grahpic mode Enhances colors and emphasize fine detail. Presents great visuals, even in clearest detail. Acer eColor Management Operation instructions Step 1: Press " " Key to open the Acer eColor Management OSD and access the scenario modes Step 2: Press " " or " " to select...
N/A Movie mode Displays scenes in unsuitably-lit environments. R eflects n a tive d isp lay mode capability N/A Grahpic mode Enhances colors and emphasize fine detail. Presents great visuals, even in clearest detail. Acer eColor Management Operation instructions Step 1: Press " " Key to open the Acer eColor Management OSD and access the scenario modes Step 2: Press " " or " " to select...

User Manual
Page 26
Then navigate to the feature you wish to bring up the OSD. 2 Using the directional keys, select OSD from the on screen display. EN-16 Adjusting the OSD position 1 Press the MENU key to adjust.
Then navigate to the feature you wish to bring up the OSD. 2 Using the directional keys, select OSD from the on screen display. EN-16 Adjusting the OSD position 1 Press the MENU key to adjust.

User Manual
Page 27
EN-17 Then navigate to the feature you wish to adjust. 3 The Setting menu can be enabled for the main source display. 7 "Wide mode" is not supported when using PBP function. Adjusting the setting 1 Press the MENU key to adjust picture‐in‐picture settings. The ...
EN-17 Then navigate to the feature you wish to adjust. 3 The Setting menu can be enabled for the main source display. 7 "Wide mode" is not supported when using PBP function. Adjusting the setting 1 Press the MENU key to adjust picture‐in‐picture settings. The ...


