
Acer Aspire 5517 Series Service Guide
Page 19
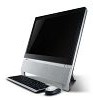
Note: Do not cover or obstruct the fan opening. Houses the computer's main memory. Chapter 1 9 Enable the computer to stay cool, even after prolonged use. Houses the computer's hard disk (secured with screws). No. 3 4 5 5 Icon Item Battery lock Hard disk bay Memory compartment Ventilation slots and cooling fan Description Locks the battery in position.
Note: Do not cover or obstruct the fan opening. Houses the computer's main memory. Chapter 1 9 Enable the computer to stay cool, even after prolonged use. Houses the computer's hard disk (secured with screws). No. 3 4 5 5 Icon Item Battery lock Hard disk bay Memory compartment Ventilation slots and cooling fan Description Locks the battery in position.

Acer Aspire 5517 Series Service Guide
Page 23
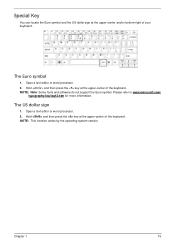
...Vista, some shortcuts may not function as described. Application This key has the same effect as clicking on your edition of Access Center < > + : Open Windows Mobility Center < > + : Display the System Properties dialog box < > + : Restore minimized windows to the desktop < > + : Cycle... (if you are on a network) + < > + : Use the arrow keys to a network domain) < > + : Minimizes all windows < > + : Open the Run dialog box < > + : Cycle through programs on the taskbar by using Windows Flip 3-D Note: Depending on the Windows Start button; Key Description Windows key...
...Vista, some shortcuts may not function as described. Application This key has the same effect as clicking on your edition of Access Center < > + : Open Windows Mobility Center < > + : Display the System Properties dialog box < > + : Restore minimized windows to the desktop < > + : Cycle... (if you are on a network) + < > + : Use the arrow keys to a network domain) < > + : Minimizes all windows < > + : Open the Run dialog box < > + : Cycle through programs on the taskbar by using Windows Flip 3-D Note: Depending on the Windows Start button; Key Description Windows key...
Acer Aspire 5517 Series Service Guide
Page 25
Open a text editor or word processor. 2. NOTE: Note: Some fonts and software do not support the Euro symbol. The US dollar sign 1. Hold and then press ... at the upper-center of the keyboard. Please refer to www.microsoft.com/ typography/faq/faq12.htm for more information. The Euro symbol 1. Chapter 1 15 Open a text editor or word processor. 2.
Open a text editor or word processor. 2. NOTE: Note: Some fonts and software do not support the Euro symbol. The US dollar sign 1. Hold and then press ... at the upper-center of the keyboard. Please refer to www.microsoft.com/ typography/faq/faq12.htm for more information. The Euro symbol 1. Chapter 1 15 Open a text editor or word processor. 2.

Acer Aspire 5517 Series Service Guide
Page 31
...) DVD-RW, DVD+R, DVD+R DL, DVD+R MultiSession, DVD+RW, DVD-RAM V1.0, DVDRAM • 4.7GB (Ver. 2.1 for General: read & write) Drawer (Solenoid Open) Tact SW (Open) Emergency Release (draw open hole) DC 5 V +/- 5% Specification Realtek ALC272X-GR 48-pin LQFP 'Green' High Definition Audio Codec with Dolby Digital Live Audio Amplifier Model Item Package...
...) DVD-RW, DVD+R, DVD+R DL, DVD+R MultiSession, DVD+RW, DVD-RAM V1.0, DVDRAM • 4.7GB (Ver. 2.1 for General: read & write) Drawer (Solenoid Open) Tact SW (Open) Emergency Release (draw open hole) DC 5 V +/- 5% Specification Realtek ALC272X-GR 48-pin LQFP 'Green' High Definition Audio Codec with Dolby Digital Live Audio Amplifier Model Item Package...
Acer Aspire 5517 Series Service Guide
Page 36
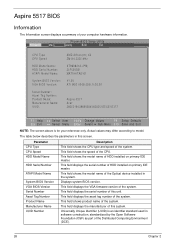
... field shows the speed of the system. This field shows the model name of the Optical device installed in software construction, standardized by the Open Software Foundation (OSF) as part of the Distributed Computing Environment (DCE). 26 Chapter 2 Displays system BIOS version. Universally Unique Identifier (UUID)...: UUID: AMD Athlon(tm) X2 ZM-84 2300 Mhz ST960821A-(PM) 3LF005DB MATSHITADVD V1.00 ATI M92 V008.050I.0-26.00 Aspire 5517 Acer 39353164386665643635001EECE1D377 F1 Help Esc Exit Select Item F5/F6 Change Values F9 Setup Defaults Select Menu Enter Select Sub-Menu F10 Save and ...
... field shows the speed of the system. This field shows the model name of the Optical device installed in software construction, standardized by the Open Software Foundation (OSF) as part of the Distributed Computing Environment (DCE). 26 Chapter 2 Displays system BIOS version. Universally Unique Identifier (UUID)...: UUID: AMD Athlon(tm) X2 ZM-84 2300 Mhz ST960821A-(PM) 3LF005DB MATSHITADVD V1.00 ATI M92 V008.050I.0-26.00 Aspire 5517 Acer 39353164386665643635001EECE1D377 F1 Help Esc Exit Select Item F5/F6 Change Values F9 Setup Defaults Select Menu Enter Select Sub-Menu F10 Save and ...
Acer Aspire 5517 Series Service Guide
Page 47
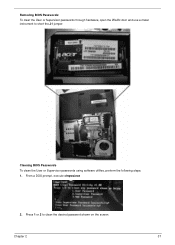
Press 1 or 2 to short the J1 jumper. Removing BIOS Passwords: To clear the User or Supervisor passwords through hardware, open the WLAN door and use a metal instrument to clean the desired password shown on the screen. Cleaning BIOS Passwords To clean the User or Supervisor passwords using software utilites, perform the following steps: 1. Chapter 2 37 From a DOS prompt, execute clnpwd.exe 2.
Press 1 or 2 to short the J1 jumper. Removing BIOS Passwords: To clear the User or Supervisor passwords through hardware, open the WLAN door and use a metal instrument to clean the desired password shown on the screen. Cleaning BIOS Passwords To clean the User or Supervisor passwords using software utilites, perform the following steps: 1. Chapter 2 37 From a DOS prompt, execute clnpwd.exe 2.

Acer Aspire 5517 Series Service Guide
Page 50
Using the LAN MAC EEPROM Utility You can see the MAC.CFG contents as below: WriteData = '001122334455' StartAddr=7A WriteLeng=6 KeepByte=0 MAC value MAC address MAC value length don't care 2. In DOS mode, run the MAC.BAT file to write MAC values to the EEPROM under DOS mode. 1. You can use the MAC.BAT utility to write the MAC.CFG file to eeprom. 40 Chapter 2 Use a text editor (for example: Notepad) to open the MAC.CFG file.
Using the LAN MAC EEPROM Utility You can see the MAC.CFG contents as below: WriteData = '001122334455' StartAddr=7A WriteLeng=6 KeepByte=0 MAC value MAC address MAC value length don't care 2. In DOS mode, run the MAC.BAT file to write MAC values to the EEPROM under DOS mode. 1. You can use the MAC.BAT utility to write the MAC.CFG file to eeprom. 40 Chapter 2 Use a text editor (for example: Notepad) to open the MAC.CFG file.
Acer Aspire 5517 Series Service Guide
Page 56
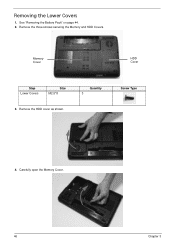
Remove the three screws securing the Memory and HDD Covers. Removing the Lower Covers 1. Memory Cover HDD Cover Step Lower Covers Size M2.5*8 3. Carefully open the Memory Cover. 46 Chapter 3 Remove the HDD cover as shown. Quantity 3 Screw Type 4. See "Removing the Battery Pack" on page 44. 2.
Remove the three screws securing the Memory and HDD Covers. Removing the Lower Covers 1. Memory Cover HDD Cover Step Lower Covers Size M2.5*8 3. Carefully open the Memory Cover. 46 Chapter 3 Remove the HDD cover as shown. Quantity 3 Screw Type 4. See "Removing the Battery Pack" on page 44. 2.

Acer Aspire 5517 Series Service Guide
Page 66
Open the locking latch and disconnect the FFC from the Upper Cover. 3. Pry up the centre of the Upper Cover. 56 Chapter 3 Removing the Keyboard 1. Lift the keyboard clear of the Keyboard and rotate it upward away from the mainboard. 5. See "Removing the Switch Cover" on to the TouchPad area to expose the FFC connector. 4. Turn the keyboard over on page 55. 2.
Open the locking latch and disconnect the FFC from the Upper Cover. 3. Pry up the centre of the Upper Cover. 56 Chapter 3 Removing the Keyboard 1. Lift the keyboard clear of the Keyboard and rotate it upward away from the mainboard. 5. See "Removing the Switch Cover" on to the TouchPad area to expose the FFC connector. 4. Turn the keyboard over on page 55. 2.
Acer Aspire 5517 Series Service Guide
Page 69
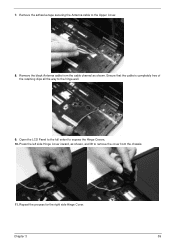
Open the LCD Panel to the full extent to the hinge well. 9. 7. Ensure that the cable is completely free of the retaining clips all the way to expose the Hinge Covers. 10. Press the left side Hinge Cover inward, as shown, and lift to the Upper Cover. 8. Chapter 3 59 Remove the black Antenna cable from the chassis. 11. Remove the adhesive tape securing the Antenna cable to remove the cover from the cable channel as shown. Repeat the process for the right side Hinge Cover.
Open the LCD Panel to the full extent to the hinge well. 9. 7. Ensure that the cable is completely free of the retaining clips all the way to expose the Hinge Covers. 10. Press the left side Hinge Cover inward, as shown, and lift to the Upper Cover. 8. Chapter 3 59 Remove the black Antenna cable from the chassis. 11. Remove the adhesive tape securing the Antenna cable to remove the cover from the cable channel as shown. Repeat the process for the right side Hinge Cover.
Acer Aspire 5517 Series Service Guide
Page 132
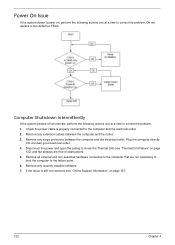
.... 6. Remove all external and non-essential hardware connected to the computer that are free of obstructions. 5. Remove any recently installed software. 7. Disconnect the power and open the casing to check the Thermal Unit (see "Online Support Information" on page 167. 122 Chapter 4 Remove any surge protectors between the computer and the...
.... 6. Remove all external and non-essential hardware connected to the computer that are free of obstructions. 5. Remove any recently installed software. 7. Disconnect the power and open the casing to check the Thermal Unit (see "Online Support Information" on page 167. 122 Chapter 4 Remove any surge protectors between the computer and the...
Acer Aspire 5517 Series Service Guide
Page 152
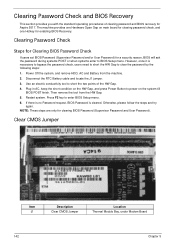
... system, and remove HDD, AC and Battery from the HW Gap. 5. Use an electric conductivity tool to BIOS Setup menu. The machine provides one Hardware Open Gap on the system till BIOS POST finish. Clearing Password Check Steps for Clearing BIOS Password Check If users set BIOS Password (Supervisor Password and... reason, BIOS will ask the password during systems POST or when systems enter to short the two points of clearing password and BIOS recovery for Aspire 5517. Disconnect the RTC Battery cable and locate the J1 jumper. 3. However, once it is cleared.
... system, and remove HDD, AC and Battery from the HW Gap. 5. Use an electric conductivity tool to BIOS Setup menu. The machine provides one Hardware Open Gap on the system till BIOS POST finish. Clearing Password Check Steps for Clearing BIOS Password Check If users set BIOS Password (Supervisor Password and... reason, BIOS will ask the password during systems POST or when systems enter to short the two points of clearing password and BIOS recovery for Aspire 5517. Disconnect the RTC Battery cable and locate the J1 jumper. 3. However, once it is cleared.


