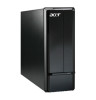
Acer Desktop User's Guide
Page 3
... not use liquid cleaners or aerosol cleaners. Follow all power cords from the computer. When you plug the power cord into is provided. • Never push objects of internal components and to the power supply unit: Install the power supply unit before cleaning Unplug this document for plug as possible.... iii Information for cleaning. Keep this product from the wall outlet before removing the power supply unit from the power supplies. Do not use this product near or over a radiator or heat register, or in a built-in a fire or ...
... not use liquid cleaners or aerosol cleaners. Follow all power cords from the computer. When you plug the power cord into is provided. • Never push objects of internal components and to the power supply unit: Install the power supply unit before cleaning Unplug this document for plug as possible.... iii Information for cleaning. Keep this product from the wall outlet before removing the power supply unit from the power supplies. Do not use this product near or over a radiator or heat register, or in a built-in a fire or ...
Acer Desktop User's Guide
Page 4
...can 't hear people speaking near you are used with the performance of this product. The grounding pin is properly grounded before inserting the power supply plug. The plug only fits in too many devices. Do not insert the plug into the wall outlet does not exceed the fuse ...this product, make sure that is equipped with a three-wire grounded plug. Using electrical power • This product should not exceed 80% of the power strip's input rating. • This product's power supply is not properly grounded may result in electric shock and/or injury. Do not locate this...
...can 't hear people speaking near you are used with the performance of this product. The grounding pin is properly grounded before inserting the power supply plug. The plug only fits in too many devices. Do not insert the plug into the wall outlet does not exceed the fuse ...this product, make sure that is equipped with a three-wire grounded plug. Using electrical power • This product should not exceed 80% of the power strip's input rating. • This product's power supply is not properly grounded may result in electric shock and/or injury. Do not locate this...
Acer Desktop User's Guide
Page 5
...your reseller for service • the product does not operate normally after following the operating instructions Note: Adjust only those controls that the new power cord meets the following requirements: detachable type, UL listed/CSA certified, type SPT-2, rated 7 A 125 V minimum, VDE approved or its...will often require extensive work by a qualified technician to restore the product to replace the power cord set . Keep them out of the reach of other risks. Replace only with the supplied power supply cord set , make sure that are covered by the manufacturer. If you to qualified ...
...your reseller for service • the product does not operate normally after following the operating instructions Note: Adjust only those controls that the new power cord meets the following requirements: detachable type, UL listed/CSA certified, type SPT-2, rated 7 A 125 V minimum, VDE approved or its...will often require extensive work by a qualified technician to restore the product to replace the power cord set . Keep them out of the reach of other risks. Replace only with the supplied power supply cord set , make sure that are covered by the manufacturer. If you to qualified ...
Acer Aspire X3300 Service Guide
Page 7
...Heat Sink Fan Assembly 32 Removing the Processor 33 Removing the Optical Drive 34 Removing the Hard Disk Drive 37 Removing the Power Supply 38 Removing the Memory Modules 40 Removing the TV Tuner Card 41 Removing the VGA Card 42 Removing the Front I/O ...and Card Reader Boards 44 Removing the Mainboard 47 System Troubleshooting 49 Hardware Diagnostic Procedure 49 System Check Procedures 50 Power System Check 50 System External Inspection 50 System Internal Inspection 50 Checkpoints 51 Viewing BIOS checkpoints 51 Bootblock Initialization Code Checkpoints ...
...Heat Sink Fan Assembly 32 Removing the Processor 33 Removing the Optical Drive 34 Removing the Hard Disk Drive 37 Removing the Power Supply 38 Removing the Memory Modules 40 Removing the TV Tuner Card 41 Removing the VGA Card 42 Removing the Front I/O ...and Card Reader Boards 44 Removing the Mainboard 47 System Troubleshooting 49 Hardware Diagnostic Procedure 49 System Check Procedures 50 Power System Check 50 System External Inspection 50 System Internal Inspection 50 Checkpoints 51 Viewing BIOS checkpoints 51 Bootblock Initialization Code Checkpoints ...
Acer Aspire X3300 Service Guide
Page 10
...) Applications Acer Empowering Technology (Acer eRecovery Management) Acer Arcade Live McAfee Internet Security Suite 2008 Trial version NTI MediaMaker System BIOS SPI Flash ROM Power supply 220-watts (115/230 Vac) power supply Active PFC 220V for... EMEA and China Non-PFC 110V and 220V with select switch. Active PFC 220V with Energy Star 5.0 Dimension and weight Dimension (LxWxH) X3300: 352 x...
...) Applications Acer Empowering Technology (Acer eRecovery Management) Acer Arcade Live McAfee Internet Security Suite 2008 Trial version NTI MediaMaker System BIOS SPI Flash ROM Power supply 220-watts (115/230 Vac) power supply Active PFC 220V for... EMEA and China Non-PFC 110V and 220V with select switch. Active PFC 220V with Energy Star 5.0 Dimension and weight Dimension (LxWxH) X3300: 352 x...

Acer Aspire X3300 Service Guide
Page 14
Internal Components No. Component 1 HDD drive 2 Optical drive 3 Expansion cards 4 Mainboard 5 Heat sink fan assembly 6 Power supply 6 Chapter 1
Internal Components No. Component 1 HDD drive 2 Optical drive 3 Expansion cards 4 Mainboard 5 Heat sink fan assembly 6 Power supply 6 Chapter 1
Acer Aspire X3300 Service Guide
Page 37
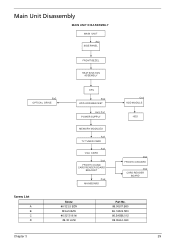
Main Unit Disassembly MAIN UNIT DISASSEMBLY MAIN UNIT Ax2 SIDE PANEL FRONT BEZEL HEAT SINK FAN ASSEMBLY Bx2 OPTICAL DRIVE CPU Bx2 HDD-ODD BRACKET Ax3, Dx1 POWER SUPPLY Cx4 HDD MODULE HDD MEMORY MODULES Ax1 TV TUNER CARD Ax1 VGA CARD Dx1 FRONT I/O AND CARD READER BOARD BRACKET Dx6 MAINBOARD Dx2 FRONT I/O BOARD Dx2 CARD READER BOARD Screw List A B C D Screw #6-32 L5 BZN M3xL5 BZN #6-32*3/16 NI #6-32 L6 NI Part No. 86.00J07.B60 86.1A324.5R0 86.5A5B6.012 86.00J44.C60 Chapter 3 29
Main Unit Disassembly MAIN UNIT DISASSEMBLY MAIN UNIT Ax2 SIDE PANEL FRONT BEZEL HEAT SINK FAN ASSEMBLY Bx2 OPTICAL DRIVE CPU Bx2 HDD-ODD BRACKET Ax3, Dx1 POWER SUPPLY Cx4 HDD MODULE HDD MEMORY MODULES Ax1 TV TUNER CARD Ax1 VGA CARD Dx1 FRONT I/O AND CARD READER BOARD BRACKET Dx6 MAINBOARD Dx2 FRONT I/O BOARD Dx2 CARD READER BOARD Screw List A B C D Screw #6-32 L5 BZN M3xL5 BZN #6-32*3/16 NI #6-32 L6 NI Part No. 86.00J07.B60 86.1A324.5R0 86.5A5B6.012 86.00J44.C60 Chapter 3 29

Acer Aspire X3300 Service Guide
Page 46
... 7. See "Removing the Hard Disk Drive" on page 31. 3. See "Removing the Optical Drive" on page 32. 4. Remove the screw (D) that secures the power supply to 6.3 kgf-cm Part No. 86.00J44.C60 38 Chapter 3 See "Removing the Heat Sink Fan Assembly" on page 34. 6. See "Removing the Processor" ...on page 30. 2. See "Removing the Side Panel" on page 33. 5. Disconnect the 4-pin and 24-pin power supply cables from the mainboard. 8. Removing the Power Supply 1. Screw (Quantity) #6-32 L6 BZN (1) Color Silver Torque 5.7 to the chassis.
... 7. See "Removing the Hard Disk Drive" on page 31. 3. See "Removing the Optical Drive" on page 32. 4. Remove the screw (D) that secures the power supply to 6.3 kgf-cm Part No. 86.00J44.C60 38 Chapter 3 See "Removing the Heat Sink Fan Assembly" on page 34. 6. See "Removing the Processor" ...on page 30. 2. See "Removing the Side Panel" on page 33. 5. Disconnect the 4-pin and 24-pin power supply cables from the mainboard. 8. Removing the Power Supply 1. Screw (Quantity) #6-32 L6 BZN (1) Color Silver Torque 5.7 to the chassis.

Acer Aspire X3300 Service Guide
Page 47
Lift the power supply module out of the chassis. Torque 5.7 to the rear panel. Remove the three screws (A) that secure the power supply to 6.3 kgf-cm Part No. 86.00J07.B60 Chapter 3 39 Screw (Quantity) #6-32 L5 BZN (3) Color Black 10. 9.
Lift the power supply module out of the chassis. Torque 5.7 to the rear panel. Remove the three screws (A) that secure the power supply to 6.3 kgf-cm Part No. 86.00J07.B60 Chapter 3 39 Screw (Quantity) #6-32 L5 BZN (3) Color Black 10. 9.


