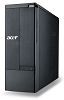
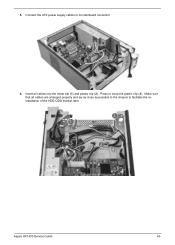
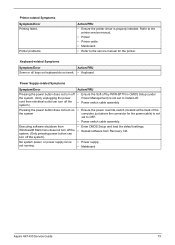
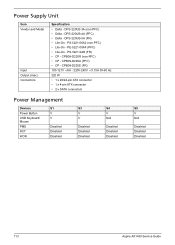
Acer Aspire X1430 and X1430G Desktop Service Guide
Page 7
...the HDD-ODD Bracket 25 Detaching the Front Bezel 30 Removing the Expansion Boards 31 Removing the Memory Modules 33 Removing the Power Supply Unit 33 Removing the Front I/O and Optional Card Reader Assembly 36 Removing the Mainboard 38 Reassembly Procedures 40 Reinstalling the Mainboard... 40 Reinstalling the Front I/O and Optional Card Reader Assembly 41 Reinstalling the Power Supply Unit 43 Installing the Memory Modules 46 Installing the Expansion Boards 46 Reinstalling the Front Bezel Power Button/LED Cable 48 Reinstalling the HDD-ODD Bracket 53 Reinstalling the Front ...
Acer Aspire X1430 and X1430G Desktop Service Guide
Page 8
Table of Contents System Architecture 81 Block Diagram 81 Mainboard Layout 82 Jumper Setting 83 Internal header pin definition 84 Connecting Optional Devices 86 Connecting Case Components 88 Field Replaceable Unit (FRU) List 91 Exploded Diagram 92 Aspire AX1430 FRU List 93 Technical Specifications 110 Processor 110 Chipsets 110 BIOS 110 Memory 111 Hard Disk Drive 111 Optical Disc Drive 112 Card Reader (optional 112 Gigabit Ethernet 112 Audio 112 Power Supply Unit 113 Power Management 113 Index ...115 viii
Acer Aspire X1430 and X1430G Desktop Service Guide
Page 9
... (MS PRO), Memory Stick (MS) - xD-Picture Card (xD) - MultiMediaCard (MMC) AVerMedia H751 PCI-E Hybrid Analog/ATSC Card 220 W power supply unit (non-PFC, non-power factor correction) 220 W power supply unit (PFC) Norton Internet Security Aspire AX1430 Service Guide 1 The exact configuration of your PC depends on page 93 for reference only. Features and Specifications...
Acer Aspire X1430 and X1430G Desktop Service Guide
Page 41
Gently pull the memory module upward (2) to remove the second memory module from its mainboard connector. Aspire AX1430 Service Guide 33 Repeat steps 1 and 2 to remove it straight up (2). Removing the Power Supply Unit 1. b. Disconnect the ATX power supply cables from the DIMM2 slot. Grasp the cable end of the connector. a. Press to the cable end...
Acer Aspire X1430 and X1430G Desktop Service Guide
Page 42
Remove the screw that secure the power supply to the chassis. 4. Open the plastic clip (1) and release the power cables from the metal clip (2) in the direction indicated. 3. Remove the two screws that secures the power supply to the rear panel. 34 Aspire AX1430 Service Guide 2.
Acer Aspire X1430 and X1430G Desktop Service Guide
Page 43
5. Push the power supply module toward the front. 6. Aspire AX1430 Service Guide 35 Tilt the power supply module slightly to the right and lift it out of the chassis.
Acer Aspire X1430 and X1430G Desktop Service Guide
Page 51
Slide the power supply module into the chassis (1) and tilt to their mainboard connectors. Aspire AX1430 Service Guide 43 Connect the front I/O and optional card reader cables to the left (2). 6. Reinstalling the Power Supply Unit 1.
Acer Aspire X1430 and X1430G Desktop Service Guide
Page 52
Secure the power supply to the rear panel using one screw. 44 Aspire AX1430 Service Guide Secure the power supply to the chassis using two screws. 4. Push the power supply module toward the rear (3), with the power connector extruding from the rear panel. 3. 2.
Acer Aspire X1430 and X1430G Desktop Service Guide
Page 53
Aspire AX1430 Service Guide 45 Press to close as possible to the chassis to its mainboard connector. 6. 5. Make sure that all cables into the metal clip (1) and plastic clip (2). Insert all cables are arranged properly and lay as close the plastic clip (3). Connect the ATX power supply cables to facilitate the reinstallation of the HDD-ODD bracket later.
Acer Aspire X1430 and X1430G Desktop Service Guide
Page 78
...". • Mainboard NOTE Ensure the memory modules are installed properly and the contact leads are clean before diagnosing any system problems. 70 Aspire AX1430 Service Guide system does not work , then replace the heat sink fan. • Mainboard • Processor • Mainboard NOTE... default settings. Its reading should be +12Vdc. then reboot the system. • Memory module • Mainboard System works but power supply fan runs. Action/FRU • Ensure the system is set to match its speed requirement before diagnosing any processor problems. Mainboard and...
Acer Aspire X1430 and X1430G Desktop Service Guide
Page 81
...8226; Keyboard Power Supply-related Symptoms Symptom/Error Pressing the power button does not turn off the system. (Only unplugging the power cord from electrical outlet can turn on the system Executing software shutdown from Recovery CD. • Power supply • Mainboard Aspire AX1430 Service... Guide 73 Refer to the printer service manual. • Printer • Printer cable • Mainboard. • Refer to OFF. • Power switch cable assembly. • Enter CMOS ...
Acer Aspire X1430 and X1430G Desktop Service Guide
Page 82
...during POST, listen for beep codes. Do not replace a non-defective FRU. 74 Aspire AX1430 Service Guide Continuous one long beep Status System ready Memory not installed or memory... the video card for damage. CMOS checksum error Undetermined Problems NOTE • Verify that the power supply being used at a time until you find the failed FRU. Remove or disconnect all attached devices...not recur, reconnect the removed devices one at the time of the following devices: • Non-Acer devices • Printer, mouse, and other external devices • Hard disk drive • DIMM...
Acer Aspire X1430 and X1430G Desktop Service Guide
Page 96
Connect the CPU cooling fan cable to the F_PANEL. CPU_FAN: CPU Cooling Fan Power Connector Pin Signal Name 1 GND 2 +12V 3 Sense 4 PWM Function System ground Power +12V Sensor PWM 88 Aspire AX1430 Service Guide Connecting Case Components After you have installed the mainboard into a case, you can begin connecting the mainboard components. Connect the case switches and indicator LEDs to CPU_FAN. 2. Refer to ATX_POWER1. 3. Connect the standard power supply connector to the following: 1.
Acer Aspire X1430 and X1430G Desktop Service Guide
Page 121
... USB Keyboard/ Mouse PME RCT WOR S1 V V Disabled Disabled Disabled S3 V V Disabled Disabled Disabled S4 V N/A Disabled Disabled Disabled S5 V N/A Disabled Disabled Disabled 113 Aspire AX1430 Service Guide Power Supply Unit Item Vendor and Model Input Output (max.) Connectors Specification • Delta - PS-5221-9AB (FR) • CP - CPB09-D220A (PFC) • CP - DPS...
Acer Aspire X1430 and X1430G Desktop Service Guide
Page 123
... Chipset Configuration 13 Boot Options 19 Exit 20 Integrated Peripherals 14 USB Device Setting 17 Main 10 Miscellaneous 12 PC Health Status 16, 18 Power Management Setup 17 BIOS Setup enter Setup 8 block diagram 81 boot block checkpoints 60 execute 75 button optical drive eject 4 C card reader...31 front bezel 23, 30 front I/O assembly 36 hard disk drive 26 HDD-ODD bracket 25 mainboard 38 memory 33 optical disc drive 26 power supply unit 33 side panel 22 tools 21 E environmental requirements 3 Ethernet port specifications 112 expansion slots expansion board, install 46 expansion board, remove...
Acer Aspire X1430 and X1430G Desktop Service Guide
Page 124
... Utility, see BIOS Setup 8 ports USB front 4 POST, see Power-On Self-Test 62 power ACPI compliance 2 button/indicator 4 specifications 1 power connector CPU cooling fan 88 standard 24-pin 89 power management ACPI mode table 113 specifications 2 power supply unit remove 33 replace 43 specifications 113 troubleshooting 73 Power-On Self-Test beep codes 74 checkpoints 62
Acer Aspire X1430 and X1430G Desktop Service Guide
Page 125
...assembly 41 hard disk drive 49 HDD-ODD bracket 53 heat sink fan assembly 54 mainboard 40 memory 46 optical disc drive 49 power supply unit 43 side panel 57 Return Merchandise Authorization 91 RMA, see Return Merchandise Authorization 91 RTC clock troubleshooting 72 S side panel ... antivirus 1 operating system 1 specifications audio 112 card reader 112 Ethernet 112 hard disk drive 111 memory 111 optical disc drive 112 power management 113 power supply unit 113 processor 110 system BIOS 110 system chipsets 110 system architecture 81 system chipsets 110 system dimensions 3 system utilities 7 system...