
User Manual
Page 3
...OF CONTENTS Safety and comfort 5 snapshot 46 First things first Returning your system to its factory 16 condition 47 Your guides 16 Recovering from Windows 48 Basic care and tips for using your Recovering from a recovery backup ........ 52 computer 16 Turning your computer on and off 16 ... Disable Fast startup 56 Taking care of your AC adapter 18 Battery pack 59 Cleaning and servicing 18 Battery pack characteristics 59 Your Acer notebook tour 19 Charging the battery 59 Screen view 20 Keyboard view 22 Left view 23 Optimizing battery life 61 Checking the battery...
...OF CONTENTS Safety and comfort 5 snapshot 46 First things first Returning your system to its factory 16 condition 47 Your guides 16 Recovering from Windows 48 Basic care and tips for using your Recovering from a recovery backup ........ 52 computer 16 Turning your computer on and off 16 ... Disable Fast startup 56 Taking care of your AC adapter 18 Battery pack 59 Cleaning and servicing 18 Battery pack characteristics 59 Your Acer notebook tour 19 Charging the battery 59 Screen view 20 Keyboard view 22 Left view 23 Optimizing battery life 61 Checking the battery...
User Manual
Page 4
... 94 Wireless networks 76 Connecting to the Internet 76 Acer Instant Connect 76 Wireless networks 76 Using a Bluetooth connection 78 Enabling and disabling Bluetooth 78 Enabling Bluetooth from Windows 8 ......... 79 Adding a Bluetooth device 80 Acer Converter Port 85 Why is a Microsoft ID (account... 98 How do I check for using Windows 8 93 Entering passwords 71 Three concepts you might want to use Windows in the way that ...
... 94 Wireless networks 76 Connecting to the Internet 76 Acer Instant Connect 76 Wireless networks 76 Using a Bluetooth connection 78 Enabling and disabling Bluetooth 78 Enabling Bluetooth from Windows 8 ......... 79 Adding a Bluetooth device 80 Acer Converter Port 85 Why is a Microsoft ID (account... 98 How do I check for using Windows 8 93 Entering passwords 71 Three concepts you might want to use Windows in the way that ...

User Manual
Page 14
... your head at a higher level than your documents, place the display at the center of your display in such a way that the side faces the window or any light source, minimizing room light by looking at the middle of the display. - Avoid adjusting your display to keep your eyes regular breaks...
... your head at a higher level than your documents, place the display at the center of your display in such a way that the side faces the window or any light source, minimizing room light by looking at the middle of the display. - Avoid adjusting your display to keep your eyes regular breaks...
User Manual
Page 16
... you get started with setting up your mobile computing needs. This guide contains detailed information on how your computer can help you use your Acer notebook, we have designed a set of guides: First off , do any of your new computer. It is available from Desktop; Basic...in the menu that opens. For more productive, please refer to the basic features and functions of the following: • Use the Windows shutdown command: Press the Windows key + , click Settings > Power then click Shut Down. 16 - In addition it contains general regulations and safety notices for using ...
... you get started with setting up your mobile computing needs. This guide contains detailed information on how your computer can help you use your Acer notebook, we have designed a set of guides: First off , do any of your new computer. It is available from Desktop; Basic...in the menu that opens. For more productive, please refer to the basic features and functions of the following: • Use the Windows shutdown command: Press the Windows key + , click Settings > Power then click Shut Down. 16 - In addition it contains general regulations and safety notices for using ...

User Manual
Page 29
... when you press the up or down arrow keys respectively. USING THE KEYBOARD The keyboard has full-sized keys and a numeric keypad, separate cursor, lock, Windows, function and special keys. Scroll Lock does not work with the arithmetic operators +, -, *, and /).
... when you press the up or down arrow keys respectively. USING THE KEYBOARD The keyboard has full-sized keys and a numeric keypad, separate cursor, lock, Windows, function and special keys. Scroll Lock does not work with the arithmetic operators +, -, *, and /).

User Manual
Page 31
... > + < > Icon Function Description Brightness up Increases the sound volume. + < > + + + + Volume down Decreases the screen brightness. Windows keys The keyboard has two keys that perform Windows-specific functions. Key Description Pressed alone it returns to the next media file. Play or pause a selected media file. Jump to the Start screen. ...Pause Stop Previous Next Decreases the sound volume. Return to the previous media file. Stop playing the selected media file. Windows key It can also be used with other keys for special functions, please check...
... > + < > Icon Function Description Brightness up Increases the sound volume. + < > + + + + Volume down Decreases the screen brightness. Windows keys The keyboard has two keys that perform Windows-specific functions. Key Description Pressed alone it returns to the next media file. Play or pause a selected media file. Jump to the Start screen. ...Pause Stop Previous Next Decreases the sound volume. Return to the previous media file. Stop playing the selected media file. Windows key It can also be used with other keys for special functions, please check...

User Manual
Page 34
Touchpad gestures Windows 8 and many applications support touchpad gestures that use one or more fingers. Touchpad This allows you to control applications with a simple finger-and-thumb gesture. ...: Switch to select all items in and out of photos, maps and documents with a few simple gestures, such as: • Swipe in from edge: Access Windows tools by placing two fingers on the active application.
Touchpad gestures Windows 8 and many applications support touchpad gestures that use one or more fingers. Touchpad This allows you to control applications with a simple finger-and-thumb gesture. ...: Switch to select all items in and out of photos, maps and documents with a few simple gestures, such as: • Swipe in from edge: Access Windows tools by placing two fingers on the active application.
User Manual
Page 35
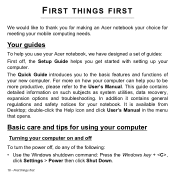
This section describes the recovery tools available on your computer's hard drive, including Windows and all settings and personal data. i.e. Acer provides Acer Recovery Management, which allows you can 'recover' your computer - Note: Acer Recovery Management is only available with your computer, and the frequently asked questions (see page 89) do not help, you to...
This section describes the recovery tools available on your computer's hard drive, including Windows and all settings and personal data. i.e. Acer provides Acer Recovery Management, which allows you can 'recover' your computer - Note: Acer Recovery Management is only available with your computer, and the frequently asked questions (see page 89) do not help, you to...

User Manual
Page 36
The Recovery Drive window 36 - From Start, type 'Recovery' and then click Acer Recovery Management in the list of 32 GB or larger. 1. Note: Since the recovery backup requires at least 16 GB of storage after formatting, it is recommended to use a USB drive with a capacity of apps. 2. Recovery Click Create Factory Default Backup.
The Recovery Drive window 36 - From Start, type 'Recovery' and then click Acer Recovery Management in the list of 32 GB or larger. 1. Note: Since the recovery backup requires at least 16 GB of storage after formatting, it is recommended to use a USB drive with a capacity of apps. 2. Recovery Click Create Factory Default Backup.

User Manual
Page 39
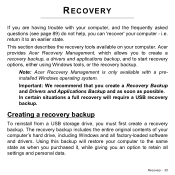
Make sure you keep the backup in a safe place that contains the factoryloaded software and drivers needed by your computer, you will remember. Unplug the USB drive and label it clearly. Important: Write a unique, descriptive label on the backup, such as 'Windows Recovery Backup'. Creating a drivers and applications backup To create a Drivers and Applications Backup, that you may use either Recovery - 39 7.
Make sure you keep the backup in a safe place that contains the factoryloaded software and drivers needed by your computer, you will remember. Unplug the USB drive and label it clearly. Important: Write a unique, descriptive label on the backup, such as 'Windows Recovery Backup'. Creating a drivers and applications backup To create a Drivers and Applications Backup, that you may use either Recovery - 39 7.

User Manual
Page 44
If you are reinstalling using Windows and the recovery information stored on your computer: • From Start, type 'Recovery' and then click Acer Recovery Management in the list of apps. • Click Reinstall Drivers or Applications. 44 - Recovery
If you are reinstalling using Windows and the recovery information stored on your computer: • From Start, type 'Recovery' and then click Acer Recovery Management in the list of apps. • Click Reinstall Drivers or Applications. 44 - Recovery

User Manual
Page 45
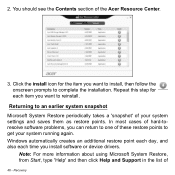
...step for each item you want to install, then follow the onscreen instructions to reinstall. • You should see the Contents section of the Acer Resource Center. • Click the install icon for the item you want to complete the installation. Recovery - 45 Insert the Drivers and Applications...the disc drive or connect it to a free USB port. • If you inserted a DVD wait for Acer Resource Center to start. • If Acer Resource Center does not start automatically, press the Windows key + , then double-click on the optical drive icon. • If you are reinstalling from a Drivers...
...step for each item you want to install, then follow the onscreen instructions to reinstall. • You should see the Contents section of the Acer Resource Center. • Click the install icon for the item you want to complete the installation. Recovery - 45 Insert the Drivers and Applications...the disc drive or connect it to a free USB port. • If you inserted a DVD wait for Acer Resource Center to start. • If Acer Resource Center does not start automatically, press the Windows key + , then double-click on the optical drive icon. • If you are reinstalling from a Drivers...
User Manual
Page 46
...For more information about using Microsoft System Restore, from Start, type 'Help' and then click Help and Support in the list of the Acer Resource Center. 3. Repeat this step for the item you want to install, then follow the onscreen prompts to get your system settings and... saves them as restore points. In most cases of your system running again. Returning to reinstall. Windows automatically creates an additional restore point each day, and also each item you want to an earlier system snapshot Microsoft System Restore periodically takes...
...For more information about using Microsoft System Restore, from Start, type 'Help' and then click Help and Support in the list of the Acer Resource Center. 3. Repeat this step for the item you want to install, then follow the onscreen prompts to get your system settings and... saves them as restore points. In most cases of your system running again. Returning to reinstall. Windows automatically creates an additional restore point each day, and also each item you want to an earlier system snapshot Microsoft System Restore periodically takes...

User Manual
Page 47
... have installed a replacement hard drive, see "Recovering from a recovery backup" on page 48. • If you cannot run Windows, your system to a restore point 1. Click Open System Restore, then Next. 4. Click System and Security > Action Center, then click Recovery at a time when your...worked correctly), click Next, then Finish. 5. Your system is restored using the restore point you have not deleted the recovery partition, see "Recovering from Windows" on page 52. From Start, type 'Control Panel' and then click Control Panel in the Search Help box, then press Enter. A confirmation...
... have installed a replacement hard drive, see "Recovering from a recovery backup" on page 48. • If you cannot run Windows, your system to a restore point 1. Click Open System Restore, then Next. 4. Click System and Security > Action Center, then click Recovery at a time when your...worked correctly), click Next, then Finish. 5. Your system is restored using the restore point you have not deleted the recovery partition, see "Recovering from Windows" on page 52. From Start, type 'Control Panel' and then click Control Panel in the Search Help box, then press Enter. A confirmation...
User Manual
Page 48
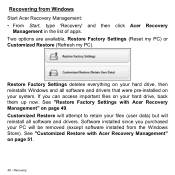
... attempt to retain your files (user data) but will be removed (except software installed from Windows Start Acer Recovery Management: • From Start, type 'Recovery' and then click Acer Recovery Management in the list of apps. Recovering from the Windows Store). Two options are available, Restore Factory Settings (Reset my PC) or Customized Restore...
... attempt to retain your files (user data) but will be removed (except software installed from Windows Start Acer Recovery Management: • From Start, type 'Recovery' and then click Acer Recovery Management in the list of apps. Recovering from the Windows Store). Two options are available, Restore Factory Settings (Reset my PC) or Customized Restore...

User Manual
Page 49
The Reset your hard drive. 2. Caution: 'Restore Factory Settings' will erase all files on your PC window opens. Click Next, then choose how to erase your files: Recovery - 49 Restore Factory Settings with Acer Recovery Management 1. Images for reference only. 3. Click Restore Factory Settings.
The Reset your hard drive. 2. Caution: 'Restore Factory Settings' will erase all files on your PC window opens. Click Next, then choose how to erase your files: Recovery - 49 Restore Factory Settings with Acer Recovery Management 1. Images for reference only. 3. Click Restore Factory Settings.
User Manual
Page 51
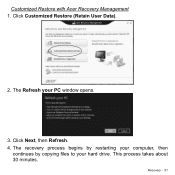
The recovery process begins by restarting your computer, then continues by copying files to your PC window opens. 3. The Refresh your hard drive. Recovery - 51 This process takes about 30 minutes. Click Next, then Refresh. 4. Click Customized Restore (Retain User Data). 2. Customized Restore with Acer Recovery Management 1.
The recovery process begins by restarting your computer, then continues by copying files to your PC window opens. 3. The Refresh your hard drive. Recovery - 51 This process takes about 30 minutes. Click Next, then Refresh. 4. Click Customized Restore (Retain User Data). 2. Customized Restore with Acer Recovery Management 1.

User Manual
Page 52
... startup, press to Enabled. b. Use the left or right arrow keys to your computer. f. The boot menu allows you must enable the F12 Boot Menu: a. Windows starts from , select the USB drive. Plug in keyboard, make sure a keyboard is not already enabled, you to select which device to confirm. If it...
... startup, press to Enabled. b. Use the left or right arrow keys to your computer. f. The boot menu allows you must enable the F12 Boot Menu: a. Windows starts from , select the USB drive. Plug in keyboard, make sure a keyboard is not already enabled, you to select which device to confirm. If it...

User Manual
Page 53
Select Troubleshoot and then choose the type of recovery to start the reset process: Reset your PC deletes everything on your hard drive, then reinstalls Windows and all software and drivers. See "Reset your PC to use: a. Click Reset your PC from the recovery backup" on page 54. 7. See "Refresh your ... the recovery backup" on page 55. If you purchased your PC will attempt to get your PC will be removed (except software installed from the Windows Store). Click Advanced then System Restore to start the refresh process: Refresh your system running again.
Select Troubleshoot and then choose the type of recovery to start the reset process: Reset your PC deletes everything on your hard drive, then reinstalls Windows and all software and drivers. See "Reset your PC to use: a. Click Reset your PC from the recovery backup" on page 54. 7. See "Refresh your ... the recovery backup" on page 55. If you purchased your PC will attempt to get your PC will be removed (except software installed from the Windows Store). Click Advanced then System Restore to start the refresh process: Refresh your system running again.

User Manual
Page 54
... keep any changes to the hard drive: a. Images for reference only. 2. The Reset your computer to Factory Settings, select Yes. 5. To completely restore your PC window opens. Recovery b. Fully clean the drive completely cleans the drive after each file is available). 4. Reset your PC from the recovery backup Caution: Reset your...
... keep any changes to the hard drive: a. Images for reference only. 2. The Reset your computer to Factory Settings, select Yes. 5. To completely restore your PC window opens. Recovery b. Fully clean the drive completely cleans the drive after each file is available). 4. Reset your PC from the recovery backup Caution: Reset your...


