
Acer V5-571 Series Notebook Touch Service Guide
Page 73
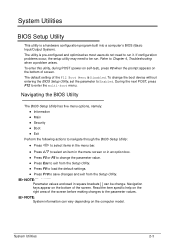
... area of the screen. System Utilities 2-3 The utility is pre-configured and optimized so most users do not need to enter the multi-boot menu. If configuration problems occur, the setup utility may need to Chapter 4, Troubleshooting when a problem arises. Read the item specific help on ... BIOS Setup Utility: Press to select items in the menu bar. Press to select an item in the menu screen or in square brackets [ ] can vary depending on the bottom of the F12 Boot Menu is a hardware configuration program built into a computer's BIOS (Basic Input...
... area of the screen. System Utilities 2-3 The utility is pre-configured and optimized so most users do not need to enter the multi-boot menu. If configuration problems occur, the setup utility may need to Chapter 4, Troubleshooting when a problem arises. Read the item specific help on ... BIOS Setup Utility: Press to select items in the menu bar. Press to select an item in the menu screen or in square brackets [ ] can vary depending on the bottom of the F12 Boot Menu is a hardware configuration program built into a computer's BIOS (Basic Input...
Acer V5-571 Series Notebook Touch Service Guide
Page 76
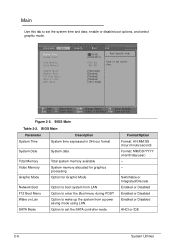
Figure 2-2. Option to set the system time and date, enable or disable boot options, and select graphic mode. Main 0 Use this tab to set the SATA controller mode Format/Option Format: HH:MM:SS (hour:minute:second) Format: ... Memory Graphic Mode Total system memory available System memory allocated for graphics processing Option for Graphic Mode Network Boot F12 Boot Menu Wake on Lan SATA Mode Option to boot system from LAN Option to enter the Boot menu during POST Option to wake up the system from a power saving mode using LAN. Switchable or Integrated...
Figure 2-2. Option to set the system time and date, enable or disable boot options, and select graphic mode. Main 0 Use this tab to set the SATA controller mode Format/Option Format: HH:MM:SS (hour:minute:second) Format: ... Memory Graphic Mode Total system memory available System memory allocated for graphics processing Option for Graphic Mode Network Boot F12 Boot Menu Wake on Lan SATA Mode Option to boot system from LAN Option to enter the Boot menu during POST Option to wake up the system from a power saving mode using LAN. Switchable or Integrated...
Acer V5-571 Series Notebook Touch Service Guide
Page 84
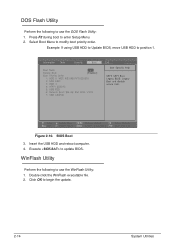
WinFlash Utility 0 Perform the following to update BIOS. Click OK to use the DOS Flash Utility: 1. Figure 2-10. Insert the USB HDD and reboot computer. 4. Press F2 during boot to modify boot priority order. BIOS Boot 3. Select Boot Menu to enter Setup Menu. 2. Execute to use the WinFlash Utility: 1. DOS Flash Utility 0 Perform the following to begin the update. 2-14 System Utilities Example: If using USB HDD to Update BIOS, move USB HDD to position 1. Double click the WinFlash executable file. 2.
WinFlash Utility 0 Perform the following to update BIOS. Click OK to use the DOS Flash Utility: 1. Figure 2-10. Insert the USB HDD and reboot computer. 4. Press F2 during boot to modify boot priority order. BIOS Boot 3. Select Boot Menu to enter Setup Menu. 2. Execute to use the WinFlash Utility: 1. DOS Flash Utility 0 Perform the following to begin the update. 2-14 System Utilities Example: If using USB HDD to Update BIOS, move USB HDD to position 1. Double click the WinFlash executable file. 2.

Acer V5-571 Series Notebook Touch Service Guide
Page 88
... the DMI\DOS folder to the first position. Select the Boot menu item and move the entry "USB HDD" to the HDD, then disconnect the HDD from the computer. 3. Create a DOS bootable USB HDD. 2. Figure 2-15. BIOS Boot Priority Order 2-18 System Utilities The DMI utility supports DOS,... 7 and Windows 8 with WMI interface installation. Reboot the computer and press F2 during the boot sequence to use the DMI Utility in DOS Mode 0 Perform the following steps to enter the setup menu. 4. Using DMI Utility 0 The DMI (Desktop Management Interface) Tool generates a standard framework for...
... the DMI\DOS folder to the first position. Select the Boot menu item and move the entry "USB HDD" to the HDD, then disconnect the HDD from the computer. 3. Create a DOS bootable USB HDD. 2. Figure 2-15. BIOS Boot Priority Order 2-18 System Utilities The DMI utility supports DOS,... 7 and Windows 8 with WMI interface installation. Reboot the computer and press F2 during the boot sequence to use the DMI Utility in DOS Mode 0 Perform the following steps to enter the setup menu. 4. Using DMI Utility 0 The DMI (Desktop Management Interface) Tool generates a standard framework for...

Acer V5-571 Series Notebook Touch Service Guide
Page 91
At the command prompt, navigate to the first position. Reboot when the process has completed. Select the Boot menu item and move the entry "USB HDD" to the MAC folder. 7. Connect the USB HDD and reboot the computer. 6. Execute the < MAC.BAT> file. 8. Figure 2-...the HDD and remove the HDD form the computer. 3. Create a DOS bootable USB HDD. 2. BIOS Boot 5. Using LAN EEPROM Utility 0 LAN EEPROM Utility enables changes to be made to enter the setup menu. 4. Reboot the computer and press F2 during the boot sequence to the MAC address. At prompt type in MAC address. 9.
At the command prompt, navigate to the first position. Reboot when the process has completed. Select the Boot menu item and move the entry "USB HDD" to the MAC folder. 7. Connect the USB HDD and reboot the computer. 6. Execute the < MAC.BAT> file. 8. Figure 2-...the HDD and remove the HDD form the computer. 3. Create a DOS bootable USB HDD. 2. BIOS Boot 5. Using LAN EEPROM Utility 0 LAN EEPROM Utility enables changes to be made to enter the setup menu. 4. Reboot the computer and press F2 during the boot sequence to the MAC address. At prompt type in MAC address. 9.
Acer V5-571 Series Notebook Touch Service Guide
Page 217
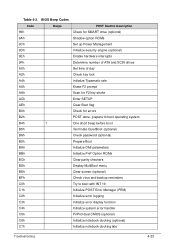
... Initialize DMI parameters BBh Initialize PnP Option ROMs BCh Clear parity checkers BDh Display MultiBoot menu BEh Clear screen (optional) BFh Check virus and backup reminders C0h Try to boot with INT 19 C1h Initialize POST Error Manager (PEM) C2h Initialize error logging C3h Initialize error display function C4h Initialize system error... of day A2h Check key lock A4h Initialize Typematic rate A8h Erase F2 prompt AAh Scan for F2 key stroke ACh Enter SETUP AEh Clear Boot flag B0h Check for errors B2h POST done-
... Initialize DMI parameters BBh Initialize PnP Option ROMs BCh Clear parity checkers BDh Display MultiBoot menu BEh Clear screen (optional) BFh Check virus and backup reminders C0h Try to boot with INT 19 C1h Initialize POST Error Manager (PEM) C2h Initialize error logging C3h Initialize error display function C4h Initialize system error... of day A2h Check key lock A4h Initialize Typematic rate A8h Erase F2 prompt AAh Scan for F2 key stroke ACh Enter SETUP AEh Clear Boot flag B0h Check for errors B2h POST done-


