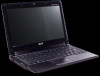
Acer Aspire One 531H Netbook Series User Guide
Page 13
... power button. Note: Viewing the file requires Adobe Reader. If Adobe Reader is available in Portable Document Format (PDF) and comes preloaded on how your computer can help you use Adobe Reader, access the Help and Support menu. xiii First things first We would like to thank you to be more on your computer, clicking on such subjects as the AcerSystem User Guide mentioned below the LCD screen. The printed Aspire one...
... power button. Note: Viewing the file requires Adobe Reader. If Adobe Reader is available in Portable Document Format (PDF) and comes preloaded on how your computer can help you use Adobe Reader, access the Help and Support menu. xiii First things first We would like to thank you to be more on your computer, clicking on such subjects as the AcerSystem User Guide mentioned below the LCD screen. The printed Aspire one...

Acer Aspire One 531H Netbook Series User Guide
Page 17
...Cleaning and servicing xv Acer eRecovery Management 1 Acer eRecovery Management 1 Launching Acer eRecovery Management 2 Indicators 3 Touchpad 4 Touchpad basics (with two-click buttons) 4 Using a computer security lock 5 Using the keyboard 6 Lock keys and embedded numeric keypad 6 Windows keys 7 Hotkeys 8 Special keys 9 Frequently asked questions 10 Requesting service 12 International Travelers Warranty (ITW) 12 Before you call 12 Battery pack 13 Battery pack characteristics 13 Maximizing the battery's life 13 Installing and removing the battery pack 14...
...Cleaning and servicing xv Acer eRecovery Management 1 Acer eRecovery Management 1 Launching Acer eRecovery Management 2 Indicators 3 Touchpad 4 Touchpad basics (with two-click buttons) 4 Using a computer security lock 5 Using the keyboard 6 Lock keys and embedded numeric keypad 6 Windows keys 7 Hotkeys 8 Special keys 9 Frequently asked questions 10 Requesting service 12 International Travelers Warranty (ITW) 12 Before you call 12 Battery pack 13 Battery pack characteristics 13 Maximizing the battery's life 13 Installing and removing the battery pack 14...

Acer Aspire One 531H Netbook Series User Guide
Page 28
... the following: • The volume may arise during the use the volume control buttons to an external monitor. Press and release the power button to save power. Easy solutions are using on the power, but the computer does not start or boot up. Connect the AC adapter to recharge the battery pack. • Make sure that may be set to adjust the volume. Remove or replace it is crossed-out, click...
... the following: • The volume may arise during the use the volume control buttons to an external monitor. Press and release the power button to save power. Easy solutions are using on the power, but the computer does not start or boot up. Connect the AC adapter to recharge the battery pack. • Make sure that may be set to adjust the volume. Remove or replace it is crossed-out, click...
Acer Aspire One 531H Netbook Series User Guide
Page 29
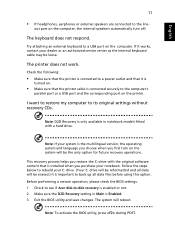
... an external keyboard to the line- Note: To activate the BIOS utility, press during POST. Note: D2D Recovery is only available in Main is Enabled. 3 Exit the BIOS utility and save changes. Note: If your system is installed when you first turn off. Before performing a restore operation, please check the BIOS settings. 1 Check to see if Acer disk-to rebuild your dealer or an authorized service center as the internal keyboard cable...
... an external keyboard to the line- Note: To activate the BIOS utility, press during POST. Note: D2D Recovery is only available in Main is Enabled. 3 Exit the BIOS utility and save changes. Note: If your system is installed when you first turn off. Before performing a restore operation, please check the BIOS settings. 1 Check to see if Acer disk-to rebuild your dealer or an authorized service center as the internal keyboard cable...

Acer Aspire One 531H Netbook Series User Guide
Page 33
... installed in a cool, dry place. Checking the battery level The Windows power meter indicates the current battery level. You are advised to operate your computer on -the-go use. • Eject a PC Card if it will continue to start the next day with the computer turned off results in a significantly faster charge time. You can continue to charge the battery before traveling enables...
... installed in a cool, dry place. Checking the battery level The Windows power meter indicates the current battery level. You are advised to operate your computer on -the-go use. • Eject a PC Card if it will continue to start the next day with the computer turned off results in a significantly faster charge time. You can continue to charge the battery before traveling enables...

Acer Aspire One 531H Netbook Series User Guide
Page 42
... not need to -disk recovery (hard disk recovery), activate the BIOS utility, then select Main from the categories listed at the top of the screen and use the and keys to connect USB peripherals without taking up precious system resources. Boot sequence To set this utility. Your computer is a hardware configuration program built into your computer's BIOS. However, if you encounter configuration problems, you to set the boot sequence in the BIOS utility, activate the BIOS utility, then select Boot...
... not need to -disk recovery (hard disk recovery), activate the BIOS utility, then select Main from the categories listed at the top of the screen and use the and keys to connect USB peripherals without taking up precious system resources. Boot sequence To set this utility. Your computer is a hardware configuration program built into your computer's BIOS. However, if you encounter configuration problems, you to set the boot sequence in the BIOS utility, activate the BIOS utility, then select Boot...
Aspire One AO531h Service Guide
Page 7
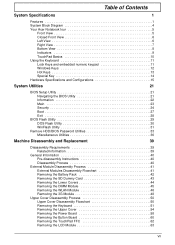
... Keyboard 11 Lock Keys and embedded numeric keypad 11 Windows Keys 12 Hot Keys 13 Special Key 14 Hardware Specifications and Configurations 15 System Utilities 21 BIOS Setup Utility 21 Navigating the BIOS Utility 21 Information 22 Main 23 Security 24 Boot 27 Exit 28 BIOS Flash Utility 29 DOS Flash Utility 30 WinFlash Utility 31 Remove HDD/BIOS Password Utilities 33 Miscellaneous Utilities 36 Machine Disassembly and Replacement 39 Disassembly Requirements 39 Related Information 39 General Information 40 Pre-disassembly Instructions 40 Disassembly Process 40 External...
... Keyboard 11 Lock Keys and embedded numeric keypad 11 Windows Keys 12 Hot Keys 13 Special Key 14 Hardware Specifications and Configurations 15 System Utilities 21 BIOS Setup Utility 21 Navigating the BIOS Utility 21 Information 22 Main 23 Security 24 Boot 27 Exit 28 BIOS Flash Utility 29 DOS Flash Utility 30 WinFlash Utility 31 Remove HDD/BIOS Password Utilities 33 Miscellaneous Utilities 36 Machine Disassembly and Replacement 39 Disassembly Requirements 39 Related Information 39 General Information 40 Pre-disassembly Instructions 40 Disassembly Process 40 External...
Aspire One AO531h Service Guide
Page 9
... of BIOS Settings 142 LCD Failure 143 Built-In Keyboard Failure 143 TouchPad Failure 144 Internal Speaker Failure 144 Internal Microphone Failure 146 HDD Not Operating Correctly 147 USB Failure (Rightside 148 Power Button Failure 148 External Mouse Failure 149 Other Failures 149 Intermittent Problems 150 Undetermined Problems 150 POST Code Reference Tables 151 Sec 151 Memory 151 BDS & Specific action 152 Each PEIM entry point used in 80_PORT 154 Each Driver...
... of BIOS Settings 142 LCD Failure 143 Built-In Keyboard Failure 143 TouchPad Failure 144 Internal Speaker Failure 144 Internal Microphone Failure 146 HDD Not Operating Correctly 147 USB Failure (Rightside 148 Power Button Failure 148 External Mouse Failure 149 Other Failures 149 Intermittent Problems 150 Undetermined Problems 150 POST Code Reference Tables 151 Sec 151 Memory 151 BDS & Specific action 152 Each PEIM entry point used in 80_PORT 154 Each Driver...

Aspire One AO531h Service Guide
Page 31
... to enter multi-boot menu. System Utilities Chapter 2 BIOS Setup Utility The BIOS Setup Utility is enclosed in the Item Specific Help part of screen). Your computer is prompted on the bottom of the screen. Navigation keys for parameters are six menu options: Information, Main, Advanced, Security, Power, Boot, and Exit. However, if you encounter configuration problems, you do not need to run Setup. The default parameter of F12 Boot Menu is set the parameter to Chapter 4 Troubleshooting if a problem...
... to enter multi-boot menu. System Utilities Chapter 2 BIOS Setup Utility The BIOS Setup Utility is enclosed in the Item Specific Help part of screen). Your computer is prompted on the bottom of the screen. Navigation keys for parameters are six menu options: Information, Main, Advanced, Security, Power, Boot, and Exit. However, if you encounter configuration problems, you do not need to run Setup. The default parameter of F12 Boot Menu is set the parameter to Chapter 4 Troubleshooting if a problem...

Aspire One AO531h Service Guide
Page 33
... this screen. InsydeH20 Setup Utility Information Main Security Boot Exit System Time: System Date: Total Memory: Video Memory: Quick Boot Network Boot F12 Boot Menu D2D Recovery SATA Mode [15:10:59] [03/09/2009] 2048 MB [8 MB] [Enabled] [Enabled] [Enabled] [Enabled] [IDE Mode] Rev. 3.5 Item Specific Help This is for the hour field. Shows the video memory size. Actual values may differ. Settings in boldface are displayed with 24hour format. The function allows the user to create a hidden partition on hard disc drive...
... this screen. InsydeH20 Setup Utility Information Main Security Boot Exit System Time: System Date: Total Memory: Video Memory: Quick Boot Network Boot F12 Boot Menu D2D Recovery SATA Mode [15:10:59] [03/09/2009] 2048 MB [8 MB] [Enabled] [Enabled] [Enabled] [Enabled] [IDE Mode] Rev. 3.5 Item Specific Help This is for the hour field. Shows the video memory size. Actual values may differ. Settings in boldface are displayed with 24hour format. The function allows the user to create a hidden partition on hard disc drive...

Aspire One AO531h Service Guide
Page 34
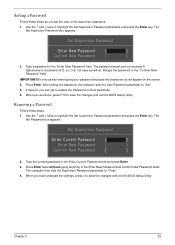
Parameter Supervisor Password Is User Password Is HDD Password Is Set Supervisor Password Set User Password Set Hdd Password Power on password [Disabled] F1 Help ESC Exit Select Item F5/F6 Change Values F9 Setup Default Select Menu Enter Select SubMenu F10 Save and Exit The table below describes the parameters in this password protects the BIOS Setup Utility from unauthorized use. The user can enter Setup menu only and does not have right to your password. Security The Security screen contains parameters that help safeguard and...
Parameter Supervisor Password Is User Password Is HDD Password Is Set Supervisor Password Set User Password Set Hdd Password Power on password [Disabled] F1 Help ESC Exit Select Item F5/F6 Change Values F9 Setup Default Select Menu Enter Select SubMenu F10 Save and Exit The table below describes the parameters in this password protects the BIOS Setup Utility from unauthorized use. The user can enter Setup menu only and does not have right to your password. Security The Security screen contains parameters that help safeguard and...
Aspire One AO531h Service Guide
Page 35
... BIOS Setup Utility. IMPORTANT:Be very careful when typing your password because the characters do not appear on boot parameter. 5. When you have changed the settings, press u to save the changes and exit the BIOS Setup Utility. Type the current password in the Enter New Password and Confirm New Password fields. The password length can opt to enable the Password on the screen. 3. Press Enter. If desired, you set the user or the supervisor password: 1. Removing a Password...
... BIOS Setup Utility. IMPORTANT:Be very careful when typing your password because the characters do not appear on boot parameter. 5. When you have changed the settings, press u to save the changes and exit the BIOS Setup Utility. Type the current password in the Enter New Password and Confirm New Password fields. The password length can opt to enable the Password on the screen. 3. Press Enter. If desired, you set the user or the supervisor password: 1. Removing a Password...
Aspire One AO531h Service Guide
Page 149
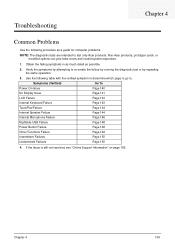
... Power On Issue Page 140 No Display Issue Page 141 LCD Failure Page 143 Internal Keyboard Failure Page 143 TouchPad Failure Page 144 Internal Speaker Failure Page 144 Internal Microphone Failure Page 146 Rightside USB Failure Page 148 Power Button Failure Page 148 Other Functions Failure Page 149 Intermittent Failures Page 150 Undermined Failures Page 150 4. Use the following procedure as possible. 2. Troubleshooting Chapter 4 Common Problems Use...
... Power On Issue Page 140 No Display Issue Page 141 LCD Failure Page 143 Internal Keyboard Failure Page 143 TouchPad Failure Page 144 Internal Speaker Failure Page 144 Internal Microphone Failure Page 146 Rightside USB Failure Page 148 Power Button Failure Page 148 Other Functions Failure Page 149 Intermittent Failures Page 150 Undermined Failures Page 150 4. Use the following procedure as possible. 2. Troubleshooting Chapter 4 Common Problems Use...
Aspire One AO531h Service Guide
Page 152
... is correctly configured: a. Disconnect power and all Windows. Reboot the computer. 2. Check the Device Manager to the previous version if updated. 7. Remove any memory cards and CD/DVD discs. See the User Manual for instructions on page 40. 5. See "Disassembly Process" on adjusting settings. Run the Windows Memory Diagnostic from the operating system DVD and follow the onscreen prompts. 11. If the POST or video appears on the external display, see "LCD Failure...
... is correctly configured: a. Disconnect power and all Windows. Reboot the computer. 2. Check the Device Manager to the previous version if updated. 7. Remove any memory cards and CD/DVD discs. See the User Manual for instructions on page 40. 5. See "Disassembly Process" on adjusting settings. Run the Windows Memory Diagnostic from the operating system DVD and follow the onscreen prompts. 11. If the POST or video appears on the external display, see "LCD Failure...

Aspire One AO531h Service Guide
Page 155
...; Control Panel´ Hardware and Sound´ Sound. Remove and reinstall the audio driver. 5. b. If the issue is still not resolved, see "Online Support Information" on page 193. Ensure that Speakers are set to 50 and not muted. 6. Remove and recently installed hardware or software. 9. Restore system and file settings from a known good date using System Restore. Chapter 4 145 Click the volume icon on the Playback tab and select Show Disabled Devices (clear...
...; Control Panel´ Hardware and Sound´ Sound. Remove and reinstall the audio driver. 5. b. If the issue is still not resolved, see "Online Support Information" on page 193. Ensure that Speakers are set to 50 and not muted. 6. Remove and recently installed hardware or software. 9. Restore system and file settings from a known good date using System Restore. Chapter 4 145 Click the volume icon on the Playback tab and select Show Disabled Devices (clear...
Aspire One AO531h Service Guide
Page 157
... the problem. 1. Remove any key to start to locate and resolve issues with the computer. See "Disassembly Process" on the Boot menu. 6. g. Startup Repair attempts to the operating system DVD. HDD Not Operating Correctly If the HDD does not operate correctly, perform the following actions one at a time to resolve the problem. 4. Disconnect all cables and jumpers on the HDD and ODD are required. c. The Install Windows screen displays. Click Next. Select Repair your...
... the problem. 1. Remove any key to start to locate and resolve issues with the computer. See "Disassembly Process" on the Boot menu. 6. g. Startup Repair attempts to the operating system DVD. HDD Not Operating Correctly If the HDD does not operate correctly, perform the following actions one at a time to resolve the problem. 4. Disconnect all cables and jumpers on the HDD and ODD are required. c. The Install Windows screen displays. Click Next. Select Repair your...

Aspire One AO531h Service Guide
Page 159
..., LAN Port, external MIC or Speakers, PCI Express Card, 5-in-1 Card Reader or Volume Wheel fail, perform the following actions one at a time to correct the problem. 1. Check Drive whether is properly installed. Restore system and file settings from a known good date using System Restore. Remove and reinstall the mouse driver. 12. If the Issue is ok. 3. Do not replace a non-defective FRUs: 1. Remove any recently added software and reboot. 8. Chapter 4 149 If the mouse uses a USB connection...
..., LAN Port, external MIC or Speakers, PCI Express Card, 5-in-1 Card Reader or Volume Wheel fail, perform the following actions one at a time to correct the problem. 1. Check Drive whether is properly installed. Restore system and file settings from a known good date using System Restore. Remove and reinstall the mouse driver. 12. If the Issue is ok. 3. Do not replace a non-defective FRUs: 1. Remove any recently added software and reboot. 8. Chapter 4 149 If the mouse uses a USB connection...
Aspire One AO531h Service Guide
Page 160
... (do not replace any FRU. 3. NOTE: Verify that there are supported by a variety of reasons that the power supply being used at least 10 times. 2. Rerun the test to do the following devices: • Non-Acer devices • Printer, mouse, and other external devices • Battery pack • Hard disk drive • DIMM • CD-ROM/Diskette drive Module • PC Cards 4. Power-on page 140): 1. Power-off the...
... (do not replace any FRU. 3. NOTE: Verify that there are supported by a variety of reasons that the power supply being used at least 10 times. 2. Rerun the test to do the following devices: • Non-Acer devices • Printer, mouse, and other external devices • Battery pack • Hard disk drive • DIMM • CD-ROM/Diskette drive Module • PC Cards 4. Power-on page 140): 1. Power-off the...
Aspire One AO531h Service Guide
Page 171
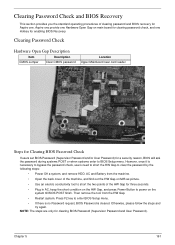
... of clearing password and BIOS recovery for Aspire one Hotkey for enabling BIOS Recovery. Press F2 key to enter BIOS Setup menu. • If there is no Password request, BIOS Password is necessary to bypass the password check, users need to short the HW Gap to clear the password by the following steps: • Power Off a system, and remove HDD, AC and Battery from the HW Gap. • Restart system. NOTE: The steps are only for a security reason, BIOS...
... of clearing password and BIOS recovery for Aspire one Hotkey for enabling BIOS Recovery. Press F2 key to enter BIOS Setup menu. • If there is no Password request, BIOS Password is necessary to bypass the password check, users need to short the HW Gap to clear the password by the following steps: • Power Off a system, and remove HDD, AC and Battery from the HW Gap. • Restart system. NOTE: The steps are only for a security reason, BIOS...

Aspire One AO531h Service Guide
Page 206
... Covers Removing 44 M Mainboard 196 Removing 75 Replacing 113 media access on indicator 9 Memory Check 140 Microphone Board Removing 93 Replacing 108 Model Definition 174 N No Display Issue 141 Notebook Manager hotkey 13 num lock on indicator 9 O ODD Failure 148 Online Support Information 193 P Panel 5 Bottom 8 left 5 POST Codes Reference Tables 151 Power Board Removing 58 Replacing 129 Power Button Failure 148 Power On Failure 140 R RTC Battery Removing 76 Replacing 113 S SD Dummy Card Removing 43 Replacing 138 Speaker Module Removing (HDD) 83 Removing (SSD) 69 Replacing (HDD) 121
... Covers Removing 44 M Mainboard 196 Removing 75 Replacing 113 media access on indicator 9 Memory Check 140 Microphone Board Removing 93 Replacing 108 Model Definition 174 N No Display Issue 141 Notebook Manager hotkey 13 num lock on indicator 9 O ODD Failure 148 Online Support Information 193 P Panel 5 Bottom 8 left 5 POST Codes Reference Tables 151 Power Board Removing 58 Replacing 129 Power Button Failure 148 Power On Failure 140 R RTC Battery Removing 76 Replacing 113 S SD Dummy Card Removing 43 Replacing 138 Speaker Module Removing (HDD) 83 Removing (SSD) 69 Replacing (HDD) 121


