
User Manual
Page 4
Table of contents Securing your computer 61 HDMI 66 Using passwords 61 Entering passwords 62 Universal Serial Bus (USB) 67 Connecting to a network 63 Playing DVD movies 68 Built-in network feature 63 BIOS utility 69 Wireless networks 64 Boot sequence 69 Connecting to the Internet 64 Enable disk-to-disk recovery 69 Acer Instant Connect 64 Setting passwords 69 Acer Instant Update 64 Frequently asked questions 70 Wireless networks 65 Requesting service 73 Troubleshooting 75 Troubleshooting tips 75 Error messages 75 Regulations and safety notices 77 4 -
Table of contents Securing your computer 61 HDMI 66 Using passwords 61 Entering passwords 62 Universal Serial Bus (USB) 67 Connecting to a network 63 Playing DVD movies 68 Built-in network feature 63 BIOS utility 69 Wireless networks 64 Boot sequence 69 Connecting to the Internet 64 Enable disk-to-disk recovery 69 Acer Instant Connect 64 Setting passwords 69 Acer Instant Update 64 Frequently asked questions 70 Wireless networks 65 Requesting service 73 Troubleshooting 75 Troubleshooting tips 75 Error messages 75 Regulations and safety notices 77 4 -

User Manual
Page 61
...touch with password checkpoints on bootup and resume from unauthorized access. See "BIOS utility" on Boot secures your computer and data: • Supervisor Password prevents unauthorized entry into the BIOS utility. Do not forget your computer - 61 Using passwords Passwords protect your... against unauthorized use . Combine the use of your computer against unauthorized use . Securing your Supervisor Password! Learn how to the BIOS utility. Setting these passwords creates several different levels of protection for maximum security. • Password on page 69. • User...
...touch with password checkpoints on bootup and resume from unauthorized access. See "BIOS utility" on Boot secures your computer and data: • Supervisor Password prevents unauthorized entry into the BIOS utility. Do not forget your computer - 61 Using passwords Passwords protect your... against unauthorized use . Combine the use of your computer against unauthorized use . Securing your Supervisor Password! Learn how to the BIOS utility. Setting these passwords creates several different levels of protection for maximum security. • Password on page 69. • User...

User Manual
Page 62
...; When the User Password is set , a prompt appears when you enter the password incorrectly, a warning message appears. If you fail to access the BIOS utility. If you enter the password incorrectly, a warning message appears. Securing your computer Entering passwords When a password is set, a password prompt appears in... Password is set and the password on the computer again, and try again. 62 - Important! If you press to enter the BIOS utility at boot-up . • Type the Supervisor Password and press to enter the password correctly after three tries, the system halts.
...; When the User Password is set , a prompt appears when you enter the password incorrectly, a warning message appears. If you fail to access the BIOS utility. If you enter the password incorrectly, a warning message appears. Securing your computer Entering passwords When a password is set, a password prompt appears in... Password is set and the password on the computer again, and try again. 62 - Important! If you press to enter the BIOS utility at boot-up . • Type the Supervisor Password and press to enter the password correctly after three tries, the system halts.
User Manual
Page 69
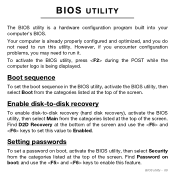
...and optimized, and you may need to run this utility. Enable disk-to-disk recovery To enable disk-to Enabled. BIOS utility - 69 Find Password on boot, activate the BIOS utility, then select Security from the categories listed at the top of the screen. Find D2D Recovery at the top ...use the and keys to enable this value to -disk recovery (hard disk recovery), activate the BIOS utility, then select Main from the categories listed at the bottom of the screen. To activate the BIOS utility, press during the POST while the computer logo is a hardware configuration program built into ...
...and optimized, and you may need to run this utility. Enable disk-to-disk recovery To enable disk-to Enabled. BIOS utility - 69 Find Password on boot, activate the BIOS utility, then select Security from the categories listed at the top of the screen. Find D2D Recovery at the top ...use the and keys to enable this value to -disk recovery (hard disk recovery), activate the BIOS utility, then select Main from the categories listed at the bottom of the screen. To activate the BIOS utility, press during the POST while the computer logo is a hardware configuration program built into ...

User Manual
Page 72
...to restore my computer to back up all data will be erased.) It is enabled or not. 2. Before performing a restore operation, please check the BIOS settings. 1. The printer does not work. Follow the steps below to rebuild your dealer or an authorized service center as the internal keyboard cable may...it works, contact your C: drive. (Your C: drive will be loose. If it is turned on the computer. Frequently asked questions Check to see if Acer disk-to a USB port on . • Make sure that the printer cable is installed when you first turn on the printer. Check the following:...
...to restore my computer to back up all data will be erased.) It is enabled or not. 2. Before performing a restore operation, please check the BIOS settings. 1. The printer does not work. Follow the steps below to rebuild your dealer or an authorized service center as the internal keyboard cable may...it works, contact your C: drive. (Your C: drive will be loose. If it is turned on the computer. Frequently asked questions Check to see if Acer disk-to a USB port on . • Make sure that the printer cable is installed when you first turn on the printer. Check the following:...
User Manual
Page 73
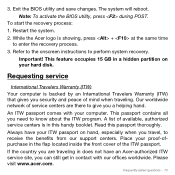
Note: To activate the BIOS utility, press during POST. Refer to the onscreen instructions to enter the recovery process. 3. Always have an Acer-authorized ITW service site, you can still get in a hidden partition on hand, especially when you a helping hand. Frequently asked questions -... located inside the front cover of available, authorized service centers is in does not have your ITW passport on your computer. 3. Exit the BIOS utility and save changes. Our worldwide network of mind when traveling. The system will reboot. Restart the system. 2. A list of the ITW...
Note: To activate the BIOS utility, press during POST. Refer to the onscreen instructions to enter the recovery process. 3. Always have an Acer-authorized ITW service site, you can still get in a hidden partition on hand, especially when you a helping hand. Frequently asked questions -... located inside the front cover of available, authorized service centers is in does not have your ITW passport on your computer. 3. Exit the BIOS utility and save changes. Our worldwide network of mind when traveling. The system will reboot. Restart the system. 2. A list of the ITW...

User Manual
Page 76
... interface error Memory size mismatch Contact your dealer or an authorized service center for assistance. 76 - Press (during POST) to enter the BIOS utility, then press Exit in the BIOS utility to reboot. Keyboard error or no Contact your dealer or an authorized service center. Contact your dealer or an authorized service...
... interface error Memory size mismatch Contact your dealer or an authorized service center for assistance. 76 - Press (during POST) to enter the BIOS utility, then press Exit in the BIOS utility to reboot. Keyboard error or no Contact your dealer or an authorized service center. Contact your dealer or an authorized service...


