Acer Aspire 8951G Notebook Service Guide
Page 8
...3-16 Touchpad Installation 3-17 ODD (Optical Disk Drive) Module Removal 3-18 ODD Module Installation 3-20 Keyboard Assembly Removal 3-21 Keyboard Assembly Installation 3-24 Keyboard Removal 3-26 Keyboard Installation 3-27 Function Board Removal 3-28 Function Board Installation 3-29 Upper Cover DIMM Module Removal 3-30 Upper Cover DIMM Module Installation 3-31 Power Board Removal 3-32 Power Board Installation 3-32 Upper Cover Removal 3-33 Upper Cover Installation 3-37 Fingerprint Scanner Removal 3-39 Fingerprint Scanner Installation 3-40 Bluetooth Module Removal 3-41 Bluetooth...
...3-16 Touchpad Installation 3-17 ODD (Optical Disk Drive) Module Removal 3-18 ODD Module Installation 3-20 Keyboard Assembly Removal 3-21 Keyboard Assembly Installation 3-24 Keyboard Removal 3-26 Keyboard Installation 3-27 Function Board Removal 3-28 Function Board Installation 3-29 Upper Cover DIMM Module Removal 3-30 Upper Cover DIMM Module Installation 3-31 Power Board Removal 3-32 Power Board Installation 3-32 Upper Cover Removal 3-33 Upper Cover Installation 3-37 Fingerprint Scanner Removal 3-39 Fingerprint Scanner Installation 3-40 Bluetooth Module Removal 3-41 Bluetooth...
Acer Aspire 8951G Notebook Service Guide
Page 9
... 4-5 LCD Failure 4-7 Keyboard Failure 4-8 Touchpad Failure 4-9 Internal Speaker Failure 4-10 Microphone Failure 4-12 USB Failure 4-13 Other Functions Failure 4-14 ODD Failure 4-15 Intermittent Problems 4-21 Undetermined Problems 4-21 Post Codes 4-22 CHAPTER 5 Jumper and Connector Locations Mainboard 5-3 Clearing Password and BIOS Recovery 5-6 Clearing Password 5-6 BIOS Recovery by Crisis Disk 5-8 CHAPTER 6 FRU (Field Replaceable Unit) List Exploded Diagrams 6-4 Main Assembly 6-4 FRU List 6-6 Screw List 6-15 CHAPTER 7 Model Definition and Configuration Aspire 8951G 7-3 ix
... 4-5 LCD Failure 4-7 Keyboard Failure 4-8 Touchpad Failure 4-9 Internal Speaker Failure 4-10 Microphone Failure 4-12 USB Failure 4-13 Other Functions Failure 4-14 ODD Failure 4-15 Intermittent Problems 4-21 Undetermined Problems 4-21 Post Codes 4-22 CHAPTER 5 Jumper and Connector Locations Mainboard 5-3 Clearing Password and BIOS Recovery 5-6 Clearing Password 5-6 BIOS Recovery by Crisis Disk 5-8 CHAPTER 6 FRU (Field Replaceable Unit) List Exploded Diagrams 6-4 Main Assembly 6-4 FRU List 6-6 Screw List 6-15 CHAPTER 7 Model Definition and Configuration Aspire 8951G 7-3 ix

Acer Aspire 8951G Notebook Service Guide
Page 22
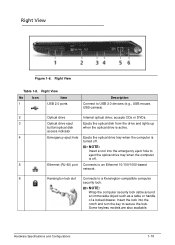
...8 Acer Bio-Protection Supports Acer FingerNav 4-way control function Fingerprint reader (only for certain models). 9 Speakers Deliver stereo audio output. 10 Power button Turns the computer on and off. 11 Microphone Internal microphone for Acer clear.fi, volume (up, down) and media (play/ pause, previous, next, stop). * Touchpad becomes inactive when media console is charging. Fully charged: The light shows blue when in Windows. Starts clear.fi in AC mode. Table 1-1. HDD indicator Indicates when the hard disk drive is closed. 1-12 Hardware Specifications and...
...8 Acer Bio-Protection Supports Acer FingerNav 4-way control function Fingerprint reader (only for certain models). 9 Speakers Deliver stereo audio output. 10 Power button Turns the computer on and off. 11 Microphone Internal microphone for Acer clear.fi, volume (up, down) and media (play/ pause, previous, next, stop). * Touchpad becomes inactive when media console is charging. Fully charged: The light shows blue when in Windows. Starts clear.fi in AC mode. Table 1-1. HDD indicator Indicates when the hard disk drive is closed. 1-12 Hardware Specifications and...
Acer Aspire 8951G Notebook Service Guide
Page 24
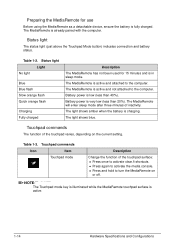
... light Blue Blue flash Slow orange flash Quick orange flash Charging Fully charged Description The MediaRemote has not been used for use 0 Before using the MediaRemote as a detachable device, ensure the battery is in sleep mode. Battery power is very low (less than 40%). The light shows blue. Touchpad commands Icon Item Touchpad mode Description Change the function of the touchpad surface: Press once to activate clear.fi shortcuts. Press again to activate the media...
... light Blue Blue flash Slow orange flash Quick orange flash Charging Fully charged Description The MediaRemote has not been used for use 0 Before using the MediaRemote as a detachable device, ensure the battery is in sleep mode. Battery power is very low (less than 40%). The light shows blue. Touchpad commands Icon Item Touchpad mode Description Change the function of the touchpad surface: Press once to activate clear.fi shortcuts. Press again to activate the media...
Acer Aspire 8951G Notebook Service Guide
Page 28
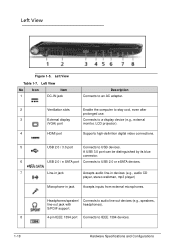
... jack Accepts audio line-in devices (e.g., audio CD player, stereo walkman, mp3 player) Microphone-in jack Accepts inputs from external microphones. Headphones/speaker/ Connects to USB devices. Left View Table 1-7. Left View No Icon Item 1 DC-IN jack Description Connects to an AC adapter. 2 Ventilation slots Enable the computer to stay cool, even after prolonged use. 3 External display Connects to a display device (e.g., external (VGA) port monitor, LCD projector). 4 HDMI port Supports high-definition digital video connections. 5 USB 2.0 / 3.0 port Connects...
... jack Accepts audio line-in devices (e.g., audio CD player, stereo walkman, mp3 player) Microphone-in jack Accepts inputs from external microphones. Headphones/speaker/ Connects to USB devices. Left View Table 1-7. Left View No Icon Item 1 DC-IN jack Description Connects to an AC adapter. 2 Ventilation slots Enable the computer to stay cool, even after prolonged use. 3 External display Connects to a display device (e.g., external (VGA) port monitor, LCD projector). 4 HDMI port Supports high-definition digital video connections. 5 USB 2.0 / 3.0 port Connects...
Acer Aspire 8951G Notebook Service Guide
Page 29
... the drive and lights up button/optical disk when the optical drive is off . Hardware Specifications and Configurations 1-19 NOTE: Insert a tool into the notch and turn the key to a Kensington-compatible computer security lock. NOTE: Wrap the computer security lock cable around an immovable object such as a table or handle of a locked drawer. Insert the lock into the emergency eject hole to USB 2.0 devices (e.g., USB mouse, USB camera). 2 Optical drive Internal optical drive...
... the drive and lights up button/optical disk when the optical drive is off . Hardware Specifications and Configurations 1-19 NOTE: Insert a tool into the notch and turn the key to a Kensington-compatible computer security lock. NOTE: Wrap the computer security lock cable around an immovable object such as a table or handle of a locked drawer. Insert the lock into the emergency eject hole to USB 2.0 devices (e.g., USB mouse, USB camera). 2 Optical drive Internal optical drive...
Acer Aspire 8951G Notebook Service Guide
Page 32
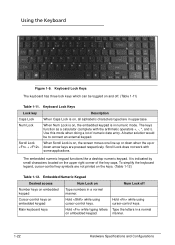
... Hardware Specifications and Configurations Use this mode when doing a lot of the key caps. Scroll Lock does not work with the arithmetic operators +, -, *, and /). Hold while using cursor-control keys. Using the Keyboard 0 Figure 1-9. Keyboard Lock Keys Lock key Description Caps Lock When Caps Lock is in a normal manner. Keyboard Lock Keys The keyboard has three lock keys which can be to connect an external keypad. The keys function as a calculator (complete with some applications. Scroll Lock When Scroll Lock is indicated by small characters located on , the screen...
... Hardware Specifications and Configurations Use this mode when doing a lot of the key caps. Scroll Lock does not work with the arithmetic operators +, -, *, and /). Hold while using cursor-control keys. Using the Keyboard 0 Figure 1-9. Keyboard Lock Keys Lock key Description Caps Lock When Caps Lock is in a normal manner. Keyboard Lock Keys The keyboard has three lock keys which can be to connect an external keypad. The keys function as a calculator (complete with some applications. Scroll Lock When Scroll Lock is indicated by small characters located on , the screen...
Acer Aspire 8951G Notebook Service Guide
Page 33
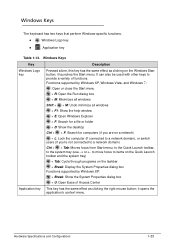
... the system tray (use or to move focus to provide a variety of Access Center Application key This key has the same effect as clicking on the Windows Start button; Hardware Specifications and Configurations 1-23 Windows Keys 0 The keyboard has two keys that perform Windows-specific functions. Windows Logo key Application key Table 1-13. Functions supported by Windows XP: + Break: Show the System Properties dialog box + U: Open Ease of...
... the system tray (use or to move focus to provide a variety of Access Center Application key This key has the same effect as clicking on the Windows Start button; Hardware Specifications and Configurations 1-23 Windows Keys 0 The keyboard has two keys that perform Windows-specific functions. Windows Logo key Application key Table 1-13. Functions supported by Windows XP: + Break: Show the System Properties dialog box + U: Open Ease of...
Acer Aspire 8951G Notebook Service Guide
Page 34
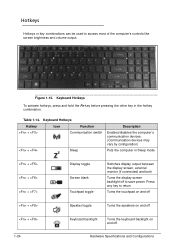
... any key to access most of the computer's controls like screen brightness and volume output. Keyboard Hotkeys Hotkey Icon Function + Communication switch + Sleep Description Enables/disables the computer's communication devices. (Communication devices may vary by configuration) Puts the computer in the hotkey combination. Keyboard Hotkeys To activate hotkeys, press and hold the Fn key before pressing the other key in Sleep mode + + + Display toggle Screen blank Touchpad toggle Switches display output between the display screen, external monitor (if connected) and...
... any key to access most of the computer's controls like screen brightness and volume output. Keyboard Hotkeys Hotkey Icon Function + Communication switch + Sleep Description Enables/disables the computer's communication devices. (Communication devices may vary by configuration) Puts the computer in the hotkey combination. Keyboard Hotkeys To activate hotkeys, press and hold the Fn key before pressing the other key in Sleep mode + + + Display toggle Screen blank Touchpad toggle Switches display output between the display screen, external monitor (if connected) and...
Acer Aspire 8951G Notebook Service Guide
Page 46
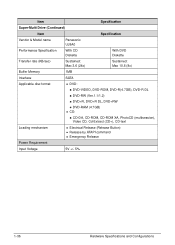
... SATA Applicable disc format DVD: DVD-VIDEO, DVD-ROM, DVD-R(4.7GB), DVD-R DL DVD-RW (Ver.1.1/1.2) DVD+R, DVD+R DL, DVD+RW DVD-RAM (4.7GB) CD: CD-DA, CD-ROM, CD-ROM XA, PhotoCD (multisession), Video CD, Cd-Extract (CD+), CD-text Loading mechanism Electrical Release (Release Button) Release by ATAPI command Emergency Release Power Requirement Input Voltage 5V +/- 5% 1-36 Hardware Specifications and Configurations
... SATA Applicable disc format DVD: DVD-VIDEO, DVD-ROM, DVD-R(4.7GB), DVD-R DL DVD-RW (Ver.1.1/1.2) DVD+R, DVD+R DL, DVD+RW DVD-RAM (4.7GB) CD: CD-DA, CD-ROM, CD-ROM XA, PhotoCD (multisession), Video CD, Cd-Extract (CD+), CD-text Loading mechanism Electrical Release (Release Button) Release by ATAPI command Emergency Release Power Requirement Input Voltage 5V +/- 5% 1-36 Hardware Specifications and Configurations
Acer Aspire 8951G Notebook Service Guide
Page 73
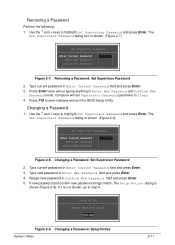
... 2-9. Type current password in Enter New Password field and press Enter. 4. Use the and keys to step 6. Press Enter twice without typing anything in Enter Current Password field and press Enter. 3. Type current password in Enter New Password and Confirm New Password fields. Removing a Password: Set Supervisor Password 2. Press F10 to Clear. 4. Retype new password in Confirm New Password field and press Enter. 5. Computer will set Supervisor Password parameter to save changes and exit the BIOS Setup Utility. Use the and keys to...
... 2-9. Type current password in Enter New Password field and press Enter. 4. Use the and keys to step 6. Press Enter twice without typing anything in Enter Current Password field and press Enter. 3. Type current password in Enter New Password and Confirm New Password fields. Removing a Password: Set Supervisor Password 2. Press F10 to Clear. 4. Retype new password in Confirm New Password field and press Enter. 5. Computer will set Supervisor Password parameter to save changes and exit the BIOS Setup Utility. Use the and keys to...
Acer Aspire 8951G Notebook Service Guide
Page 94
... Maintenance Flowchart 3-6 Getting Started 3-7 Dummy Card Removal 3-8 Dummy Card Installation 3-8 Logic Door Removal 3-9 Logic Door Installation 3-9 Battery Cable Removal 3-11 Battery Cable Installation 3-11 Lower Cover DIMM Module Removal 3-12 Lower Cover DIMM Module Installation 3-12 Main HDD (Hard Disk Drive) Module Removal 3-13 HDD Module Installation 3-13 HDD Brackets Removal 3-14 HDD Brackets Installation 3-14 WLAN Module Removal 3-15 WLAN Module Installation 3-15 Touchpad Removal 3-16 Touchpad Installation 3-17 ODD (Optical Disk Drive) Module Removal 3-18 ODD Module...
... Maintenance Flowchart 3-6 Getting Started 3-7 Dummy Card Removal 3-8 Dummy Card Installation 3-8 Logic Door Removal 3-9 Logic Door Installation 3-9 Battery Cable Removal 3-11 Battery Cable Installation 3-11 Lower Cover DIMM Module Removal 3-12 Lower Cover DIMM Module Installation 3-12 Main HDD (Hard Disk Drive) Module Removal 3-13 HDD Module Installation 3-13 HDD Brackets Removal 3-14 HDD Brackets Installation 3-14 WLAN Module Removal 3-15 WLAN Module Installation 3-15 Touchpad Removal 3-16 Touchpad Installation 3-17 ODD (Optical Disk Drive) Module Removal 3-18 ODD Module...
Acer Aspire 8951G Notebook Service Guide
Page 157
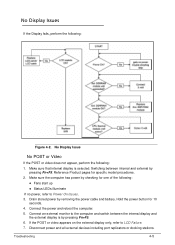
... seconds. 4. Make sure the computer has power by removing the power cable and battery. If the POST or video appears on the external display only, refer to the computer and switch between internal and external by pressing Fn+F5. 6. Switching between the internal display and the external display is selected. Hold the power button for specific model procedures. 2. Troubleshooting 4-5 Make sure that internal display is by pressing Fn+F5. Connect an external monitor to LCD Failure. 7. No Display Issue No...
... seconds. 4. Make sure the computer has power by removing the power cable and battery. If the POST or video appears on the external display only, refer to the computer and switch between internal and external by pressing Fn+F5. 6. Switching between the internal display and the external display is selected. Hold the power button for specific model procedures. 2. Troubleshooting 4-5 Make sure that internal display is by pressing Fn+F5. Connect an external monitor to LCD Failure. 7. No Display Issue No...
Acer Aspire 8951G Notebook Service Guide
Page 158
... to Online Support Information. Refer to Maintenance Flowchart. If the display is too dim at the highest brightness setting, the LCD is discovered. 9. Readjust if necessary. 4. Remove and reinstall the video driver. 6. Adjust the brightness to Maintenance Flowchart). 11. Check the Device Manager to Maintenance Flowchart. If extensive pixel damage is present (different colored spots in the same locations on the screen), the LCD is not...
... to Online Support Information. Refer to Maintenance Flowchart. If the display is too dim at the highest brightness setting, the LCD is discovered. 9. Readjust if necessary. 4. Remove and reinstall the video driver. 6. Adjust the brightness to Maintenance Flowchart). 11. Check the Device Manager to Maintenance Flowchart. If extensive pixel damage is present (different colored spots in the same locations on the screen), the LCD is not...

Acer Aspire 8951G Notebook Service Guide
Page 166
... boot device on -screen information to resolve the problem. 1. Run a complete virus scan using System Restore. 8. Run the Windows Vista Startup Repair Utility: a. d. If the issue is discovered, follow the on the Boot menu. 3. Replace the HDD. (Refer to confirm the computer is set correctly. 4. Select Repair your computer. When the System Recovery Options screen appears, click Next. Select Startup Repair. h. When complete, click Finish. Run the Windows Memory Diagnostic Tool. Remove any key to start to locate...
... boot device on -screen information to resolve the problem. 1. Run a complete virus scan using System Restore. 8. Run the Windows Vista Startup Repair Utility: a. d. If the issue is discovered, follow the on the Boot menu. 3. Replace the HDD. (Refer to confirm the computer is set correctly. 4. Select Repair your computer. When the System Recovery Options screen appears, click Next. Select Startup Repair. h. When complete, click Finish. Run the Windows Memory Diagnostic Tool. Remove any key to start to locate...
Acer Aspire 8951G Notebook Service Guide
Page 170
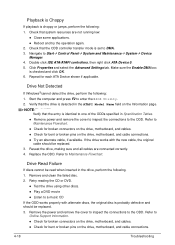
... cable connections. 4-18 Troubleshooting Refer to enter the BIOS Utility. 2. Make sure the Enable DMA box is identical to the ODD. NOTE: NOTE: Verify that the ODD controller transfer mode is probably defective and should be replaced. 3. Refer to Maintenance Flowchart. Drive Read Failure 0 If discs cannot be replaced. 3. If the drive works with alternate discs, the original disc is set to a music CD If the ODD works properly with the new cable...
... cable connections. 4-18 Troubleshooting Refer to enter the BIOS Utility. 2. Make sure the Enable DMA box is identical to the ODD. NOTE: NOTE: Verify that the ODD controller transfer mode is probably defective and should be replaced. 3. Refer to Maintenance Flowchart. Drive Read Failure 0 If discs cannot be replaced. 3. If the drive works with alternate discs, the original disc is set to a music CD If the ODD works properly with the new cable...
Acer Aspire 8951G Notebook Service Guide
Page 172
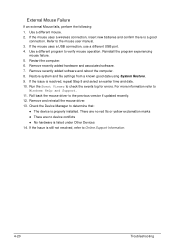
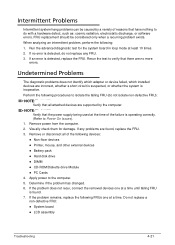
.... External Mouse Failure 0 If an external Mouse fails, perform the following: 1. If the mouse uses a wireless connection, insert new batteries and confirm there is listed under Other Devices 14. If the mouse uses a USB connection, use a different USB port. 4. Restore system and file settings from a known good date using System Restore. 9. Remove recently added hardware and associated software. 7. Use a different mouse. 2. If the issue is still not resolved, refer to Online Support Information. 4-20 Troubleshooting Check the Device Manager to Windows Help and Support...
.... External Mouse Failure 0 If an external Mouse fails, perform the following: 1. If the mouse uses a wireless connection, insert new batteries and confirm there is listed under Other Devices 14. If the mouse uses a USB connection, use a different USB port. 4. Restore system and file settings from a known good date using System Restore. 9. Remove recently added hardware and associated software. 7. Use a different mouse. 2. If the issue is still not resolved, refer to Online Support Information. 4-20 Troubleshooting Check the Device Manager to Windows Help and Support...
Acer Aspire 8951G Notebook Service Guide
Page 173
...;Non-Acer devices Printer, mouse, and other external devices Battery pack Hard disk drive DIMM CD-ROM/Diskette drive Module PC Cards 4. Determine if the problem has changed. 6. Rerun the test to isolate the failing FRU (do with a hardware defect, such as: cosmic radiation, electrostatic discharge, or software errors. Remove power from the computer. 2. If the problem remains, replace the...
...;Non-Acer devices Printer, mouse, and other external devices Battery pack Hard disk drive DIMM CD-ROM/Diskette drive Module PC Cards 4. Determine if the problem has changed. 6. Rerun the test to isolate the failing FRU (do with a hardware defect, such as: cosmic radiation, electrostatic discharge, or software errors. Remove power from the computer. 2. If the problem remains, replace the...

Acer Aspire 8951G Notebook Service Guide
Page 174
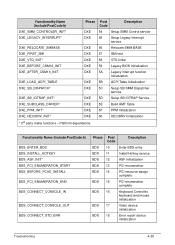
... switch to Protected mode SEC 02 Patching CPU microcode SEC 03 Setup Cache as RAM SEC 04 PCIE MMIO Base Address initial SEC 05 CPU Generic MSR initialization SEC 06 Setup CPU speed SEC 07 Cache as RAM test SEC 08 Tune CPU frequency ratio to maximum level SEC 09 Setup BIOS ROM cache 4-22 Troubleshooting Post Codes 0 The following are the InsydeH2O™ Functionality POST code...
... switch to Protected mode SEC 02 Patching CPU microcode SEC 03 Setup Cache as RAM SEC 04 PCIE MMIO Base Address initial SEC 05 CPU Generic MSR initialization SEC 06 Setup CPU speed SEC 07 Cache as RAM test SEC 08 Tune CPU frequency ratio to maximum level SEC 09 Setup BIOS ROM cache 4-22 Troubleshooting Post Codes 0 The following are the InsydeH2O™ Functionality POST code...
Acer Aspire 8951G Notebook Service Guide
Page 177
... Enter BDS entry BDS 11 Install Hotkey service BDS 12 ASF Initialization BDS 13 PCI enumeration BDS 14 PCI resource assign complete BDS 15 PCI enumeration complete BDS 16 Keyboard Controller, keyboard and mouse initialization BDS 17 Video device initialization BDS 18 Error report device initialization Troubleshooting 4-25 Functionality Name (Include\PostCode.h) Phase Post Code Description DXE_SMM_CONTROLER_INIT* DXE 54 Setup SMM Control service DXE_LEGACY_INTERRUPT* DXE 55 Setup Legacy Interrupt service...
... Enter BDS entry BDS 11 Install Hotkey service BDS 12 ASF Initialization BDS 13 PCI enumeration BDS 14 PCI resource assign complete BDS 15 PCI enumeration complete BDS 16 Keyboard Controller, keyboard and mouse initialization BDS 17 Video device initialization BDS 18 Error report device initialization Troubleshooting 4-25 Functionality Name (Include\PostCode.h) Phase Post Code Description DXE_SMM_CONTROLER_INIT* DXE 54 Setup SMM Control service DXE_LEGACY_INTERRUPT* DXE 55 Setup Legacy Interrupt service...


