Acer Aspire 7740 Keyboard Removal
Related Manual Pages


Similar Questions

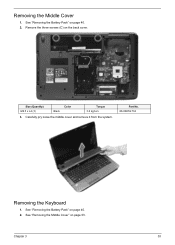
How To Remove Keyboard And Replace It?
how to remove keyboard and replace it? help please
how to remove keyboard and replace it? help please
(Posted by sergiut11 9 years ago)


What F Keyboard Key To Aspire 7740-5691 Restore At Startup
(Posted by mandbren 9 years ago)

How To Video On Replacing Keyboard On Aspire 4743-4861
Need necessary steps on keyboard removal and install.
Need necessary steps on keyboard removal and install.
(Posted by justinpoky 10 years ago)
