

Acer Aspire 7250 Service Guide
Page 3
Privacy Control 0 BIOS user, supervisor, HDD passwords Kensington lock slot Dimensions and Weight 0 Dimensions 0 414.75 (W) x 275(D) x 34.3(H) mm (16.3 x 10.8 x 1.35 inches) Weight 0 2.7 kg (5.95 lbs.) with 6-... Battery 0 48Wh 4400 mAh 6-cell Li-ion standard battery pack Battery life: 4 hours ENERGY STAR® Special Keys and Controls 0 Keyboard 0 103-/104-/107-key Acer Finetip keyboard with independent standard numeric keypad, international language support Touchpad 0 Multi-gesture function, supporting two-finger scroll, pinch, rotate, flip Media keys 0 Media control...
Privacy Control 0 BIOS user, supervisor, HDD passwords Kensington lock slot Dimensions and Weight 0 Dimensions 0 414.75 (W) x 275(D) x 34.3(H) mm (16.3 x 10.8 x 1.35 inches) Weight 0 2.7 kg (5.95 lbs.) with 6-... Battery 0 48Wh 4400 mAh 6-cell Li-ion standard battery pack Battery life: 4 hours ENERGY STAR® Special Keys and Controls 0 Keyboard 0 103-/104-/107-key Acer Finetip keyboard with independent standard numeric keypad, international language support Touchpad 0 Multi-gesture function, supporting two-finger scroll, pinch, rotate, flip Media keys 0 Media control...
Acer Aspire 7250 Service Guide
Page 23
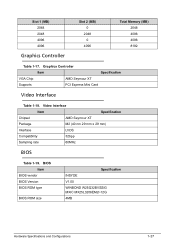
... Item Specification VGA Chip AMD Seymour XT Supports PCI Express Mini Card Video Interface 0 Table 1-18. BIOS Item BIOS vendor BIOS Version BIOS ROM type BIOS ROM size Specification INSYDE V1.00 WINBOND W25Q32BVSSIG MXIC MX25L3206EM2I-12G 4MB Hardware Specifications and Configurations 1-27 Video... Interface Item Specification Chipset AMD Seymour XT Package M2 (40 nm 29 mm x 29 mm) Interface LVDS Compatibility 32bpp Sampling rate 60MHz BIOS 0 Table 1-19. Slot 1 (MB) 2048 2048 4096 4096 Graphics Controller Slot 2 (MB) 0 2048 0 4096 Total Memory (MB) 2048...
... Item Specification VGA Chip AMD Seymour XT Supports PCI Express Mini Card Video Interface 0 Table 1-18. BIOS Item BIOS vendor BIOS Version BIOS ROM type BIOS ROM size Specification INSYDE V1.00 WINBOND W25Q32BVSSIG MXIC MX25L3206EM2I-12G 4MB Hardware Specifications and Configurations 1-27 Video... Interface Item Specification Chipset AMD Seymour XT Package M2 (40 nm 29 mm x 29 mm) Interface LVDS Compatibility 32bpp Sampling rate 60MHz BIOS 0 Table 1-19. Slot 1 (MB) 2048 2048 4096 4096 Graphics Controller Slot 2 (MB) 0 2048 0 4096 Total Memory (MB) 2048...
Acer Aspire 7250 Service Guide
Page 24
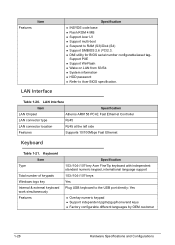
... Features Supports 10/100Mbps Fast Ethernet Keyboard 0 Table 1-21. Features Item LAN Interface Specification INSYDE code base Flash ROM 4 MB Support Acer UI Support multi-boot Suspend to the USB port directly: Yes Overlay numeric keypad Support independent pgdn/pgup/home/end keys Factory configurable different... languages by OEM customer 1-28 Hardware Specifications and Configurations DMI utility for BIOS serial number configurable/asset tagSupport PXE Support WinFlash Wake on LAN from S3/S4 System information HDD password Refer to...
... Features Supports 10/100Mbps Fast Ethernet Keyboard 0 Table 1-21. Features Item LAN Interface Specification INSYDE code base Flash ROM 4 MB Support Acer UI Support multi-boot Suspend to the USB port directly: Yes Overlay numeric keypad Support independent pgdn/pgup/home/end keys Factory configurable different... languages by OEM customer 1-28 Hardware Specifications and Configurations DMI utility for BIOS serial number configurable/asset tagSupport PXE Support WinFlash Wake on LAN from S3/S4 System information HDD password Refer to...
Acer Aspire 7250 Service Guide
Page 37
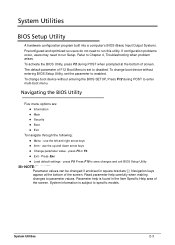
...NOTE: Parameter values can be changed if enclosed in the Item Specific Help area of the screen. To change boot device without entering the BIOS SETUP, Press F12 during POST when prompted at the bottom of the screen. use the up and down arrow keys Change parameter value - ...Navigation keys appear at the bottom of F12 Boot Menu is set the parameter to run Setup. Navigating the BIOS Utility 0 Five menu options are: Information Main Security Boot Exit To navigate through the following: Menu - If configuration problems occur, users may ...
...NOTE: Parameter values can be changed if enclosed in the Item Specific Help area of the screen. To change boot device without entering the BIOS SETUP, Press F12 during POST when prompted at the bottom of the screen. use the up and down arrow keys Change parameter value - ...Navigation keys appear at the bottom of F12 Boot Menu is set the parameter to run Setup. Navigating the BIOS Utility 0 Five menu options are: Information Main Security Boot Exit To navigate through the following: Menu - If configuration problems occur, users may ...

Acer Aspire 7250 Service Guide
Page 38
BIOS Information 2-4 System Utilities Information 0 This tab shows a summary of the tabs found on the InsydeH20 Setup Utility screen: NOTE: NOTE: The screens provided are for reference only. Actual values may differ by model. BIOS 0 The following is a description of computer hardware information. Figure 2-1.
BIOS Information 2-4 System Utilities Information 0 This tab shows a summary of the tabs found on the InsydeH20 Setup Utility screen: NOTE: NOTE: The screens provided are for reference only. Actual values may differ by model. BIOS 0 The following is a description of computer hardware information. Figure 2-1.

Acer Aspire 7250 Service Guide
Page 39
... Computing Environment (DCE). UUID Number Universally Unique Identifier (UUID) is an identifier standard used in Figure 2-1 Table 2-1. CPU Speed The speed of the system. VGA BIOS Version The VGA firmware version of the CPU. System BIOS Version Displays system BIOS version. Product Name The product name of the system.
... Computing Environment (DCE). UUID Number Universally Unique Identifier (UUID) is an identifier standard used in Figure 2-1 Table 2-1. CPU Speed The speed of the system. VGA BIOS Version The VGA firmware version of the CPU. System BIOS Version Displays system BIOS version. Product Name The product name of the system.

Acer Aspire 7250 Service Guide
Page 40
BIOS Main Parameter Description System Time Sets the system time. Total Memory Shows the total memory available. Figure 2-2. Table 2-2. BIOS Main Table 2-2 describes the parameters shown in Figure 2-2. The hours are shown with 24-hour format. Video Memory Shows the available memory for Video. 2-6 Format/Option Format: HH:MM:SS (hour:minute:second) Format MM/DD/YYYY (month/day/year) N/A N/A System Utilities System Date Sets the system date. Main 0 This tab allows the user to set system time and date, enable or disable boot option and enable or disable recovery.
BIOS Main Parameter Description System Time Sets the system time. Total Memory Shows the total memory available. Figure 2-2. Table 2-2. BIOS Main Table 2-2 describes the parameters shown in Figure 2-2. The hours are shown with 24-hour format. Video Memory Shows the available memory for Video. 2-6 Format/Option Format: HH:MM:SS (hour:minute:second) Format MM/DD/YYYY (month/day/year) N/A N/A System Utilities System Date Sets the system date. Main 0 This tab allows the user to set system time and date, enable or disable boot option and enable or disable recovery.
Acer Aspire 7250 Service Guide
Page 41
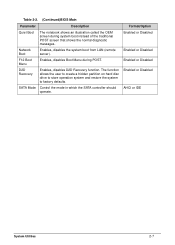
Table 2-2. (Continued)BIOS Main Parameter Description Format/Option Quiet Boot The notebook shows an illustration called the OEM screen during POST. Enabled or Disabled SATA Mode Control the ...
Table 2-2. (Continued)BIOS Main Parameter Description Format/Option Quiet Boot The notebook shows an illustration called the OEM screen during POST. Enabled or Disabled SATA Mode Control the ...
Acer Aspire 7250 Service Guide
Page 42
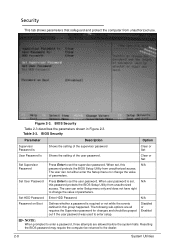
...Set Supervisor Password Press Enter to enter setup. N/A Password on Boot Defines whether a password is set , this group happened. Resetting the BIOS password may require the computer be grayed out if the user password was used to set the user password. Security 0 This tab shows ...password. Set HDD Password Enter HDD Password. Figure 2-3. When user password is required or not while the events defined in Figure 2-3. BIOS Security Parameter Description Option Supervisor Password Is Shows the setting of the supervisor password Clear or Set User Password Is Shows the setting ...
...Set Supervisor Password Press Enter to enter setup. N/A Password on Boot Defines whether a password is set , this group happened. Resetting the BIOS password may require the computer be grayed out if the user password was used to set the user password. Security 0 This tab shows ...password. Set HDD Password Enter HDD Password. Figure 2-3. When user password is required or not while the events defined in Figure 2-3. BIOS Security Parameter Description Option Supervisor Password Is Shows the setting of the supervisor password Clear or Set User Password Is Shows the setting ...

Acer Aspire 7250 Service Guide
Page 43
... press Enter. 3. After setting the password, the computer sets the User Password parameter to save changes and exit the BIOS Setup Utility. Removing a Password 0 Perform the following to save changes and exit the BIOS Setup Utility. Press Enter twice without typing anything in the Confirm New Password field. + IMPORTANT: Use care when...
... press Enter. 3. After setting the password, the computer sets the User Password parameter to save changes and exit the BIOS Setup Utility. Removing a Password 0 Perform the following to save changes and exit the BIOS Setup Utility. Press Enter twice without typing anything in the Confirm New Password field. + IMPORTANT: Use care when...

Acer Aspire 7250 Service Guide
Page 44
... will show the Setup Warning (Figure 2-9). 2-10 System Utilities Figure 2-6. Figure 2-7. Changing a Password 0 1. Use the ↑ and ↓ keys to save changes and exit the BIOS Setup Utility. The computer sets User Password parameter to Set. Figure 2-8.
... will show the Setup Warning (Figure 2-9). 2-10 System Utilities Figure 2-6. Figure 2-7. Changing a Password 0 1. Use the ↑ and ↓ keys to save changes and exit the BIOS Setup Utility. The computer sets User Password parameter to Set. Figure 2-8.

Acer Aspire 7250 Service Guide
Page 46
Bootable devices include the: USB diskette drives Onboard hard disk drive DVD drive in the module bay Use ↑ and ↓ keys to select a device and press F5 or F6 to load the operating system. Figure 2-10. BIOS Boot 2-12 System Utilities Boot 0 This tab allows changes to the order of boot devices used to move it up or down the list.
Bootable devices include the: USB diskette drives Onboard hard disk drive DVD drive in the module bay Use ↑ and ↓ keys to select a device and press F5 or F6 to load the operating system. Figure 2-10. BIOS Boot 2-12 System Utilities Boot 0 This tab allows changes to the order of boot devices used to move it up or down the list.

Acer Aspire 7250 Service Guide
Page 47
Exit 0 The Exit tab allows users to save changes to . Exit Parameters Parameter Description Exit Saving Changes Exit System Setup and save or discard changes and quit the BIOS Utility. System Utilities 2-13 Load Setup Default Load default values for all setup items. Save Changes Save setup data. Figure 2-11. Table 2-4. Discard Changes Load previous values all setup item. Exit Discarding Changes Exit utility without saving setup data to the system. BIOS Exit Table 2-4 describes the parameters in Figure 2-11.
Exit 0 The Exit tab allows users to save changes to . Exit Parameters Parameter Description Exit Saving Changes Exit System Setup and save or discard changes and quit the BIOS Utility. System Utilities 2-13 Load Setup Default Load default values for all setup items. Save Changes Save setup data. Figure 2-11. Table 2-4. Discard Changes Load previous values all setup item. Exit Discarding Changes Exit utility without saving setup data to the system. BIOS Exit Table 2-4 describes the parameters in Figure 2-11.
Acer Aspire 7250 Service Guide
Page 48
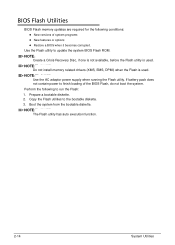
BIOS Flash Utilities 0 BIOS Flash memory updates are required for the following to run the Flash: 1. Use the Flash utility to the bootable diskette. 3. NOTE: NOTE: Create a Crisis Recovery .... NOTE: NOTE: The Flash utility has auto execution function. 2-14 System Utilities Copy the Flash utilities to update the system BIOS Flash ROM. Perform the following conditions: New versions of the BIOS Flash, do not boot the system. Boot the system from the bootable diskette. Prepare a bootable diskette. 2. If battery pack does...
BIOS Flash Utilities 0 BIOS Flash memory updates are required for the following to run the Flash: 1. Use the Flash utility to the bootable diskette. 3. NOTE: NOTE: Create a Crisis Recovery .... NOTE: NOTE: The Flash utility has auto execution function. 2-14 System Utilities Copy the Flash utilities to update the system BIOS Flash ROM. Perform the following conditions: New versions of the BIOS Flash, do not boot the system. Boot the system from the bootable diskette. Prepare a bootable diskette. 2. If battery pack does...

Acer Aspire 7250 Service Guide
Page 49
Figure 2-12. Execute the < FLASH.BAT > batch file to position 1. Example: If using USB HDD to Update BIOS, move USB HDD to update BIOS. The flash process begins as shown in Figure 2-13. System Utilities 2-15 Select Boot Menu to enter the Setup Menu. 2. Press F2 during boot to modify the boot priority order. DOS Flash Utility 0 Perform the following to use the DOS Flash Utility: 1. BIOS Boot 3.
Figure 2-12. Execute the < FLASH.BAT > batch file to position 1. Example: If using USB HDD to Update BIOS, move USB HDD to update BIOS. The flash process begins as shown in Figure 2-13. System Utilities 2-15 Select Boot Menu to enter the Setup Menu. 2. Press F2 during boot to modify the boot priority order. DOS Flash Utility 0 Perform the following to use the DOS Flash Utility: 1. BIOS Boot 3.

Acer Aspire 7250 Service Guide
Page 50
AC Power Warning NOTE: NOTE: Plug in the AC power to continue. 5. Flash is complete when the message Flash Programming Complete is shown. Figure 2-13. DOS Flash 4. In flash BIOS, the message Please do not remove AC Power Source is shown. 2-16 System Utilities NOTE: NOTE: If AC power is not connected, the following message (Figure 2-14) is shown. Figure 2-14.
AC Power Warning NOTE: NOTE: Plug in the AC power to continue. 5. Flash is complete when the message Flash Programming Complete is shown. Figure 2-13. DOS Flash 4. In flash BIOS, the message Please do not remove AC Power Source is shown. 2-16 System Utilities NOTE: NOTE: If AC power is not connected, the following message (Figure 2-14) is shown. Figure 2-14.

Acer Aspire 7250 Service Guide
Page 54
Figure 2-21. CMOS Jumper Figure 2-22. Removing BIOS Passwords 0 To clear User or Supervisor passwords, open the DIMM door and use a metal instrument to short the RTCRST# point. CMOS Jumper r 2-20 System Utilities
Figure 2-21. CMOS Jumper Figure 2-22. Removing BIOS Passwords 0 To clear User or Supervisor passwords, open the DIMM door and use a metal instrument to short the RTCRST# point. CMOS Jumper r 2-20 System Utilities
Acer Aspire 7250 Service Guide
Page 55
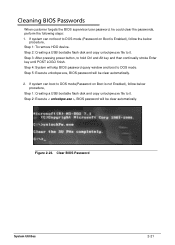
... System Utilities 2-21 Step 3: After pressing power button, to DOS mode. Cleaning BIOS Passwords 0 When customer forgets the BIOS supervisor/user password, he could clear the passwords, perform the following steps: 1. If system can boot to it . If system can not boot ...), follow the below procedure, Step 1: Creating a USB bootable flash disk and copy unlockpw.exe file to it . Step 2: Execute < unlockpw.exe >, BIOS password will skip BIOS password query window and boot to hold Ctrl and Alt key and than continually stroke Enter key until POST LOGO finish. Figure 2-23. Step...
... System Utilities 2-21 Step 3: After pressing power button, to DOS mode. Cleaning BIOS Passwords 0 When customer forgets the BIOS supervisor/user password, he could clear the passwords, perform the following steps: 1. If system can boot to it . If system can not boot ...), follow the below procedure, Step 1: Creating a USB bootable flash disk and copy unlockpw.exe file to it . Step 2: Execute < unlockpw.exe >, BIOS password will skip BIOS password query window and boot to hold Ctrl and Alt key and than continually stroke Enter key until POST LOGO finish. Figure 2-23. Step...

Acer Aspire 7250 Service Guide
Page 56
Manufacture Name 2-22 System Utilities Used in the DMI pool for hardware management. 1. Execute < MN.bat > to EEPROM. Figure 2-24. DMI Utilities 0 The DMI (Desktop Management Interface) Tool copies BIOS information to update SMBIOS Type 1 Manufacturer Name(Figure 2-23).
Manufacture Name 2-22 System Utilities Used in the DMI pool for hardware management. 1. Execute < MN.bat > to EEPROM. Figure 2-24. DMI Utilities 0 The DMI (Desktop Management Interface) Tool copies BIOS information to update SMBIOS Type 1 Manufacturer Name(Figure 2-23).

Acer Aspire 7250 Service Guide
Page 145
... Crisis Recovery PEI_MEMORY_INSTALL PEI 80 Simple Memory test PEI_TXTPEI* PEI 81 TXT function early Initialization PEI_SWITCH_STACK PEI 82 Start to maximum level SEC_GO_TO_SECSTARTUP SEC 9 Setup BIOS ROM cache SEC_GO_TO_PEICORE SEC 0A Enter Boot Firmware Volume * 3rd party relate functions - SEC Phase POST Code Table (Continued) Functionality Name (Include\ PostCode.h) Phase Post...
... Crisis Recovery PEI_MEMORY_INSTALL PEI 80 Simple Memory test PEI_TXTPEI* PEI 81 TXT function early Initialization PEI_SWITCH_STACK PEI 82 Start to maximum level SEC_GO_TO_SECSTARTUP SEC 9 Setup BIOS ROM cache SEC_GO_TO_PEICORE SEC 0A Enter Boot Firmware Volume * 3rd party relate functions - SEC Phase POST Code Table (Continued) Functionality Name (Include\ PostCode.h) Phase Post...


