Service Guide
Page 7
...Keyboard 15 Lock Keys and embedded numeric keypad 15 Windows Keys 16 Hot Keys 17 Special Key 18 The Euro symbol 18 The US dollar sign 18 Acer Empowering Technology 19 Empowering Technology password 20 Acer eAudio Management 21 Acer ePower Management 22 Acer eDataSecurity Management (for selected models 24 Acer eRecovery Management 26 Acer...Machine Disassembly and Replacement 53 General Information 54 Before You Begin 54 Disassembly Procedure Flowchard 55 Removing the Battery Pack 57 Removing HDD/Wirless Cover/RAM Module/Wireless LAN Card/TV Tunder Card/ System Fan/ Thermal ...
...Keyboard 15 Lock Keys and embedded numeric keypad 15 Windows Keys 16 Hot Keys 17 Special Key 18 The Euro symbol 18 The US dollar sign 18 Acer Empowering Technology 19 Empowering Technology password 20 Acer eAudio Management 21 Acer ePower Management 22 Acer eDataSecurity Management (for selected models 24 Acer eRecovery Management 26 Acer...Machine Disassembly and Replacement 53 General Information 54 Before You Begin 54 Disassembly Procedure Flowchard 55 Removing the Battery Pack 57 Removing HDD/Wirless Cover/RAM Module/Wireless LAN Card/TV Tunder Card/ System Fan/ Thermal ...
Service Guide
Page 65
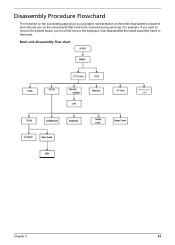
For example, if you want to be removed during servicing. Main unit disassembly flow chart Chapter 3 55 Disassembly Procedure Flowchard The flowchart on the succeeding page gives you a graphic representation on the entire disassembly sequence and instructs you must first remove the keyboard, then disassemble the inside assembly frame in that need to remove the system board, you on the components that order.
For example, if you want to be removed during servicing. Main unit disassembly flow chart Chapter 3 55 Disassembly Procedure Flowchard The flowchart on the succeeding page gives you a graphic representation on the entire disassembly sequence and instructs you must first remove the keyboard, then disassemble the inside assembly frame in that need to remove the system board, you on the components that order.
Service Guide
Page 72
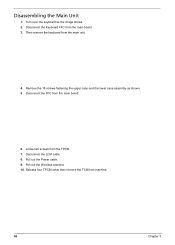
Then remove the keyboard from the TPCB. 7. Remove the 18 screws fastening the upper case and the lower case assembly as the image shows. 2. Pull out the Power cable. 9. Turn over the keyboard as shown. 5. Loose two screws from the main unit. 4. Release four TPCB locker then remove the TCB from the main board. 6. Disconnect the FFC from machine. 62 Chapter 3 Disconnect the LCM cable. 8. Pull out the Wireless antenna. 10. Disassembling the Main Unit 1. Disconnect the Keyboard FFC from the main board 3.
Then remove the keyboard from the TPCB. 7. Remove the 18 screws fastening the upper case and the lower case assembly as the image shows. 2. Pull out the Power cable. 9. Turn over the keyboard as shown. 5. Loose two screws from the main unit. 4. Release four TPCB locker then remove the TCB from the main board. 6. Disconnect the FFC from machine. 62 Chapter 3 Disconnect the LCM cable. 8. Pull out the Wireless antenna. 10. Disassembling the Main Unit 1. Disconnect the Keyboard FFC from the main board 3.
Service Guide
Page 78
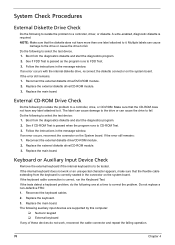
... the test device. 1. Do the following to FDD Test. 3. Boot from the diagnostics diskette and start the diagnostics program. 2. If the internal keyboard does not work , reconnect the cable connector and repeat the failing operation. 70 Chapter 4 Do not replace a non-defective FRU: 1. See if... drive/CD-ROM module. 3. System Check Procedures External Diskette Drive Check Do the following to isolate the problem to be tested. Keyboard or Auxiliary Input Device Check Remove the external keyboard if the internal keyboard is passed when the program runs to correct the problem.
... the test device. 1. Do the following to FDD Test. 3. Boot from the diagnostics diskette and start the diagnostics program. 2. If the internal keyboard does not work , reconnect the cable connector and repeat the failing operation. 70 Chapter 4 Do not replace a non-defective FRU: 1. See if... drive/CD-ROM module. 3. System Check Procedures External Diskette Drive Check Do the following to isolate the problem to be tested. Keyboard or Auxiliary Input Device Check Remove the external keyboard if the internal keyboard is passed when the program runs to correct the problem.
Service Guide
Page 91
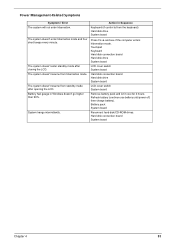
...Battery pack System board Reconnect hard disk/CD-ROM drives. Refresh battery (continue use battery until power off, then charge battery). Touchpad Keyboard Hard disk connection board Hard disk drive System board LCD cover switch System board Hard disk connection board Hard disk drive System board LCD... cover switch System board Remove battery pack and let it cool for 2 hours. Power Management-Related Symptoms Symptom / Error The system will not enter hibernation. Battery...
...Battery pack System board Reconnect hard disk/CD-ROM drives. Refresh battery (continue use battery until power off, then charge battery). Touchpad Keyboard Hard disk connection board Hard disk drive System board LCD cover switch System board Hard disk connection board Hard disk drive System board LCD... cover switch System board Remove battery pack and let it cool for 2 hours. Power Management-Related Symptoms Symptom / Error The system will not enter hibernation. Battery...


