
Quick Start Guide
Page 7
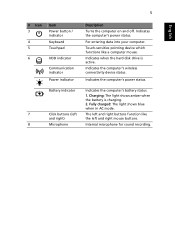
.... Fully charged: The light shows blue when in AC mode. 7 Click buttons (left The left and right mouse buttons. 8 Microphone Internal microphone for sound recording. 5 English # Icon 3 4 5 Item Power button / indicator Keyboard Touchpad 6 HDD indicator Communication indicator Power indicator Description Turns the computer on and off. Touch-sensitive pointing device which functions like and right...
.... Fully charged: The light shows blue when in AC mode. 7 Click buttons (left The left and right mouse buttons. 8 Microphone Internal microphone for sound recording. 5 English # Icon 3 4 5 Item Power button / indicator Keyboard Touchpad 6 HDD indicator Communication indicator Power indicator Description Turns the computer on and off. Touch-sensitive pointing device which functions like and right...
Service Guide
Page 21
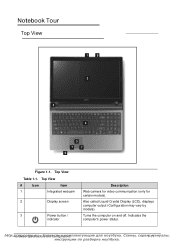
...;nfиiguиraкtioоnмs 1с-1м1 Notebook Tour 0 Top View 0 1 8 2 3 4 5 77 6 Figure 1-1. Top View # Icon Item 1 Integrated webcam 2 Display screen 3 Power button / indicator Description Web camera for video communication (only for certain models). Also called Liquid-Crystal Display (LCD), displays computer output (Configuration may vary by models...
...;nfиiguиraкtioоnмs 1с-1м1 Notebook Tour 0 Top View 0 1 8 2 3 4 5 77 6 Figure 1-1. Top View # Icon Item 1 Integrated webcam 2 Display screen 3 Power button / indicator Description Web camera for video communication (only for certain models). Also called Liquid-Crystal Display (LCD), displays computer output (Configuration may vary by models...
Service Guide
Page 22
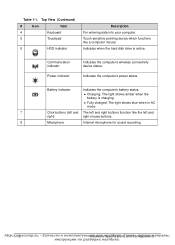
...;s Indicates when the hard disk drive is charging. Indicates the computer's power status. Communication indicator Power indicator Indicates the computer's wireless connectivity device status. Fully charged: The light shows blue when in AC mode. 7 Click buttons (left and The left and right buttons function like a computer mouse. Touch-sensitive pointing device which functions like...
...;s Indicates when the hard disk drive is charging. Indicates the computer's power status. Communication indicator Power indicator Indicates the computer's wireless connectivity device status. Fully charged: The light shows blue when in AC mode. 7 Click buttons (left and The left and right buttons function like a computer mouse. Touch-sensitive pointing device which functions like...
Service Guide
Page 40
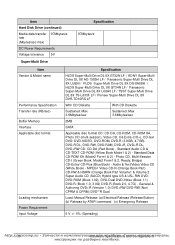
...Multi Drive Item Vendor & Model name Performance Specification Transfer rate (KB/sec) Buffer Memory Interface Applicable disc format Loading mechanism Power Requirement Input Voltage Specification HLDS Super-Multi Drive DL 8X GT32N LF / SONY Super-Multi Drive DL 8X AD-7585H LF...- General & Authoring DVD+R (Version 1.0) DVD+RW DVD-RW (Non CPRM & CPRM) DVD°"R Dual Load: Manual Release: (a) Electrical Release (Release Button) (b) Release by ATAPI command (c) Emergency Release 5 V +/- 5% (Operating) http:/1/-3m0 ycomp.su HиaеrdдwлaяreнSоpу...
...Multi Drive Item Vendor & Model name Performance Specification Transfer rate (KB/sec) Buffer Memory Interface Applicable disc format Loading mechanism Power Requirement Input Voltage Specification HLDS Super-Multi Drive DL 8X GT32N LF / SONY Super-Multi Drive DL 8X AD-7585H LF...- General & Authoring DVD+R (Version 1.0) DVD+RW DVD-RW (Non CPRM & CPRM) DVD°"R Dual Load: Manual Release: (a) Electrical Release (Release Button) (b) Release by ATAPI command (c) Emergency Release 5 V +/- 5% (Operating) http:/1/-3m0 ycomp.su HиaеrdдwлaяreнSоpу...

Service Guide
Page 41
... Items Vendor & Model name Performance Specification Transfer rate (KB/sec) Buffer Memory Interface Applicable disc format Loading mechanism Power Requirement Input Voltage Specifications PLDS BD COMBO DRIVE TRAY DL DS-6E2SH LF / HLDS BD COMBO 12.7mm Tray ... Dual Blu-Ray: BD-R, BD-R DL, BD-RE, BD-RE DL (important must check information from datasheet) Load: Manual Release: (a) Electrical Release (Release Button) (b) Release by ATAPI command (c) Emergency Release 5 V +/- 5% (Operating) http:/H/armdwyacreoSmpepc.isficuat-ionЗsаaпnчd аCсoтnfиigu...
... Items Vendor & Model name Performance Specification Transfer rate (KB/sec) Buffer Memory Interface Applicable disc format Loading mechanism Power Requirement Input Voltage Specifications PLDS BD COMBO DRIVE TRAY DL DS-6E2SH LF / HLDS BD COMBO 12.7mm Tray ... Dual Blu-Ray: BD-R, BD-R DL, BD-RE, BD-RE DL (important must check information from datasheet) Load: Manual Release: (a) Electrical Release (Release Button) (b) Release by ATAPI command (c) Emergency Release 5 V +/- 5% (Operating) http:/H/armdwyacreoSmpepc.isficuat-ionЗsаaпnчd аCсoтnfиigu...
Service Guide
Page 49
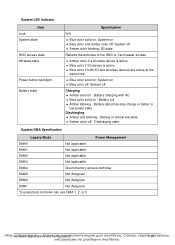
...1089;oтnfиiguиraкtioоnмs 1с-3м9 Discharging state System DMA Specification Legacy Mode Power Management DMA0 Not applicable DMA1 Not applicable DMA2 Not applicable DMA3 Not applicable DMA4 Direct memory access controller DMA5 Not Assigned DMA6...Not Assigned *ExpressCard controller can use DMA 1, 2, or 5. System LED Indicator Item Lock System state HDD access state Wireless state Power button backlight Battery state Specification N/A Blue color solid on: System on Blue color and amber color off: System off Amber color blinking:...
...1089;oтnfиiguиraкtioоnмs 1с-3м9 Discharging state System DMA Specification Legacy Mode Power Management DMA0 Not applicable DMA1 Not applicable DMA2 Not applicable DMA3 Not applicable DMA4 Direct memory access controller DMA5 Not Assigned DMA6...Not Assigned *ExpressCard controller can use DMA 1, 2, or 5. System LED Indicator Item Lock System state HDD access state Wireless state Power button backlight Battery state Specification N/A Blue color solid on: System on Blue color and amber color off: System off Amber color blinking:...
Service Guide
Page 139
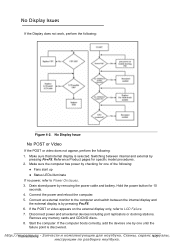
...by checking for one of the following: Fans start up Status LEDs illuminate If no power, refer to LCD Failure. 7. Hold the power button for specific model procedures. 2. No Display Issues 0 If the Display does not work, perform the following :... 1. Start the computer. Connect the power and reboot the computer. 5. Disconnect power and all external devices including port replicators or docking...
...by checking for one of the following: Fans start up Status LEDs illuminate If no power, refer to LCD Failure. 7. Hold the power button for specific model procedures. 2. No Display Issues 0 If the Display does not work, perform the following :... 1. Start the computer. Connect the power and reboot the computer. 5. Disconnect power and all external devices including port replicators or docking...

Service Guide
Page 172
Power Board Bottom Table 5-4. Power Board 0 Figure 5-5. Power Board Top Figure 5-6. nСdхCеoмnыne,cсtoеrрLвoиcaсtiмonаs Power Board SW1 SW2 SW3 SW4 JP1 JP2 JP5 Item Description Switch Button for E0 project Switch Button for S0 project Switch Button for D0 project Speaker Connector To PWR/B FFC To M/B FFC To LID/B FFC http://5m-6ycomp.su Juтбmуpкerаa.
Power Board Bottom Table 5-4. Power Board 0 Figure 5-5. Power Board Top Figure 5-6. nСdхCеoмnыne,cсtoеrрLвoиcaсtiмonаs Power Board SW1 SW2 SW3 SW4 JP1 JP2 JP5 Item Description Switch Button for E0 project Switch Button for S0 project Switch Button for D0 project Speaker Connector To PWR/B FFC To M/B FFC To LID/B FFC http://5m-6ycomp.su Juтбmуpкerаa.
Service Guide
Page 175
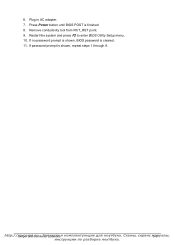
If no password prompt is shown, BIOS password is finished 8. Plug in AC adapter. 7. Remove conductivity tool from RCT_RST point. 9. Press Power button until BIOS POST is cleared. 11. 6. If password prompt is shown, repeat steps 1 through 9. http://Jmumypceormanpd .Csounn-ecЗto enter BIOS Utility Setup menu. 10. Restart the system and press F2 to аrпLчocаaсtiтoиns 5а-9
If no password prompt is shown, BIOS password is finished 8. Plug in AC adapter. 7. Remove conductivity tool from RCT_RST point. 9. Press Power button until BIOS POST is cleared. 11. 6. If password prompt is shown, repeat steps 1 through 9. http://Jmumypceormanpd .Csounn-ecЗto enter BIOS Utility Setup menu. 10. Restart the system and press F2 to аrпLчocаaсtiтoиns 5а-9
Service Guide
Page 177
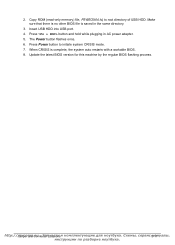
.... 5. http://Jmumypceormanpd .Csounn-ecЗto root directory of USB HDD. Press button and hold while plugging in the same directory. 3. The Power button flashes once. 6. Make sure that there is no other BIOS file is complete, the system auto restarts with a workable BIOS. 8. Insert USB HDD into USB ...;Lчocаaсtiтoиns 5м-1а1 Update the latest BIOS version for this machine by the regular BIOS flashing process. 2. Press Power button to initiate system CRISIS mode. 7.
.... 5. http://Jmumypceormanpd .Csounn-ecЗto root directory of USB HDD. Press button and hold while plugging in the same directory. 3. The Power button flashes once. 6. Make sure that there is no other BIOS file is complete, the system auto restarts with a workable BIOS. 8. Insert USB HDD into USB ...;Lчocаaсtiтoиns 5м-1а1 Update the latest BIOS version for this machine by the regular BIOS flashing process. 2. Press Power button to initiate system CRISIS mode. 7.


