Acer Aspire 5538 Series Service Guide
Page 165
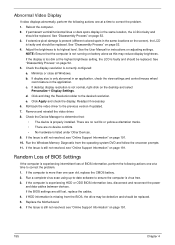
... the BIOS settings are no red Xs or yellow exclamation marks. • There are still lost, replace the cables. 4. If extensive pixel damage is present (different colored spots in the same locations on the screen), the LCD is not running on page 191. 155 Chapter 4 NOTE: Ensure that : •...video driver. 8. If the display is too dim at a time to ensure the computer is faulty and should be replaced. If the Issue is faulty and should be replaced. Check the display resolution is properly installed. Run the Windows Memory Diagnostic from the BIOS, the drive may reduce ...
... the BIOS settings are no red Xs or yellow exclamation marks. • There are still lost, replace the cables. 4. If extensive pixel damage is present (different colored spots in the same locations on the screen), the LCD is not running on page 191. 155 Chapter 4 NOTE: Ensure that : •...video driver. 8. If the display is too dim at a time to ensure the computer is faulty and should be replaced. If the Issue is faulty and should be replaced. Check the display resolution is properly installed. Run the Windows Memory Diagnostic from the BIOS, the drive may reduce ...
Acer Aspire 5538 Series Service Guide
Page 170
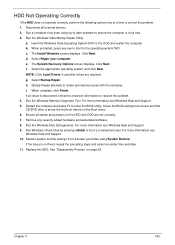
... Process" on the HDD and ODD are required. Chapter 4 160 Run the Windows Vista Startup Repair Utility: a. b. The Install Windows screen displays. Click Next. Startup Repair attempts to the operating system DVD. Ensure all external devices. 2. Click Next. For more information see ... computer. Run Windows Check Disk by entering chkdsk /r from a known good date using up-to-date software to correct the problem. 1. Replace the HDD. i. Run the Windows Disk Defragmenter. Restore system and file settings from a command prompt. c. Select Repair your computer. h. ...
... Process" on the HDD and ODD are required. Chapter 4 160 Run the Windows Vista Startup Repair Utility: a. b. The Install Windows screen displays. Click Next. Startup Repair attempts to the operating system DVD. Ensure all external devices. 2. Click Next. For more information see ... computer. Run Windows Check Disk by entering chkdsk /r from a known good date using up-to-date software to correct the problem. 1. Replace the HDD. i. Run the Windows Disk Defragmenter. Restore system and file settings from a command prompt. c. Select Repair your computer. h. ...
Acer Aspire 5538 Series Service Guide
Page 171
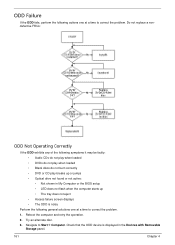
Do not replace a nondefective FRUs: ODD Not Operating Correctly If the ODD exhibits any of the following symptoms it may be faulty: • Audio CDs do not play ... My Computer or the BIOS setup • LED does not flash when the computer starts up • The tray does not eject • Access failure screen displays • The ODD is displayed in the Devices with Removable Storage panel. 161 Chapter 4 Navigate to correct the problem. 1. Try an alternate disc. 3. ODD...
Do not replace a nondefective FRUs: ODD Not Operating Correctly If the ODD exhibits any of the following symptoms it may be faulty: • Audio CDs do not play ... My Computer or the BIOS setup • LED does not flash when the computer starts up • The tray does not eject • Access failure screen displays • The ODD is displayed in the Devices with Removable Storage panel. 161 Chapter 4 Navigate to correct the problem. 1. Try an alternate disc. 3. ODD...
Acer Aspire 5538 Series Service Guide
Page 189
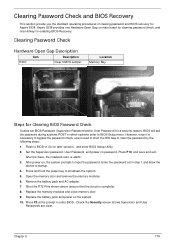
... the HW Gap to input the password. Replace the memory modules and close memory door. 9. Chapter 5 179 Aspire 5538 provides one Hardware Open Gap on password. After the Save, the notebook auto re-starts. 3. Check the Security screen shows Supervisor and User Passwords are clear. ...the memory modules. 6. Replace the battery pack and power on , the system prompts to clear the password by the following steps: 1. Clearing Password Check Hardware Open Gap Description Item Description R397 Clear CMOS Jumper Location Memory Bay Steps for Aspire 5538. Remove the battery pack ...
... the HW Gap to input the password. Replace the memory modules and close memory door. 9. Chapter 5 179 Aspire 5538 provides one Hardware Open Gap on password. After the Save, the notebook auto re-starts. 3. Check the Security screen shows Supervisor and User Passwords are clear. ...the memory modules. 6. Replace the battery pack and power on , the system prompts to clear the password by the following steps: 1. Clearing Password Check Hardware Open Gap Description Item Description R397 Clear CMOS Jumper Location Memory Bay Steps for Aspire 5538. Remove the battery pack ...


