Aspire 5534 Service Guide
Page 7
... Tour 4 Front View 4 Closed Front View 5 Left View 6 Right View 6 Base View 7 Rear View 8 Indicators 8 TouchPad Basics 9 Using the Keyboard 10 Lock Keys and embedded numeric keypad 10 Windows Keys 11 Hot Keys 12 Special Keys 13 Hardware Specifications and Configurations 14 System Utilities 23...28 Power 31 Boot 32 Exit 33 BIOS Flash Utility 34 DOS Flash Utility 35 WinFlash Utility 36 Remove HDD/BIOS Password Utilities 37 Removing BIOS Passwords 38 Miscellaneous Utilities 39 Machine Disassembly and Replacement 43 Disassembly Requirements 43 Related Information 43 43...
... Tour 4 Front View 4 Closed Front View 5 Left View 6 Right View 6 Base View 7 Rear View 8 Indicators 8 TouchPad Basics 9 Using the Keyboard 10 Lock Keys and embedded numeric keypad 10 Windows Keys 11 Hot Keys 12 Special Keys 13 Hardware Specifications and Configurations 14 System Utilities 23...28 Power 31 Boot 32 Exit 33 BIOS Flash Utility 34 DOS Flash Utility 35 WinFlash Utility 36 Remove HDD/BIOS Password Utilities 37 Removing BIOS Passwords 38 Miscellaneous Utilities 39 Machine Disassembly and Replacement 43 Disassembly Requirements 43 Related Information 43 43...
Aspire 5534 Service Guide
Page 8
...Removing the Upper Cover 62 Removing the Button Board 66 Removing the Touchpad Bracket 68 Removing the Power Board 70 Removing the Speaker Modules 72 Removing the Media Board 74 Removing the Bluetooth Module 76 Removing the I/O Board 77 Removing the DC-In Cable 80 Removing the Mainboard 81 Removing the LCD Module 84 Removing the Fan 86 Removing the Thermal Module 88 Removing... Touchpad Bracket 128 Replacing the Button Board 130 Replacing the Upper Cover 131 Replacing the Keyboard 136 External Module Reassembly Process 138 Replacing the WLAN Board 138 Replacing the DIMM Modules...
...Removing the Upper Cover 62 Removing the Button Board 66 Removing the Touchpad Bracket 68 Removing the Power Board 70 Removing the Speaker Modules 72 Removing the Media Board 74 Removing the Bluetooth Module 76 Removing the I/O Board 77 Removing the DC-In Cable 80 Removing the Mainboard 81 Removing the LCD Module 84 Removing the Fan 86 Removing the Thermal Module 88 Removing... Touchpad Bracket 128 Replacing the Button Board 130 Replacing the Upper Cover 131 Replacing the Keyboard 136 External Module Reassembly Process 138 Replacing the WLAN Board 138 Replacing the DIMM Modules...
Aspire 5534 Service Guide
Page 54
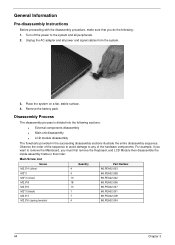
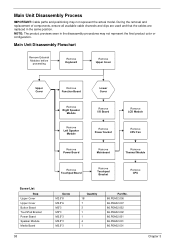
... sections: q External components disassembly q Main unit disassembly q LCD module disassembly The flowcharts provided in that you must first remove the Keyboard, and LCD Module then disassemble the inside assembly frame in the succeeding disassembly sections illustrate the entire disassembly sequence. Disassembly Process...order. Observe the order of the sequence to avoid damage to the system and all power and signal cables from the system. 3. Remove the battery pack. Place the system on a flat, stable surface. 4. Unplug the AC adapter and all peripherals. 2. Turn off...
... sections: q External components disassembly q Main unit disassembly q LCD module disassembly The flowcharts provided in that you must first remove the Keyboard, and LCD Module then disassemble the inside assembly frame in the succeeding disassembly sections illustrate the entire disassembly sequence. Disassembly Process...order. Observe the order of the sequence to avoid damage to the system and all power and signal cables from the system. 3. Remove the battery pack. Place the system on a flat, stable surface. 4. Unplug the AC adapter and all peripherals. 2. Turn off...
Aspire 5534 Service Guide
Page 68
... procedures may not represent the actual model. Main Unit Disassembly Flowchart Remove External Modules before proceeding Remove Keyboard Remove Upper Cover Upper Cover Remove Function Board Lower Cover Remove Right Speaker Module Remove Left Speaker Module Remove I/O Board Remove Power Socket Remove LCD Module Remove CPU Fan Remove Power Board Remove Mainboard Remove Thermal Module Screw List Step Upper Cover Upper Cover Button Board...
... procedures may not represent the actual model. Main Unit Disassembly Flowchart Remove External Modules before proceeding Remove Keyboard Remove Upper Cover Upper Cover Remove Function Board Lower Cover Remove Right Speaker Module Remove Left Speaker Module Remove I/O Board Remove Power Socket Remove LCD Module Remove CPU Fan Remove Power Board Remove Mainboard Remove Thermal Module Screw List Step Upper Cover Upper Cover Button Board...
Aspire 5534 Service Guide
Page 70
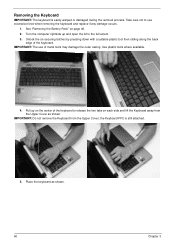
... available. 4. Unlock the six securing latches by pressing down with a suitable plastic tool then sliding along the back edge of the keyboard to the full extent. 3. Removing the Keyboard IMPORTANT: The keyboard is still attached. 5. Take care not to use of metal tools may damage the outer casing. Turn the computer rightside up on...
... available. 4. Unlock the six securing latches by pressing down with a suitable plastic tool then sliding along the back edge of the keyboard to the full extent. 3. Removing the Keyboard IMPORTANT: The keyboard is still attached. 5. Take care not to use of metal tools may damage the outer casing. Turn the computer rightside up on...
Aspire 5534 Service Guide
Page 71
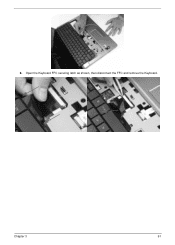
Open the Keyboard FFC securing latch as shown, then disconnect the FFC and remove the Keyboard. 6. Chapter 3 61
Open the Keyboard FFC securing latch as shown, then disconnect the FFC and remove the Keyboard. 6. Chapter 3 61

Aspire 5534 Service Guide
Page 178
... remote terminal is being enabled Keyboard reset USB Keyboard disable Keyboard detection Report that the usb keyboard is being enabled Clear the keyboard buffer Init Keyboard Mouse reset Mouse disable Detect PS2 mouse Report that the mouse is being enabled Peripheral removable media reset(ex:IsaFloppy, USB device) Peripheral removable media disable Peripheral removable media enable Report Status Code...
... remote terminal is being enabled Keyboard reset USB Keyboard disable Keyboard detection Report that the usb keyboard is being enabled Clear the keyboard buffer Init Keyboard Mouse reset Mouse disable Detect PS2 mouse Report that the mouse is being enabled Peripheral removable media reset(ex:IsaFloppy, USB device) Peripheral removable media disable Peripheral removable media enable Report Status Code...

Aspire 5534 Service Guide
Page 222
... Internal Speaker Failure 153 J Jumper and Connector Locations 173 Top View 173 K Keyboard Removing 60 Replacing 136 Keyboard Failure 152 L LCD Bezel Removing 91 Replacing 109 LCD Brackets Removing 98 Replacing 105 LCD Cable Removing 96, 107 LCD Failure 152 LCD Module Disassembly 90 Reassembly 103 Removing 84 Replacing 112 LCD Module Disassembly Flowchart 90 LCD Panel...
... Internal Speaker Failure 153 J Jumper and Connector Locations 173 Top View 173 K Keyboard Removing 60 Replacing 136 Keyboard Failure 152 L LCD Bezel Removing 91 Replacing 109 LCD Brackets Removing 98 Replacing 105 LCD Cable Removing 96, 107 LCD Failure 152 LCD Module Disassembly 90 Reassembly 103 Removing 84 Replacing 112 LCD Module Disassembly Flowchart 90 LCD Panel...


