
Acer Aspire 5534 Notebook Series Start Guide
Page 7
... visible even when the computer cover is charging. 2. Rear view # Icon 1 Item Battery bay Description Houses the computer's battery pack. 7 Closed front view English # Icon 1 2 Item Description Battery1 Indicates the computer's battery status. 1. Charging: The light shows amber when the battery is closed up. Note: Push to remove/install the card. Fully charged: The...
... visible even when the computer cover is charging. 2. Rear view # Icon 1 Item Battery bay Description Houses the computer's battery pack. 7 Closed front view English # Icon 1 2 Item Description Battery1 Indicates the computer's battery status. 1. Charging: The light shows amber when the battery is closed up. Note: Push to remove/install the card. Fully charged: The...

Acer Aspire 5534 Notebook Series Start Guide
Page 10
10 Base view English # Icon Item 1 Battery bay Description Houses the computer's battery pack. 2 Battery lock Locks the battery in position. 3 Memory compartment Houses the computer's main memory. 4 Hard disk bay Houses the computer's hard disk (secured with screws). 5 Ventilation slots and Enable the computer to stay cool, even cooling fan after prolonged use. Note: Do not cover or obstruct the opening of the fan. 6 Battery release latch Releases the battery for removal.
10 Base view English # Icon Item 1 Battery bay Description Houses the computer's battery pack. 2 Battery lock Locks the battery in position. 3 Memory compartment Houses the computer's main memory. 4 Hard disk bay Houses the computer's hard disk (secured with screws). 5 Ventilation slots and Enable the computer to stay cool, even cooling fan after prolonged use. Note: Do not cover or obstruct the opening of the fan. 6 Battery release latch Releases the battery for removal.
Acer Aspire 5534 Notebook Series Start Guide
Page 11
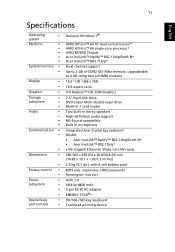
...7® AMD Athlon™ 64 X2 dual-core processor* AMD Athlon™ 64 single-core processor* AMD M780G Chipset Acer InviLink™ Nplify™ 802.11b/g/Draft-N* Acer InviLink™ 802.11b/g* Dual-channel support Up to 2 GB of DDR2 667 MHz memory, upgradeable to 4 GB using...™ Nplify™ 802.11b/g/Draft-N* • Acer InviLink™ 802.11b/g* LAN: Gigabit Ethernet; Wake-on-LAN ready 380 (W) x 259 (D) x 26.4/30.8 (H) mm (14.82 x 10.1 x 1.02/1.2 inches) 2.4 kg (5.3 lbs.) with 6-cell battery pack BIOS user, supervisor, HDD passwords Kensington lock slot ACPI 3.0 48.8 W 4400 mAh ...
...7® AMD Athlon™ 64 X2 dual-core processor* AMD Athlon™ 64 single-core processor* AMD M780G Chipset Acer InviLink™ Nplify™ 802.11b/g/Draft-N* Acer InviLink™ 802.11b/g* Dual-channel support Up to 2 GB of DDR2 667 MHz memory, upgradeable to 4 GB using...™ Nplify™ 802.11b/g/Draft-N* • Acer InviLink™ 802.11b/g* LAN: Gigabit Ethernet; Wake-on-LAN ready 380 (W) x 259 (D) x 26.4/30.8 (H) mm (14.82 x 10.1 x 1.02/1.2 inches) 2.4 kg (5.3 lbs.) with 6-cell battery pack BIOS user, supervisor, HDD passwords Kensington lock slot ACPI 3.0 48.8 W 4400 mAh ...
Aspire 5534 Service Guide
Page 7
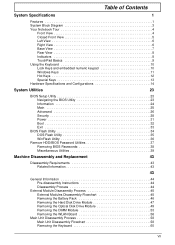
... Information 43 43 General Information 44 Pre-disassembly Instructions 44 Disassembly Process 44 External Module Disassembly Process 45 External Modules Disassembly Flowchart 45 Removing the Battery Pack 46 Removing the Hard Disk Drive Module 47 Removing the Optical Disk Drive Module 49 Removing the DIMM Module 53 Removing the WLAN Board...
... Information 43 43 General Information 44 Pre-disassembly Instructions 44 Disassembly Process 44 External Module Disassembly Process 45 External Modules Disassembly Flowchart 45 Removing the Battery Pack 46 Removing the Hard Disk Drive Module 47 Removing the Optical Disk Drive Module 49 Removing the DIMM Module 53 Removing the WLAN Board...
Aspire 5534 Service Guide
Page 8
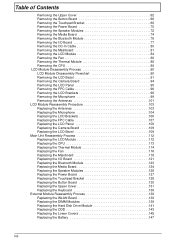
... Board 138 Replacing the DIMM Modules 139 Replacing the Hard Disk Drive Module 141 Replacing the ODD 143 Replacing the Lower Covers 145 Replacing the Battery 147 VIII
... Board 138 Replacing the DIMM Modules 139 Replacing the Hard Disk Drive Module 141 Replacing the ODD 143 Replacing the Lower Covers 145 Replacing the Battery 147 VIII

Aspire 5534 Service Guide
Page 12
...Kensington lock slot Dimensions and Weight • 380 (W) x 259 (D) x 26.4/30.8 (H) mm (14.82 x 10.1 x 1.02/1.2 inches) • 2.4 kg (5.3 lbs.) with 6-cell battery pack Power subsystem • ACPI 3.0 • 48.8 W 4400 mAh • 3-pin 65 W AC adapter • ENERGY STAR®* Special keys and controls • 99-/100...8226; Non-operating: 20% to 80% NOTE: The specifications listed above are for reference only. Wake-on the model purchased. 2 Chapter 1 • Acer InviLink™ Nplify™ 802.11b/g/Draft-N* • Acer InviLink™ 802.11b/g* • LAN: Gigabit Ethernet;
...Kensington lock slot Dimensions and Weight • 380 (W) x 259 (D) x 26.4/30.8 (H) mm (14.82 x 10.1 x 1.02/1.2 inches) • 2.4 kg (5.3 lbs.) with 6-cell battery pack Power subsystem • ACPI 3.0 • 48.8 W 4400 mAh • 3-pin 65 W AC adapter • ENERGY STAR®* Special keys and controls • 99-/100...8226; Non-operating: 20% to 80% NOTE: The specifications listed above are for reference only. Wake-on the model purchased. 2 Chapter 1 • Acer InviLink™ Nplify™ 802.11b/g/Draft-N* • Acer InviLink™ 802.11b/g* • LAN: Gigabit Ethernet;

Aspire 5534 Service Guide
Page 15
... active. Turns the internal touchpad on and off. Fully charged: The light shows blue when in -1 card reader Description Indicates the computer's battery status. 1. Chapter 1 5 Presses to remove/install the card. Accepts Secure Digital (SD), MultiMediaCard (MMC), Memory Stick (MS), Memory Stick PRO (MS ...when the hard disk drive is charging. 2. Note: Push to eject the optical disk from the drive. No. 1 2 Icon Item Battery Indicator 5-in AC mode. No. 9 Icon Item Wireless LAN communication button/indicator Touchpad toggle Description Enables / disables the WLAN function.
... active. Turns the internal touchpad on and off. Fully charged: The light shows blue when in -1 card reader Description Indicates the computer's battery status. 1. Chapter 1 5 Presses to remove/install the card. Accepts Secure Digital (SD), MultiMediaCard (MMC), Memory Stick (MS), Memory Stick PRO (MS ...when the hard disk drive is charging. 2. Note: Push to eject the optical disk from the drive. No. 1 2 Icon Item Battery Indicator 5-in AC mode. No. 9 Icon Item Wireless LAN communication button/indicator Touchpad toggle Description Enables / disables the WLAN function.

Aspire 5534 Service Guide
Page 17
... jack Ejects the optical drive tray when the computer is turned off . Releases the battery for reference only. Your PC may have a different battery, depending on the model purchased. Enable the computer to USB 2.0 devices (e.g., USB mouse, USB camera). Houses the computer's hard disk (...cover or obstruct the opening of the fan. based network. Connects to an Ethernet 10/100/1000- Connects to an AC adapter. Chapter 1 7 Note: The battery shown is off . 3 4 5 6 Base View Emergency eject hole USB 2.0 port Ethernet (RJ-45) port DC-in position. Note: Insert a paper...
... jack Ejects the optical drive tray when the computer is turned off . Releases the battery for reference only. Your PC may have a different battery, depending on the model purchased. Enable the computer to USB 2.0 devices (e.g., USB mouse, USB camera). Houses the computer's hard disk (...cover or obstruct the opening of the fan. based network. Connects to an Ethernet 10/100/1000- Connects to an AC adapter. Chapter 1 7 Note: The battery shown is off . 3 4 5 6 Base View Emergency eject hole USB 2.0 port Ethernet (RJ-45) port DC-in position. Note: Insert a paper...

Aspire 5534 Service Guide
Page 18
...the computer cover is charging. 2. Indicates the computer's battery status. 1. Charging: The battery light shows amber when the battery is closed. Indicates when the hard disk drive is activated. Rear View No. 1 Icon Item Battery bay Description Houses the computer's battery pack. Fully charged: The light shows green when in... is activated. Indicates the status of 3G communication. Icon Function Bluetooth Wireless LAN 3G communication HDD Num Lock Caps Lock Battery Description Indicates the status of Bluetooth communication. Lights up when Num Lock is active.
...the computer cover is charging. 2. Indicates the computer's battery status. 1. Charging: The battery light shows amber when the battery is closed. Indicates when the hard disk drive is activated. Rear View No. 1 Icon Item Battery bay Description Houses the computer's battery pack. Fully charged: The light shows green when in... is activated. Indicates the status of 3G communication. Icon Function Bluetooth Wireless LAN 3G communication HDD Num Lock Caps Lock Battery Description Indicates the status of Bluetooth communication. Lights up when Num Lock is active.
Aspire 5534 Service Guide
Page 30
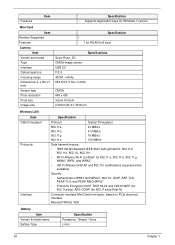
... for Windows 7 version Specification 1 • 1 for 802.11a/b/g/Draft-N) Connector interface Mini Card form factor, based on PCIe electrical interface Microsoft WHQL YES Battery Item Vendor & model name Battery Type Specification Panasonic / Simplo / Sony Li-ion 20 Chapter 1 infinity 65X 8.0X 3.79+/-0.2mm CMOS 640 x 480 3.6um X3.6um 2.36mm(H) X1.76mm...
... for Windows 7 version Specification 1 • 1 for 802.11a/b/g/Draft-N) Connector interface Mini Card form factor, based on PCIe electrical interface Microsoft WHQL YES Battery Item Vendor & model name Battery Type Specification Panasonic / Simplo / Sony Li-ion 20 Chapter 1 infinity 65X 8.0X 3.79+/-0.2mm CMOS 640 x 480 3.6um X3.6um 2.36mm(H) X1.76mm...
Aspire 5534 Service Guide
Page 54
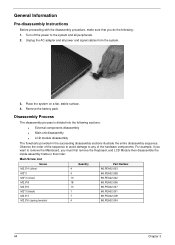
Remove the battery pack. Main Screw List Screw M2.5*4 (silver) M3*3 M2*3 (silver) M2.5*8 M2.5*6 M2*3 (black) M2.5*3 M2.5*6 (spring tension) Quantity 4 4 10 18 13 1 7 4 Part Number 86....
Remove the battery pack. Main Screw List Screw M2.5*4 (silver) M3*3 M2*3 (silver) M2.5*8 M2.5*6 M2*3 (black) M2.5*3 M2.5*6 (spring tension) Quantity 4 4 10 18 13 1 7 4 Part Number 86....

Aspire 5534 Service Guide
Page 55
External Modules Disassembly Flowchart Turn off system and peripherals power Disconnect power and signal cables from system Remove Battery Remove Dummy Card Remove Lower Covers Remove DIMMs Remove WLAN Remove HDD Remove ODD Screw List Step HDD Module HDD Carrier WLAN Board ODD Module ...
External Modules Disassembly Flowchart Turn off system and peripherals power Disconnect power and signal cables from system Remove Battery Remove Dummy Card Remove Lower Covers Remove DIMMs Remove WLAN Remove HDD Remove ODD Screw List Step HDD Module HDD Carrier WLAN Board ODD Module ...

Aspire 5534 Service Guide
Page 56
Slide and hold the battery release latch to the unlock position. 3. Removing the Battery Pack 1. Turn the computer over. 2. Slide the battery lock/unlock latch to the release position (1), then slide out the battery pack from the main unit (2). 2 1 46 Chapter 3
Slide and hold the battery release latch to the unlock position. 3. Removing the Battery Pack 1. Turn the computer over. 2. Slide the battery lock/unlock latch to the release position (1), then slide out the battery pack from the main unit (2). 2 1 46 Chapter 3

Aspire 5534 Service Guide
Page 57
Chapter 3 47 Loosen the two captive screws in place. 4. See "Removing the Battery Pack" on page 46 2. Removing the Hard Disk Drive Module 1. Six tabs hold the door in the HDD Cover. 3. Lift the HDD cover up using the finger tab to remove. Remove the two screws securing the HDD Module in place.
Chapter 3 47 Loosen the two captive screws in place. 4. See "Removing the Battery Pack" on page 46 2. Removing the Hard Disk Drive Module 1. Six tabs hold the door in the HDD Cover. 3. Lift the HDD cover up using the finger tab to remove. Remove the two screws securing the HDD Module in place.

Aspire 5534 Service Guide
Page 59
Chapter 3 49 Loosen the three captive screws in the HDD Cover. 7. Remove the four screws (two each side) securing the hard disk to the carrier. See "Removing the Battery Pack" on page 46 2. Remove the HDD from the carrier. Step HDD Carrier M3*3 Size Quantity 4 8. Screw Type Removing the Optical Disk Drive Module 1.
Chapter 3 49 Loosen the three captive screws in the HDD Cover. 7. Remove the four screws (two each side) securing the hard disk to the carrier. See "Removing the Battery Pack" on page 46 2. Remove the HDD from the carrier. Step HDD Carrier M3*3 Size Quantity 4 8. Screw Type Removing the Optical Disk Drive Module 1.

Aspire 5534 Service Guide
Page 63
... latches on page 46 2. Removing the DIMM Module 1. Chapter 3 53 The image below ) to remove. Loosen the two captive screws in place. 4. See "Removing the Battery Pack" on both sides of SODIMM slot 0 and SODIMM slot 1.
... latches on page 46 2. Removing the DIMM Module 1. Chapter 3 53 The image below ) to remove. Loosen the two captive screws in place. 4. See "Removing the Battery Pack" on both sides of SODIMM slot 0 and SODIMM slot 1.

Aspire 5534 Service Guide
Page 66
Use the finger tab to release the six clips securing the cover in the HDD Cover. 3. Removing the WLAN Board 1. Lift the HDD cover up to the MAIN terminal (left). 56 Chapter 3 See "Removing the Battery Pack" on page 46. 2. Disconnect the Antenna cables from the WLAN Board. NOTE: The HDD is White to the AUX terminal (right) and Black to remove. NOTE: Cable placement is also located under this cover. 4. Loosen the two captive screws in place.
Use the finger tab to release the six clips securing the cover in the HDD Cover. 3. Removing the WLAN Board 1. Lift the HDD cover up to the MAIN terminal (left). 56 Chapter 3 See "Removing the Battery Pack" on page 46. 2. Disconnect the Antenna cables from the WLAN Board. NOTE: The HDD is White to the AUX terminal (right) and Black to remove. NOTE: Cable placement is also located under this cover. 4. Loosen the two captive screws in place.
Aspire 5534 Service Guide
Page 70
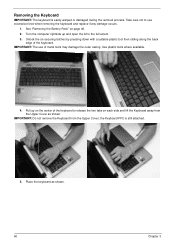
... up on the center of the keyboard. IMPORTANT: The use excessive force when removing the keyboard and replace if any damage occurs. 1. See "Removing the Battery Pack" on each side and lift the Keyboard away from the Upper Cover; Unlock the six securing latches by pressing down with a suitable plastic tool...
... up on the center of the keyboard. IMPORTANT: The use excessive force when removing the keyboard and replace if any damage occurs. 1. See "Removing the Battery Pack" on each side and lift the Keyboard away from the Upper Cover; Unlock the six securing latches by pressing down with a suitable plastic tool...
Aspire 5534 Service Guide
Page 157
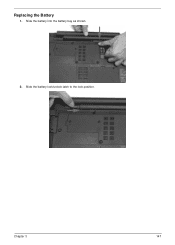
Chapter 3 147 Replacing the Battery 1. Slide the battery into the battery bay as shown. 2. Slide the battery lock/unlock latch to the lock position.
Chapter 3 147 Replacing the Battery 1. Slide the battery into the battery bay as shown. 2. Slide the battery lock/unlock latch to the lock position.
Aspire 5534 Service Guide
Page 160
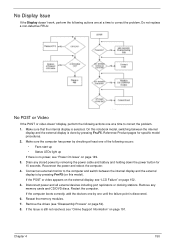
... the external display is no power, see "LCD Failure" on page 152. 5. Restart the computer. Remove any stored power by removing the power cable and battery and holding down the power button for specific model procedures. 2. On this model). Do not replace a non-defective FRUs: No POST or Video If the...
... the external display is no power, see "LCD Failure" on page 152. 5. Restart the computer. Remove any stored power by removing the power cable and battery and holding down the power button for specific model procedures. 2. On this model). Do not replace a non-defective FRUs: No POST or Video If the...


